No Plugins Needed, I Built a Fully Automated Coding Loop in OpenCode
Using DeepSeek-V4 for low-cost Loop Engineering

This article was last updated on July 27, 2026.
Today I want to talk about how I built an agentic coding loop inside OpenCode. People call this Loop Engineering.
To show you how well this coding loop holds up, I used DeepSeek-V4-Pro and DeepSeek-V4-Flash for every example in this article. It turns out that with the right design, DeepSeek models can pull off high-quality coding loops at a very low cost.
All the source code in this article is available at the end of the post. Let's get into it.
Introduction
If you've been following the AI agent space recently, you've probably heard the term Loop Engineering. Claude Code and OpenClaw both mention it.
But nobody really explains what it means.
Until Andrew Ng posted a clear breakdown of what Loop Engineering actually is. That post gave me the direction I needed to build it inside OpenCode.
What Andrew Ng Says About the Coding Loop
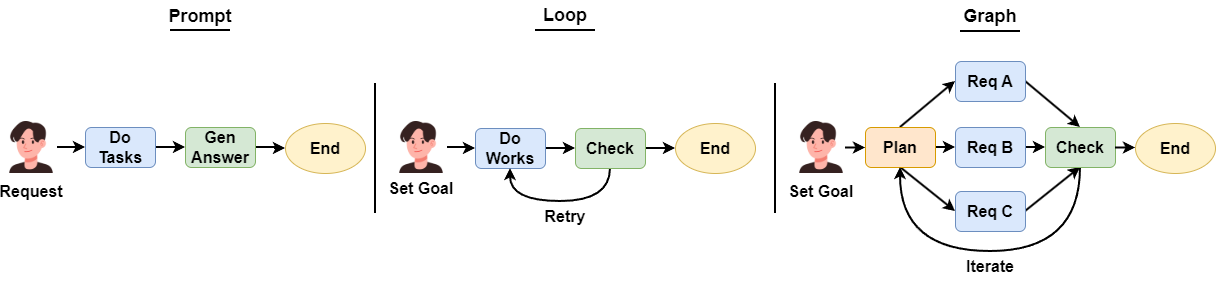
Andrew Ng's explanation centers around this diagram:
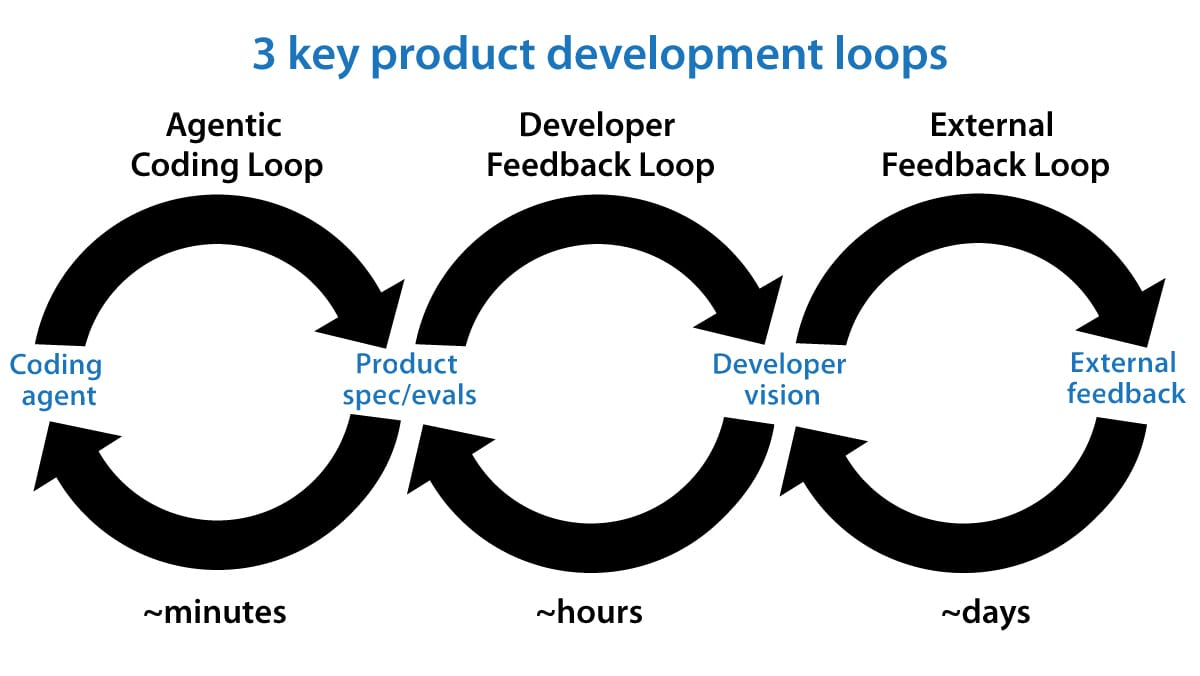
Three loops, simply put:
- The first loop is the code agent's implementation loop. You give the agent a product spec and a measurable target. The agent starts building features on its own, runs tests, and keeps iterating until every requirement in the spec is met.
- The second loop is the engineer feedback loop. Here the engineer acts as QA for their own product. They test what the coding agent built, and check if it matches their vision. If something is off, they write a new spec and kick off another round in the first loop.
- The third loop is the external feedback loop. Once the engineer is happy with the product, it goes to the open-source community or gets handed to a product team. Real user feedback comes in. The engineer collects that feedback regularly, feeds it back into the engineer feedback loop, and from there back into the code implementation loop.
All three loops keep running. With AI in the mix, they push the product forward until it gets to where it needs to be.
My Take on the Coding Loop
The way I see it, these three loops map to two commands in Claude or Codex: /goal and /loop.
/goal covers the first and second loops. Once a user writes a product requirements doc or a spec, they pass the task to the agent through the /goal command. The agent iterates on its own, runs its own tests, and opens a Pull Request.
Then the engineer reviews the code and tests it manually. If everything looks good, they merge the PR and ship.
Next comes the external feedback loop. You can use the /loop command to set up scheduled tasks that pull issues from GitHub or Jira on a timer. The agent turns those issues into requirement docs, and /goal takes it from there.
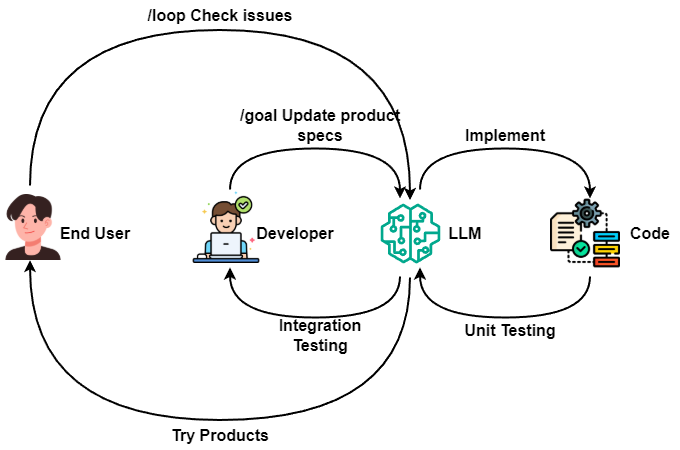
/goal to create a new task, and use /loop to schedule it to run on a timer. Image by AuthorThere is a gap in the traditional understanding here. When a user calls /goal, they just pass in what they want done. How it gets done, and what the exit condition is, often gets left up to a strong reasoning model like Claude Opus or GPT 5.5 to figure out.
But in a proper coding loop, you need to give the agent a product spec and a measurable completion target so it knows when to exit. Something like this:
/goal Use the spec I wrote to build this chess game.
Use Playwright MCP for end-to-end testing.
Verify the game supports castling, pawn promotion, checkmate, stalemate, and rating calculation.
Fix any bugs found during testing and re-run. Loop no more than 20 times.
That is a solid starting instruction for a coding loop. It needs a goal, a verification method, and a max iteration count. And you have to write something like that every single time, either right after the /goal command or inside the spec itself.
In my OpenCode version, I am not going that route. I just want to tell /goal what I want. The agent handles everything else.
The rest of this article shows you how I built that enhanced /goal loop. (The /loop command is a separate topic I will cover in a future post.)
See the Final Result First
Before getting into the implementation, let me show you what the /goal command actually does in a few scenarios, from simple to complex.
1. Write a Fibonacci script
This test checks whether the agent picks the best algorithm. The prompt is:
/goal Write a Fibonacci calculation script with the best possible performance.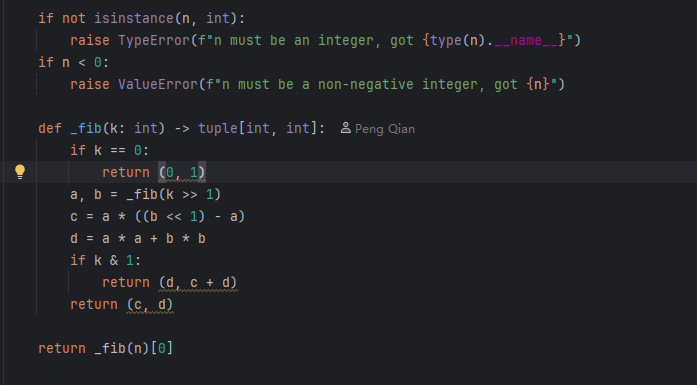
2. Build a Tower of Hanoi web game
Everyone knows this game. You could honestly just prompt an LLM directly and get it built. But that predictability is exactly what makes it useful for testing whether each step of the coding loop is working correctly.
The prompt is:
/goal Build a playable Tower of Hanoi web game.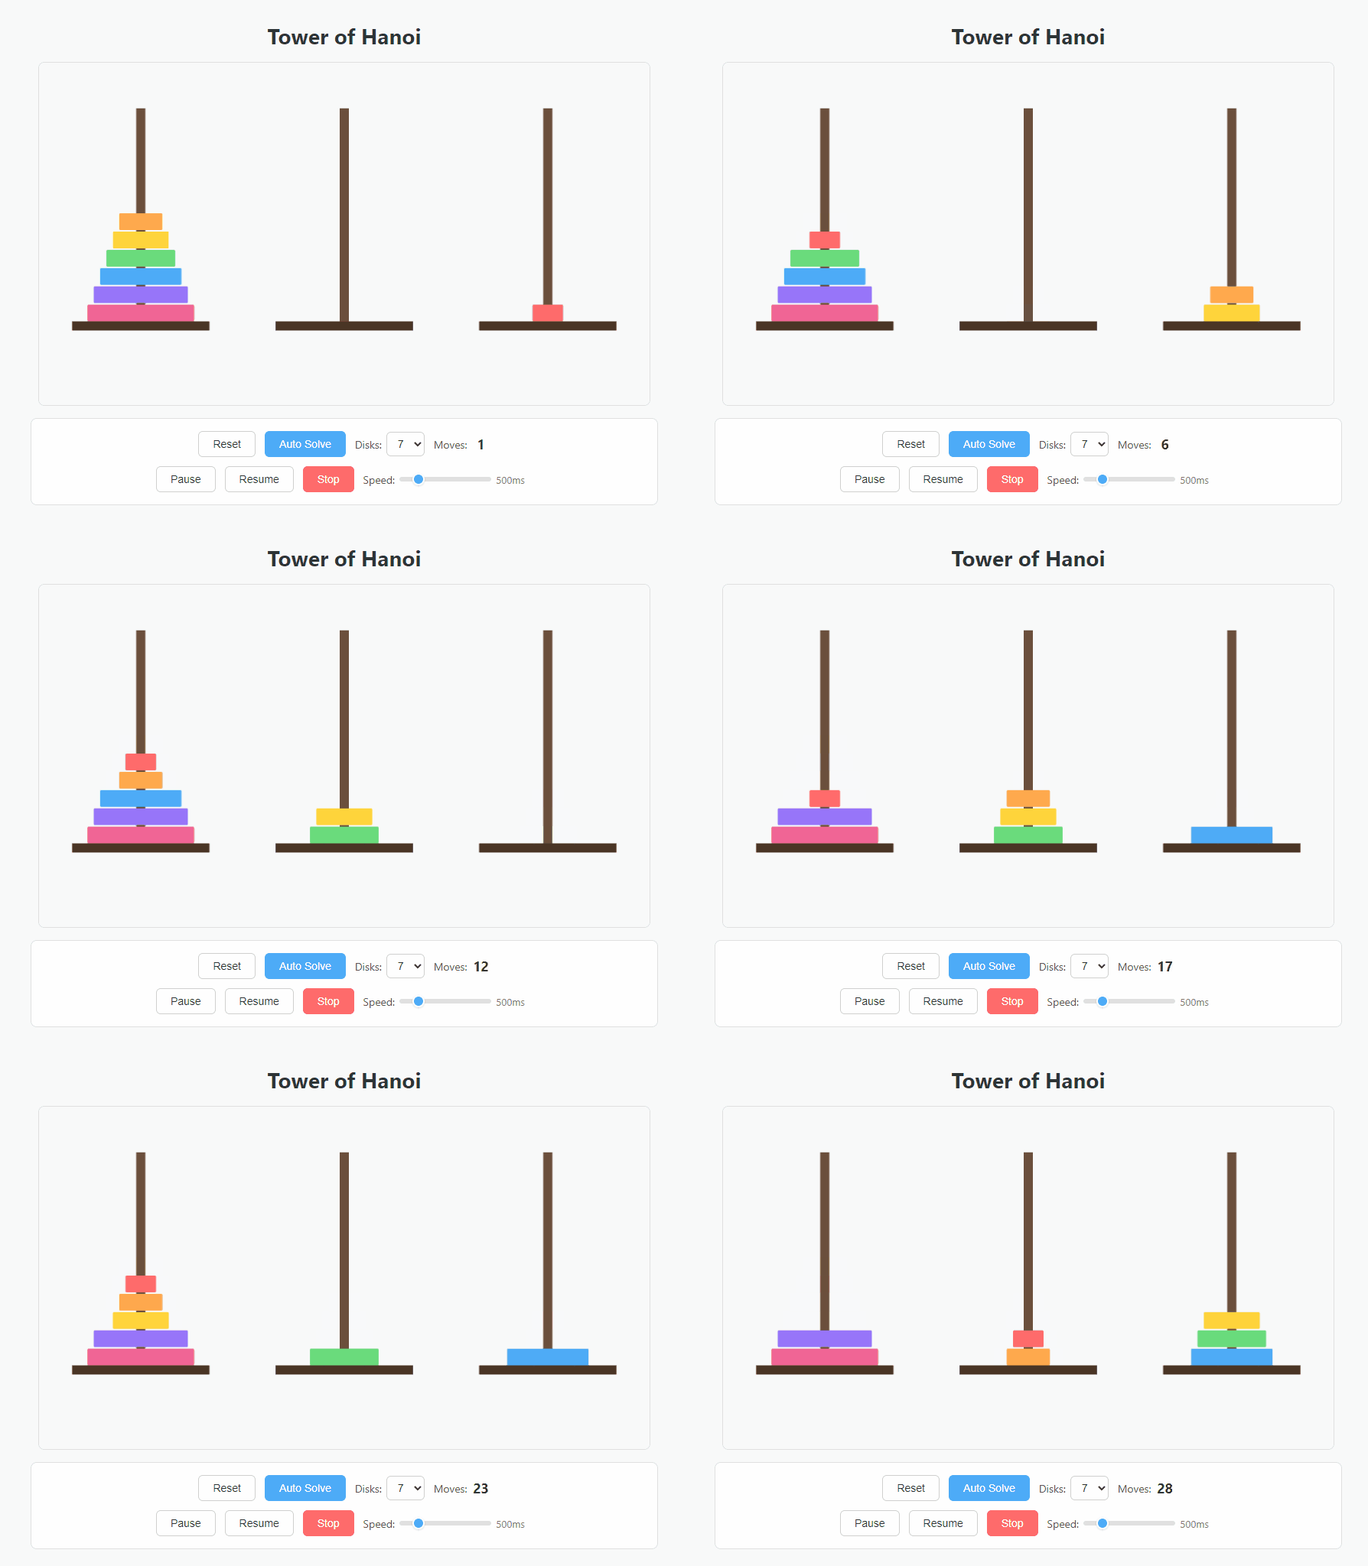
/goal command comes with a built-in AI solver. Image by Author3. Build a chess web game
Maybe you are not impressed by the Tower of Hanoi example, since a regular prompt to any frontier model can do the same thing without a coding loop. Fair. The chess game experiment is something you should actually try for yourself.
The prompt is:
/goal Build a playable chess web game.
Include easy, medium, and hard difficulty levels.
No online multiplayer needed.
Use a Python backend as the AI engine.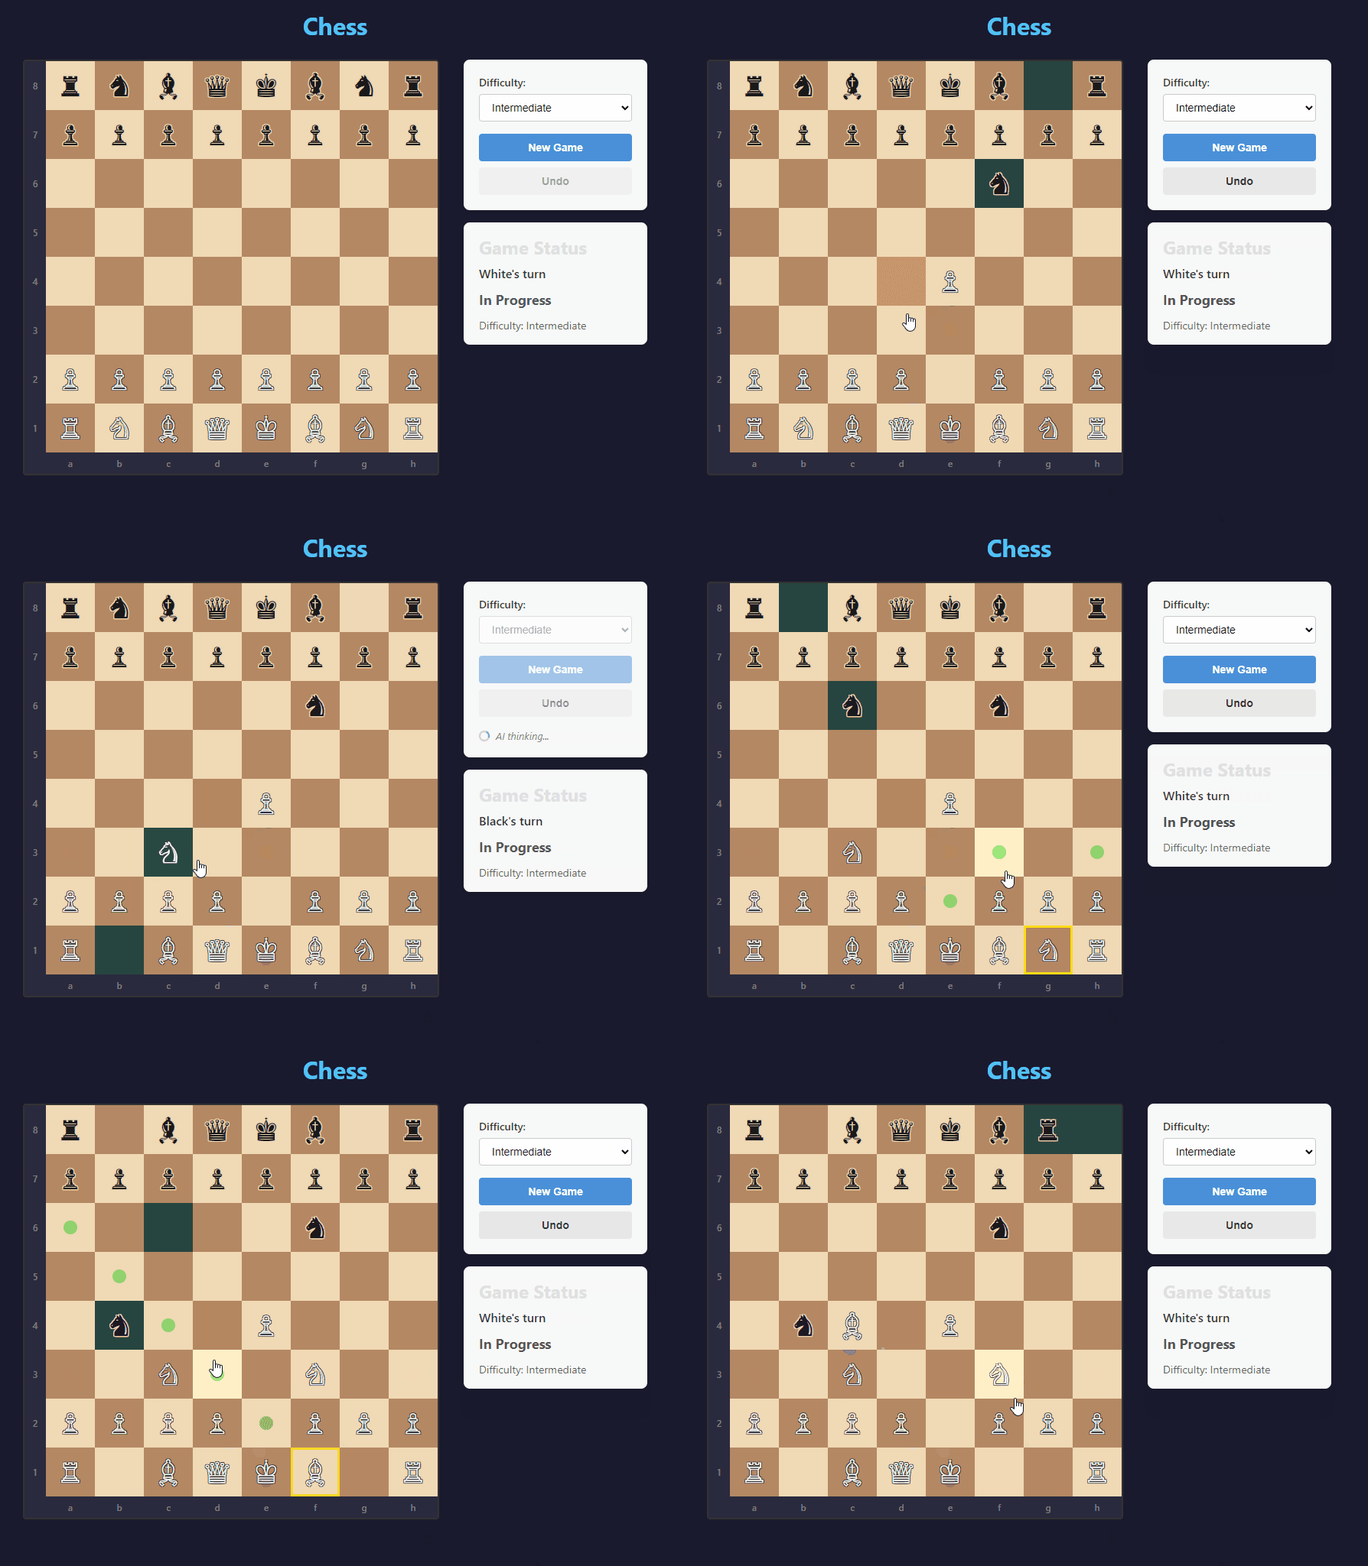
/goal command. Image by AuthorIn this experiment, OpenCode first does a quick requirements check with the user after receiving the task.
It offers suggestions along the way so you can just click next. Once the full requirements list is confirmed, it enters autonomous mode.
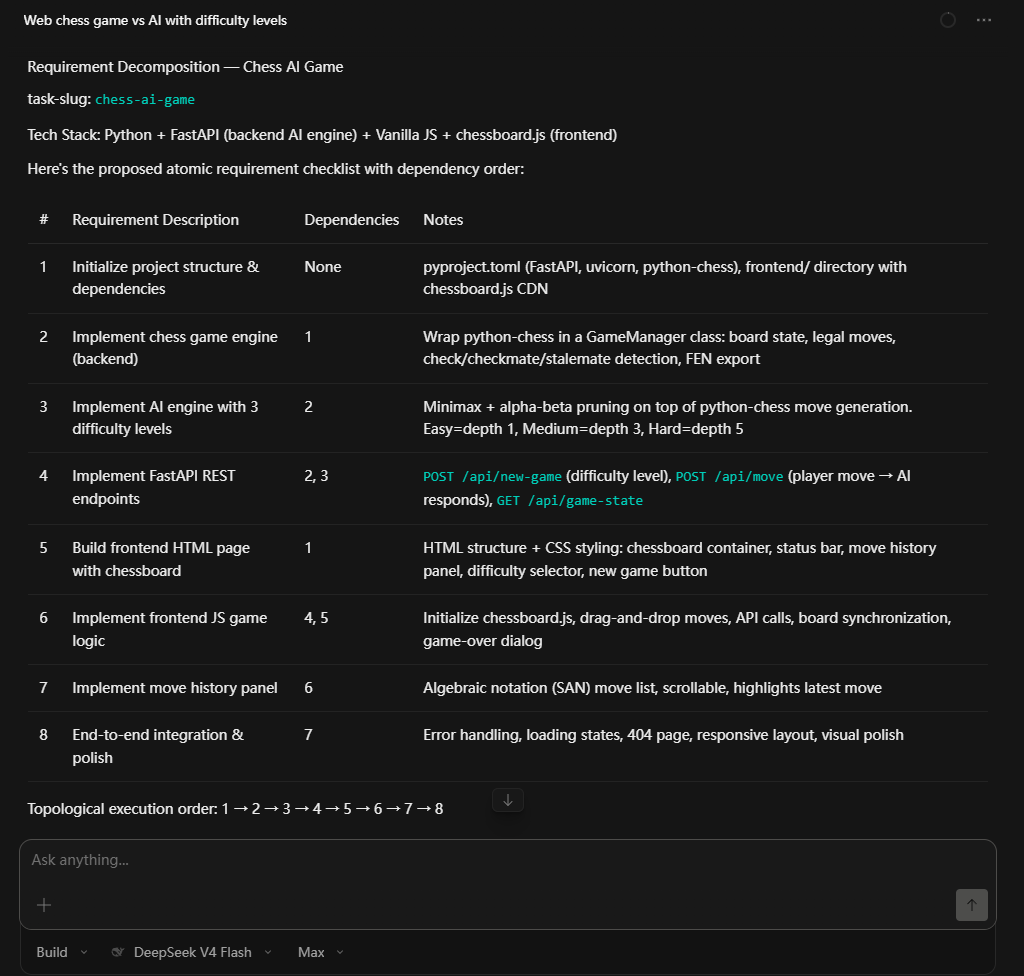
/goal command breaks down your goal into a list of requirements and then implements them one by one. Image by AuthorIt handles architecture design, builds each feature module, runs unit tests, edge case tests, and end-to-end tests. It only hands the result back to the user when everything passes.
Pretty cool, right? Want to know how it works? Let's go.
Building the Coding Loop
Overall design
OpenCode updates very fast. Almost every release breaks something or introduces small bugs. So I am not building yet another OpenCode plugin, since a plugin can easily break after an update.
The good news is that OpenCode lets you define commands and agents using plain Markdown files. Write a few lines of prompts, save the file as Markdown, and drop it in the right directory. That mechanism is the foundation for building a powerful coding loop on the cheap.
Let me walk you through the interaction flow of the whole loop.
When a user runs /goal <some task> to start a new coding task, OpenCode sends that task to an agent I call the orchestrator. In this setup, that agent is goal-orch.
The orchestrator's job is to talk to the user and review completed work. When it receives a task, it does not start coding right away. It first has a short conversation with the user to clarify the details, then breaks the task down into a list of atomic requirements.
This is different from OpenCode's built-in Plan agent. The /goal orchestrator does not ask open-ended questions. It takes its best guess at what the user wants and asks the user to confirm whether those sub-requirements are correct.
This works much better when the user is not a software engineer. It is like a capable assistant breaking down tasks for their manager without making the manager feel lost.
Once the requirements list is confirmed, the orchestrator saves it as a reqs-manifest.md file. This file tracks requirement status and serves as the acceptance record throughout the loop.
After that, the orchestrator enters autonomous mode. It starts an internal loop that calls a worker agent called goal-worker and sends each requirement to it.
goal-worker handles code implementation. Before writing any code, it does architecture planning first. If there are technology choices involved, it raises questions. It does not ask the user though. It asks goal-orch. Once goal-orch answers, goal-worker continues.
After the architecture plan is done, goal-worker enters the loop and starts implementing each requirement.
Each requirement includes feature code, edge case handling, and unit test code. When all of that is done, goal-worker sends an implementation report back to goal-orch.
The orchestrator checks the report against the requirement description, confirms completion, and updates the status in the requirements list.
Inside the loop, goal-orch also builds a DAG from the full requirements list to map out dependencies. Requirements with no dependencies between them get executed in parallel with multiple goal-worker instances, which speeds things up significantly.
Once all requirements are done, goal-orch runs acceptance tests against the list, checks unit test coverage, and for tasks involving frontend work, it launches end-to-end tests using browser use to confirm everything works.
When everything passes, the orchestrator writes an implementation report and notifies the user that the task is complete. Then it waits for the next task.
The execution sequence looks like this:
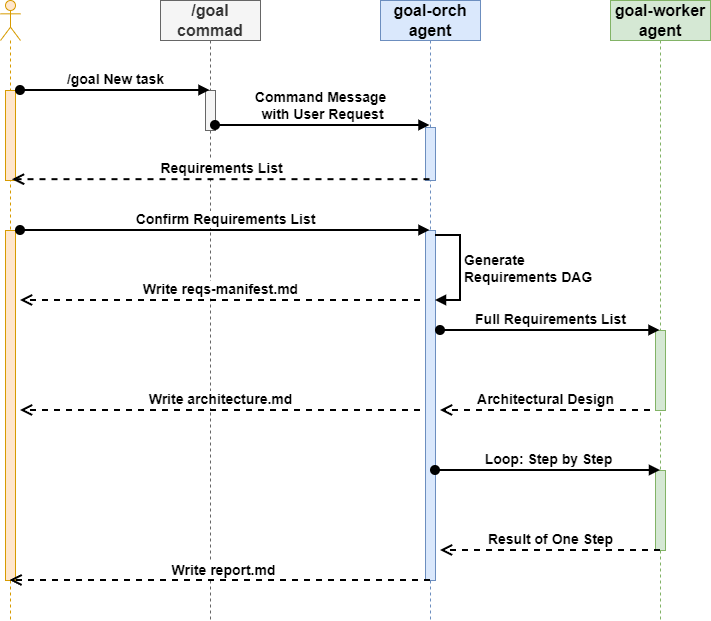
/goal command runs. Image by AuthorNow, let me walk through how each piece is built.
Implementing the /goal command
Since we want /goal to be the entry point for the coding loop, just like in Claude Code, which is the first thing to build in OpenCode.
Thankfully, creating a command in OpenCode is pretty simple. Just drop a Markdown command definition file into the .opencode/commands/ directory.
Two things to keep in mind when writing the Markdown command file:
- In the
frontmatter, configure a separate agent through theagentparameter. Without a dedicated agent, OpenCode sends the command straight to the default agent. The default agent has no Loop Engineering prompts, so the command fails. For/goal, I set up an orchestrator agent namedgoal-orch, which I will cover next. - In the body of the command, use the
$ARGUMENTSplaceholder to represent the task the user passes when calling the command. When the command sends the message to the orchestrator, this placeholder gets replaced with whatever the user typed, and the full assembled message goes to the orchestrator.
Implementing the goal-orch agent
Now let's build the goal-orch agent, which acts as the orchestrator. It handles user communication, requirements clarification, kicks off the development loop, and calls goal-worker, and verifies that work is complete.
Since we have built OpenCode agents multiple times in previous articles, I will not go into every detail here. Just a few things worth noting:
- Model choice.
goal-orchhandles workflow orchestration overall, so it needs strong reasoning. I am a fan of the DeepSeek-V4 series, so I went withdeepseek-v4-pro. - System prompt. The prompt needs to cover both workflow orchestration and the agent's own tasks, so it is on the longer side. But that is fine. When you use
/goalto send a task, thegoal-orchsystem prompt automatically replaces OpenCode's default prompt, so there is no need to worry about excessive token usage. goal-orchmust be a primary agent. OpenCode has two agent types: primary agents and subagents. The key difference is that primary agents can call subagents to delegate work, but subagents cannot. Sincegoal-orchneeds to callgoal-workerinside the loop, so it has to be a primary agent. The only downside is that it shows up in the agent list at the bottom of the OpenCode interface, but you get used to it.- The interaction mechanism between primary and subagents. During the loop, when
goal-workerhits a tricky problem or needs to make a technology choice, it does not ask the user. It returns the question togoal-orchthrough a session return. This requiresgoal-orchto answer the question and then continue the previous sub-session. OpenCode uses atasktool to send messages to subagents. This tool accepts atask_idparameter. The first call to thetasktool opens a new subagent session, and the return value includes atask_id. Aftergoal-orchanswersgoal-worker's question, it passes the answer and the previoustask_idback into thetasktool. This resumes the task in the original sub-session and preserves context. - Put simply, it works like a foreman and a worker. The foreman sends the worker off to do a job. The worker gives the foreman a reference number. If the worker hits a problem, they come back and ask the foreman. The foreman solves the problem, takes the reference number and the answer back to the worker, and the worker picks up exactly where they left off. No starting over.
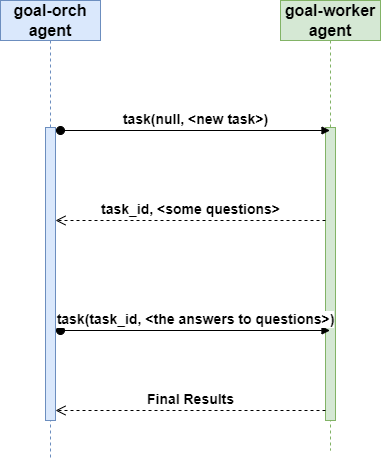
task_id to keep track of the context in sub-sessions. Image by Author- Parallel task execution. Even though we are building a fully automatic coding loop, the orchestrator can still run multiple
goal-workerinstances in parallel for requirements that have no dependencies on each other. This speeds up the overall task significantly. Aftergoal-orchconfirms the requirements list with the user, it does not jump straight into the coding loop. It first maps out the dependency relationships between requirements into a DAG. When it finds requirements with no dependencies between them, it kicks off parallel execution to finish the task faster.
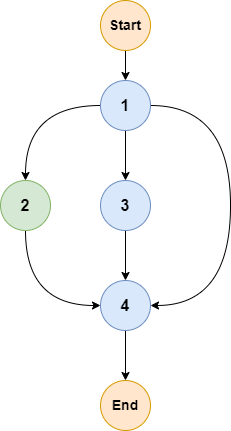
- Every completed task gets documented. A coding loop handles a large volume of requirements at once, and this process can run for hours. As the task keeps going, the context grows longer and the agent's ability to follow the prompt gets weaker. At that point, we cannot rely on session messages alone to track the status of each requirement. The orchestrator will start missing key steps in the workflow. So when designing
goal-orch, I included a requirement in the prompt: subagents must not only update the requirement status inreqs-manifest.mdafter each step, they also generate a documentation note for each completed requirement. That way, once the coding loop ends,goal-orchcan review those documents to see which tasks finished cleanly and which ones hit blockers that need human attention. - End-to-end testing with
browser use. Since we are going fully automatic, why not go all the way? Whengoal-orchdetects that the task involves a frontend page, it calls theagent-browserskill or@playwright-mcpduring the final review phase to run end-to-end tests, and captures screenshots as proof that the feature works. Since I am usingdeepseek-v4models, I also call the@observeragent for image reading when needed. I covered the@observeragent implementation in a previous article.
That covers the notable design decisions behind goal-orch. I am not going to paste the full prompt here since prompts are easy to generate with an LLM once you understand the principles. Grab the full source code at the end of the article.
It's Loop Engineering, and it's also Graph Engineering
When goal-orch calculates the dependencies across all requirements before starting implementation and compiles them into a DAG, our /goal goes beyond Loop Engineering in the narrow sense. It levels up into a new concept: Graph Engineering.
In Graph Engineering, the agent no longer completes tasks one by one in a straight line. It pre-arranges all tasks into a dependency map, then lets goal-worker move through that map. goal-orch only checks goal-worker's results at the end of the map.
Now let's look at goal-worker.
Implementing the goal-worker agent
Compared to goal-orch, goal-worker is much simpler by design. It just does the work. The simpler its instructions, the better it performs. That said, I did set a few expectations for it in this coding loop:
- Model choice. For tasks that do not need deep reasoning,
deepseek-v4-flashhonestly outperformspro. From my experience, in situations involving function calling and skill loading,flashis more accurate thanproand costs much less. So forgoal-worker, which is all about execution,deepseek-v4-flashis the right call. - Ask before acting. Even though it is a subagent, I gave
goal-workerthe ability to ask questions. Whether it is before starting or in the middle of a task, whenever it hits a technical question,goal-workerstops and asksgoal-orchfor input. This makes full use of the stronger reasoning model higher up in the chain. - Plan first, then act. Just like the outer loop driven by
goal-orch,goal-workerfollows the same rule: plan before doing. Before implementing any new requirement,goal-workerwrites out a plan that covers the tech stack, what it intends to change, and how it will handle unit tests and edge cases. That plan goes togoal-orchfor review. Only aftergoal-orchsigns off doesgoal-workerstart coding. This mechanism maximizes the chance of a successful implementation. - Use modern package managers. This is not strictly required, but in practice I noticed that DeepSeek tends to default to traditional tools like
pipandnpmfor global dependency installs. As a developer, that is something I can not live with. So I explicitly requiregoal-workerto use modern package managers likeuvandpnpm. This also keeps your environment clean when the coding loop is building something for you.
That is the full implementation plan for my OpenCode coding loop. I did not paste source code into the article body since all of it is at the end. Go grab it there.
I also tried to explain the thinking behind this coding loop and how to build it clearly enough that you could just drop this article into OpenCode and have it reconstruct a working /goal command for you. From there, tweak it however you want and build your own version of Loop Engineering. In the age of AI, what is really impossible anymore?
Before wrapping up, let me quickly cover how to actually use this coding loop.
How to Use This Coding Loop
First, go to the end of this article and open the GitHub link I shared. Then come back here and keep reading.
The source code for the coding loop lives in its own git repo. The only directory you need to care about is .opencode/. To use this coding loop across all your OpenCode projects, copy the agents and commands directories from that folder into ~/.config/opencode/, then restart OpenCode.
If you only want to try it in one specific project, just copy the .opencode/ directory into your project root and restart OpenCode.
If you just want to take it for a quick spin, clone the repo locally, create a new branch, and run opencode from that branch to start the environment.
After that, type the /goal command in OpenCode with whatever task you want the coding loop to handle. For example, if you want to build the typing practice game Andrew Ng mentioned in his post, just enter this:
/goal I want to build a typing practice web app for kids.
At the bottom of the screen are 9 keys representing the positions of 10 fingers, with the thumbs sharing a wider spacebar key that takes up two slots.
Above those 9 keys is a gradient-transparent rectangle.
Letters fall down from the top toward that rectangle, aligned to their matching key positions.
Press the right key as the letter enters the zone and it counts as a hit, triggering a hit effect.
Consecutive correct hits build up increasingly dramatic effects.
The falling speed gradually increases.
At the top of the screen is a scoreboard that adds 1 point for each hit, with a pop animation.
The whole thing should feel exciting and dopamine-triggering, with plenty of visual encouragement.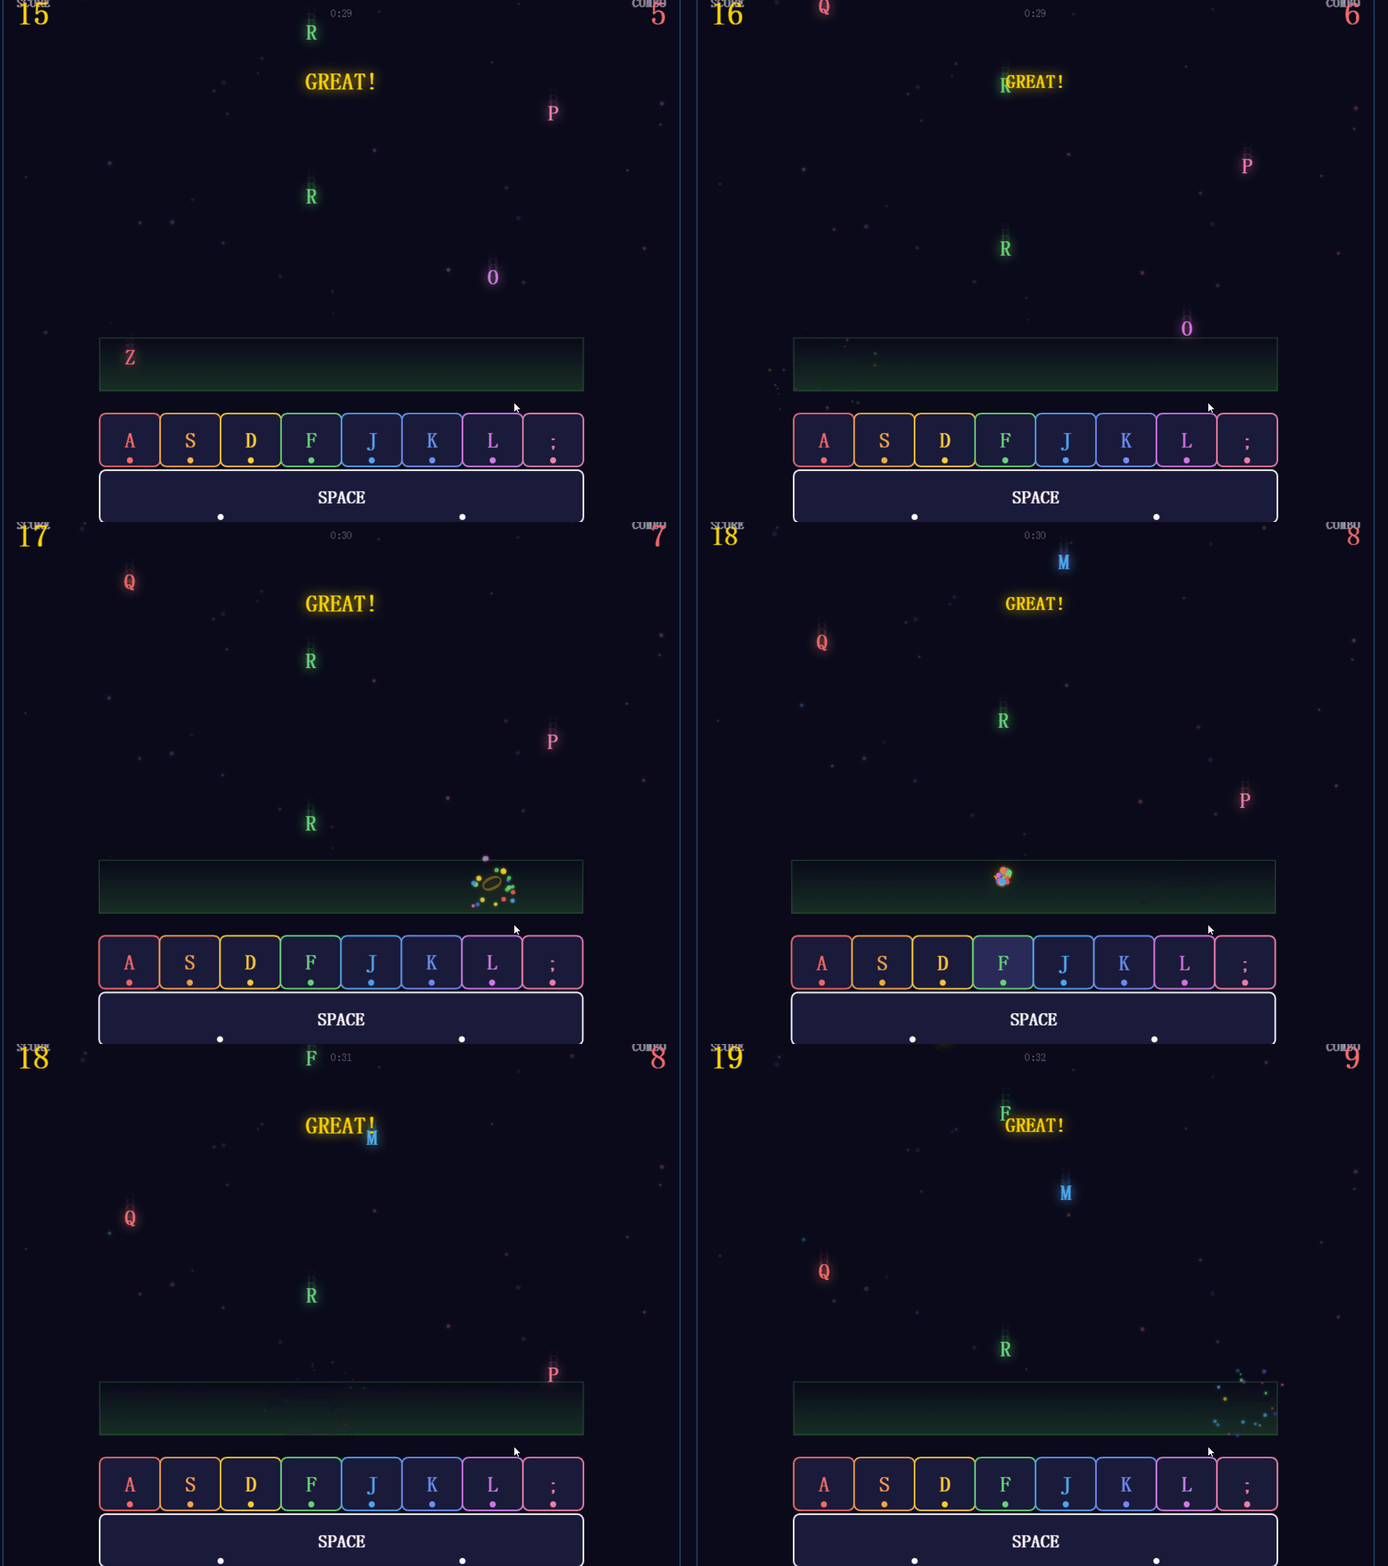
/goal command. Image by AuthorYou can be as detailed or as vague as you want. Either way, once you hit enter, the coding loop starts running. goal-orch will open a conversation with you to clarify the requirements.
You can fill in more details as the conversation develops, or just choose recommend for everything and go make yourself a coffee while it does the work.
Conclusion
That is the story of how I built this coding loop inside OpenCode. Before I wrap up, let me answer a few questions you might have.
1. Can open-source models support this coding loop?
Yes, I think so. In this article, I used deepseek-v4-pro for goal-orch and deepseek-v4-flash for goal-worker, and both worked well. With the strict constraints of the loop workflow in place, they can handle most of your tasks automatically.
Also, DeepSeek is releasing the official version of DeepSeek-V4 in mid-July. It will almost certainly come with post-training improvements, and I expect even better results from it.
2. What results should I expect?
The coding loop will spend hours working through your task, but do not set your expectations too high for what a single /goal run can produce. That is true even with the most powerful Claude or GPT models.
As Andrew Ng said, the code implementation loop is just the first of three loops. You need to step into the second loop, the engineer feedback loop. Try out what /goal produced, find all the bugs and things that do not match your vision, organize those into a new spec, and kick off another coding loop. Keep iterating. That is how the product gets better over time.
3. Can the coding loop replace SDD frameworks like OpenSpec?
No. They serve different scenarios.
The coding loop is great for product managers or team leads who want to quickly spin up a minimum viable product from market insights or their own ideas. It prioritizes speed and automation. It is for people who want to hand things off and let the agent run on its own.
But if your product is going to production, if you have high standards for code quality and implementation details, if you have a detailed product spec, and you are an experienced software engineer who knows exactly what the product should look like, then OpenSpec or another SDD plugin is the right tool. Start from a solid foundation and build your full product step by step.
I will keep updating this article as I use the loop more, and the Q&A section at the end will keep growing. If you have any questions, leave a comment, and I will get back to you as soon as I can.
Thanks for reading and subscribing. Next time you are sitting there sipping coffee while OpenCode codes away on its own, if this article comes to mind, please share it with a friend.
Further Reading
 Peng Qian
 Peng Qian
 Peng Qian
 Peng Qian
Source Code
Here's the source code for this article. Sign up now to get it for free.