How I Use OpenCode, Oh-My-OpenCode-Slim, and OpenSpec to Build My Own AI Coding Environment
Ride the wave of AI coding, don't get swept away by it

Introduction
I have never used Claude Code. The reason is simple. Claude Code is too expensive. Even with a subscription, the cost-to-value ratio does not work for my research.
So I have been building my own AI coding environment using OpenCode as the foundation, combined with Oh-My-OpenCode-Slim (multi-agent orchestration) and OpenSpec (SDD).
My take is this: if you understand what you want to build, and you know how to use coding tools properly, especially with well-written Spec files as constraints, frontier open-source models like Qwen3.6-Plus, Kimi-k2.5, and GLM-5 can handle your daily coding tasks just fine.
There is another huge advantage to open-source software: community power. The community can tune system prompts and model parameters to fit different models well, and get the most out of open-source models.
In this article, I want to share what I have learned from using OpenCode and its surrounding tools. I will skip the generic tutorials you find everywhere online and focus only on the details I think actually matter. I hope this helps you make better choices.
Tool Installation and Environment Setup
I will cover my experience in two parts: installing and configuring OpenCode and its related plugins, and my AI coding workflow.
Let's start with tool installation and environment setup, beginning with OpenCode itself.
Installing OpenCode
Unlike most coding agents that only offer a TUI-based command-line tool, OpenCode also comes with a desktop app with a graphical interface. I use the desktop app for my daily coding work. It is clearly much more efficient than the TUI version.
That said, you still need to install the command-line program first. From my testing, some plugins need a command-line environment to check whether OpenCode is installed on your machine during project initialization.
Why does the installation fail
OpenCode relies on bun as its only runtime. But in a lot of workplace environments, restrictions can prevent bun from being installed automatically. In that case, you just need to install bun manually:
npm install -g bunConfiguring OpenCode
After installing OpenCode Desktop, open the app. Once you select your project directory, you will land on the main OpenCode interface. The features are fairly intuitive, so I will not walk through each one. But before you type your first Hello World, you should check your terminal configuration first.
Configuring the terminal
I use Windows 11. On Windows, OpenCode Desktop defaults to PowerShell as its terminal. Many companies, though, do not allow PowerShell. If you are in a non-English locale, OpenCode may run into character encoding issues when running shell commands through PowerShell, causing those commands to fail.
In that case, you need to change your default terminal.
OpenCode uses the SHELL environment variable to determine which terminal to use. You can configure Windows Command Prompt (cmd.exe), WSL, or git bash. Personally, I prefer cmd.exe because I had already installed a lot of CLI tools before setting up OpenCode. Using cmd.exe directly saves me from reinstalling everything.
SET SHELL="%windir%\system32\cmd.exe"Configuring model providers
Next, let's talk about how to configure model providers.
Open the settings window and select "Providers". You will see a list of the most popular model providers and API relays. If you want to use open-source models, though, they probably will not be on that list.
At that point, you might click "Custom provider" and manually fill in the model id, base url, api key, and so on. The problem is that OpenCode then has no idea about your model's context window size or pricing, which causes features like automatic context compression to stop working correctly.
The right approach is to click the "Show more providers" link at the bottom, find the provider you want to add, and enter that provider's api key.
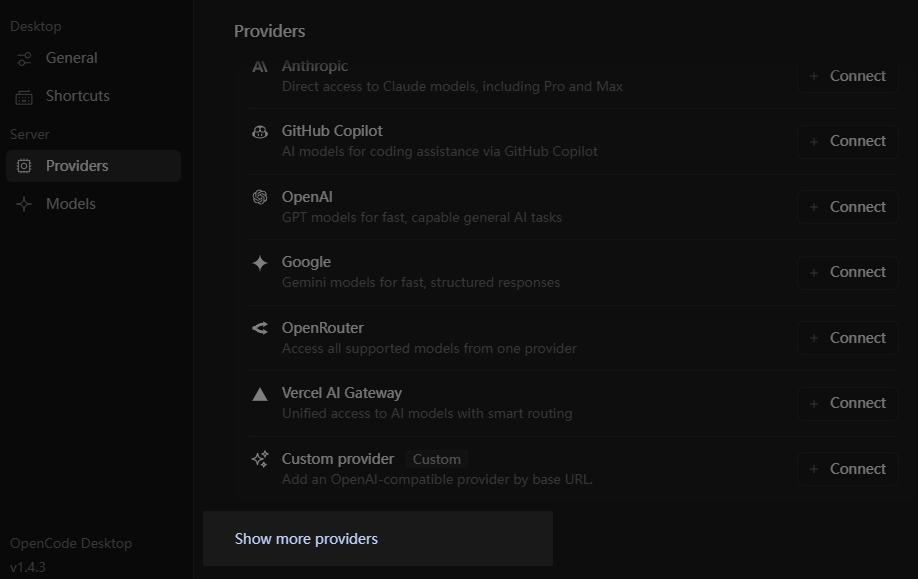
Once configured, all models from that provider will appear in the model list. These models come with metadata like context size and pricing, so context management plugins can work correctly.
The downside is that you cannot directly see your provider ID this way, which makes it tricky to configure Oh-My-OpenCode-Slim later.
No worries. OpenCode already saved your provider configuration when you selected your provider. You can find it at ~/.local/share/opencode/auth.json. Your provider ID and API key are both there.
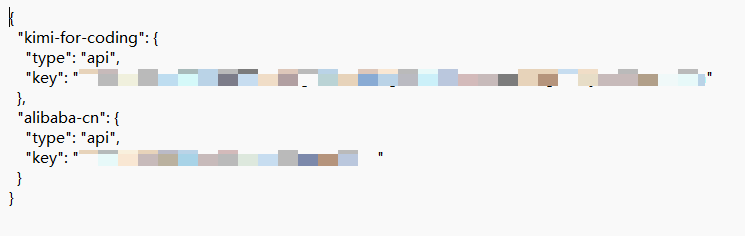
auth.json file. Image by AuthorEnable workspaces
The biggest difference between AI coding and traditional coding is that while you wait for the AI to work, you can actually work on another requirement at the same time. If you use git for version control, you would normally need to create a separate directory and check out a new branch.
Or you can use git's worktree feature to create a new worktree on top of your current branch. When you are doing parallel development, using worktrees is much more convenient than creating new branches.
Compared to OpenCode CLI, the desktop app has a clear advantage here: it natively supports the worktree feature. In OpenCode Desktop, this feature is called "workspace".
The way to open a workspace is a bit hidden. Right-click the project icon in the top-left corner of the window, then select "Enable Workspace" from the menu. From there, you can create multiple workspaces in the conversation list and work on them simultaneously. The corresponding branches and code directories will be created automatically.
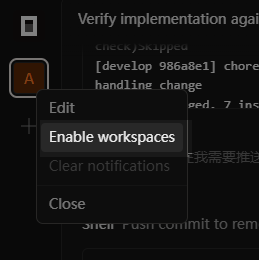
When the coding work in a workspace is done, you can ask the AI to submit a PR for the current code, then close the workspace. The branch and code directory that were created for it will be cleaned up automatically. Very convenient.
Choosing the right agent
If you want to use OpenCode without any extra plugins, pay attention to how you use agents.
OpenCode has two types of agents: primary agents, which you choose yourself, and sub-agents, which the primary agent calls on its own when needed.
Without any plugins installed, OpenCode only provides two primary agents: Build and Plan: The Build agent has full tool access and is the default choice. The Plan agent has no editing permissions. Its job is to ask you clarifying questions when you describe a requirement, and eventually produce an execution plan.
When you first try this, you might go straight to the Build agent. But for complex tasks, Build tends to just start coding based on its own interpretation. That is like looking through a straw. It fixes things locally without thinking through the overall architecture and design patterns.
The right approach is to start every new requirement with the Plan agent for requirement clarification, and get a solid execution plan first. Only then should you hand things off to Build to start development.
But even that is not enough. Model context is limited. As coding progresses, the execution plan from earlier in the conversation can get pushed out of the context window.
A better approach is to ask Build to save the execution plan as a Markdown file before starting to code. Review that file, confirm everything looks good, then start a fresh session and have Build load the execution plan document back in before executing.

Once you start working this way, you will feel how much value comes from planning before executing. It also sets you up well for SDD coding later, which I will cover when we get to OpenSpec.
Want to add enterprise-level AI development projects to your resume?
Check out the Generative AI Software Engineering Specialization, where you'll pick up everything from the theory to hands-on AI software engineering.
If you choose to enroll, I may earn a small commission at zero extra cost to you. I only recommend high-quality resources that genuinely align with the engineering standards of Data Leads Future.
Always start a new session
I just mentioned that after forming a development plan, you should create a new session before continuing with coding. Why?
Because anyone familiar with LLMs knows that even though context windows are long today, and OpenCode does offer context compression, context rot is still a real problem. LLMs pay more attention to the beginning and end of the context window, and less to the middle. I call this positional bias.
So to make sure the LLM follows instructions accurately based on the conversation context, especially after forming an execution plan where you need precise execution, start a new session after each major milestone. Do not keep working in the same session forever.
Do not forget to create AGENTS.md
The AGENTS.md file is called "rules" in OpenCode. You can create it automatically with the /init command. It tells the LLM what rules to follow during coding.
You may ask: if this file is created by the LLM, does that not mean the LLM already knows all these rules internally? Is saving them to a file redundant?
Not at all. AGENTS.md is a file written specifically for the LLM to read. In my view, it serves three important purposes:
First, AGENTS.md acts as long-term memory for the project. It locks in facts and choices. For example, after asking the LLM to set up the project structure or create a new module, run /init once. The project architecture gets locked into AGENTS.md. Without this, the LLM will scan the entire project from scratch every time you start a new session, wasting a huge number of tokens.
Another example: if you use uv to manage your project and use uv sync --prerelease=allow to sync prerelease dependencies, write that clearly in AGENTS.md. This prevents the LLM from making errors with dependency management.
Second, AGENTS.md narrows the probability distribution and reduces hallucinations. LLMs are probability models. When facing a question, an LLM generates several possible answers with associated probabilities, then picks one based on the temperature parameter.
For example, when a method parameter can accept multiple types, the LLM might consider these options:
- Use
Optional[int](40% chance) - Use
int | None(40% chance) - Use no type annotation at all (20% chance)
At that point, the LLM will randomly pick Optional[int] or int | None.
But once you explicitly require str | None syntax in AGENTS.md, the probability distribution shifts to:
- Use
int | None(100% chance) - Use
Optional[int](0% chance)
At this point, the LLM will just go ahead and pick int | None as the final answer.
Third, AGENTS.md serves a harness engineering purpose. You can give the LLM direct instructions through AGENTS.md that it must follow. For example, you can tell the LLM to communicate with you in Chinese, or require that during the spec-driven process, it cannot create new proposals without your approval.
Improve the success rate of Skills loading
By now, most people in the AI coding space have heard of Skills. But many find that Skills do not load reliably under normal conditions.
There are two reasons for this. On one hand, the description in a Skill's front matter is often unclear. We need to write the front matter carefully, especially the description part. It should clearly explain when the Skill applies and what it provides, so the LLM can load the right Skill for the situation.
On the other hand, for common coding scenarios, LLMs have learned so much during pretraining that they do not feel the need to load a Skill for extra guidance.
For this, there is a simple and proven fix. Just add this line to AGENTS.md:
Prioritize retrieval-led reasoning over pretrained-knowledge-led reasoning.
That is all. After receiving this instruction, the LLM will load the relevant Skill for a given coding scenario instead of falling back on its internal pretrained knowledge. From my testing, the Skill loading success rate jumps from around 60% to 90%.
On top of that, with this instruction in place, the LLM will use tools like glob/grep to check existing code structure before starting, and will use websearch more often to look things up online. It follows a "search first, verify after" approach instead of relying on its own instincts. Definitely worth trying.
Installing and Configuring Oh-My-OpenCode-Slim
Now that we have covered the key details of OpenCode itself, let's move on to Oh-My-OpenCode-Slim.
Oh-My-OpenCode-Slim is a multi-agent orchestration plugin. It provides six types of agents, each focused on a specific coding scenario.
You might ask: why Oh-My-OpenCode-Slim instead of Oh-My-OpenCode? Because at this stage of AI coding, multi-agent orchestration workflows have become too heavy and less important than they used to be.
A lightweight multi-agent plugin like Oh-My-OpenCode-Slim fits much better here. Each agent's system prompt is concise. The main value comes from the efficiency of parallel execution across agents, and the context isolation that sub-agents provide, which helps the primary agent stay focused. It does not add much to your token costs.
Installing the plugin
Let's start with what to watch out for when installing Oh-My-OpenCode-Slim.
Even if you use OpenCode Desktop, you need to install OpenCode CLI first. Otherwise, the installation of Oh-My-OpenCode-Slim will fail. This is because Oh-My-OpenCode-Slim checks for the OpenCode CLI to determine whether OpenCode is installed on your machine.
Due to a series of recent npm package poisoning incidents, OpenCode removed the feature that auto-installs plugins through opencode.json configuration. You now need to install the latest version of Oh-My-OpenCode-Slim using this command:
bunx oh-my-opencode-slim@latest install --no-tui --tmux=yes --skills=yesThis command installs the Oh-My-OpenCode-Slim agents and also installs two Skills: simplify and agent-browser. The former simplifies and cleans up unnecessary code. The latter helps agents inspect the frontend page styling.
You will also notice that in the opencode.json config file, the Oh-My-OpenCode-Slim plugin points to a local entry file instead of an npm package. So for future updates, you will need to update it manually.
Configuring the plugin
Now let's talk about provider config. The official documentation covers this in reasonable detail, so just follow the configuration for your model.
If you configured your model through the provider list, you cannot directly see the Provider ID. No worries. As I mentioned earlier, ~/.local/share/opencode/auth.json stores all the providers you have configured, including the provider IDs.
{
  "preset": "kimi",
  "presets": {
    "kimi": {
      "orchestrator": {"model": "kimi-for-coding/k2p6", "skills": ["*"], "mcps": ["*"]},
      "oracle": {"model": "kimi-for-coding/k2p6", "variant": "high", "skills": ["simplify"], "mcps": []},
      "librarian": {"model": "kimi-for-coding/k2p6", "variant": "low", "skills": [], "mcps": ["websearch","context7","grep_app"]},
      "explorer": {"model": "kimi-for-coding/k2p6", "variant": "low", "skills": [], "mcps": []},
      "designer": {"model": "kimi-for-coding/k2p6", "variant": "medium", "skills": ["agent-browser"], "mcps": []},
      "fixer": { "model": "kimi-for-coding/k2p6", "variant": "low", "skills": [], "mcps": []}
    }
  }
}
After configuring, remember to run opencode auth login. Even if you already filled in your API KEY through the provider list earlier, the agents will not connect properly unless you run this CLI command.
Trying out the Council feature
Oh-My-OpenCode-Slim introduced a Council agent in its latest version. More accurately, Council is a collection of agents. It sends the same task to several different agents that make up the Council, calculates a confidence interval from their responses, and synthesizes a final answer.
It is a bit like ensemble learning in machine learning. "Two heads are better than one," and by using this parliamentary discussion approach, even a few different open-source models working together can match or even exceed the capability of Opus 4.6. This makes it a great fit for solving complex architecture design problems or tracking down tricky bugs.
Council configuration is straightforward. Just follow the official example. For best results, pick a few different agents as Council members to make the most of the ensemble learning approach:
{
  "council": {
    "master": { "model": "alibaba-cn/glm-5" },
    "presets": {
      "default": {
        "alpha":  { "model": "kimi-for-coding/k2p6" },
        "beta": { "model": "alibaba-cn/qwen3.6-plus" },
        "gamma": { "model": "alibaba-cn/MiniMax-M2.5" }
      }
    }
  }
}
OpenCode's UI was not designed for this parliamentary-style interaction, so the Council discussion process is not very transparent. If something goes wrong in the configuration, you cannot tell from the interface. We need a way to debug Council.
The method is simple. Since Council itself is a primary agent you can select from the agent list, just select Council, then type "test Council connectivity" in the chat. OpenCode will send a test task to each Council member and list the results from each one in detail. Very handy.
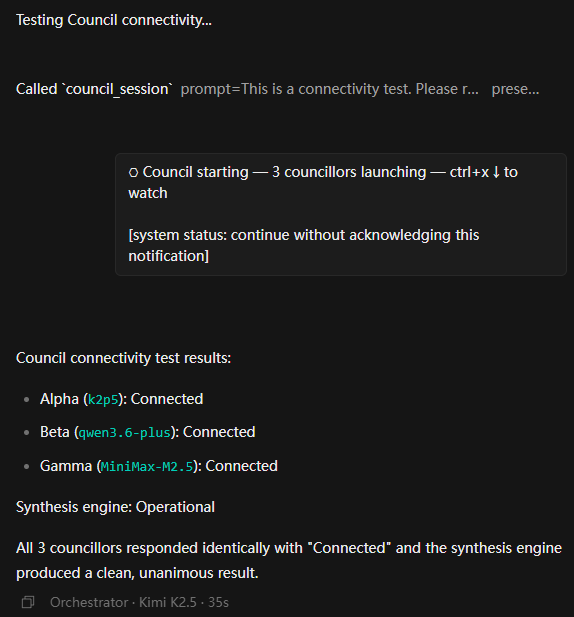
You can use this same approach to test other OpenCode features. For example, type "test context7 availability" or "test Oracle agent connectivity."
Why isn't your LSP tool working anymore?
In the earlier versions, the omo-slim agent used to run a tool called lsp_diagnostics after writing or editing code to check for syntax issues, making sure there were no unused imports or dead code and stuff like that.
I really liked that tool, it was pretty handy.
But after the latest omo-slim plugin update, you might notice the agent no longer calls lsp_diagnostics to check the code.
That's because the old omo-slim used its own built-in LSP tool, while the new omo-slim is going to use the LSP tool provided by opencode. However, opencode has the LSP tool disabled by default, since the author thinks it uses up too much memory and doesn't really pay off in most situations.
If you still want the agent to use lsp_diagnostics, you can manually add the "lsp": true setting in the opencode.json config file, and that'll turn it back on.
Also, opencode offers other LSP tools like goToDefinition, findReferences, hover, workspaceSymbol, goToImplementation, and so on, which are useful for code searching and debugging. You can enable them by setting the environment variable OPENCODE_EXPERIMENTAL_LSP_TOOL = true and give them a try.
But even with those tools enabled, the agent will still prefer using grep for text based code searches. That's because the LLM was trained on data that heavily uses grep during the pretraining phase. So from my own testing, turning on the LSP tools didn't make a big difference.
OpenSpec and SDD
Finally, let's look at another key piece of the AI coding puzzle: the OpenSpec plugin and the SDD coding workflow.
Why do we need SDD? The reason is pretty simple.
A lot of articles that benchmark model coding ability use prompts like "build a 3D web demo from this one-sentence description," then compare results and conclude that open-source LLMs still have a long way to go.
But is that really true? Think back to how software development worked before AI coding. Before writing a single line of code, did we not always ask the business side for detailed requirements, write design documents, plan the coding schedule and testing plan, and only then start writing code?
So why would anyone think you can skip the documentation phase when asking an AI to write code?
The ability to write coding specs that make an LLM work with precision is one of the golden standards for evaluating a programmer's skills in the AI era.
No need to stress about it, though. There are plenty of AI tools today that help you do SDD development. Superpowers, BMAD, and OpenSpec are among the best.
Compared to Superpowers or BMAD, OpenSpec is much lighter. For most everyday projects, OpenSpec is more than enough to get the job done. Let's look at how to install and configure it.
Even though we use OpenCode and OpenSpec together, OpenSpec is not a plugin for OpenCode. It is a completely independent tool.
Configuring the workflow
The default OpenSpec workflow has three phases: opsx-propose, opsx-apply, and opsx-archive. These correspond to creating a proposal, implementing the proposal, and archiving the proposal.
Just like I recommended using the Plan agent to plan things out before implementing any changes, I also want you to have a thorough discussion with the AI about your requirements before creating a proposal. Make sure both you and the AI clearly understand what you want to build.
Since OpenSpec does not have the concept of agents, the responsibility for requirement clarification falls on a command called opsx-explorer.
Compared to the Plan agent, the opsx-explorer command uses a Skill to strengthen the ability to guide users through their requirements in an exploratory way, helping them think things through more completely.
opsx-explorer is also great at using charts to compare the pros and cons of different implementation options, making decisions easier for the user.
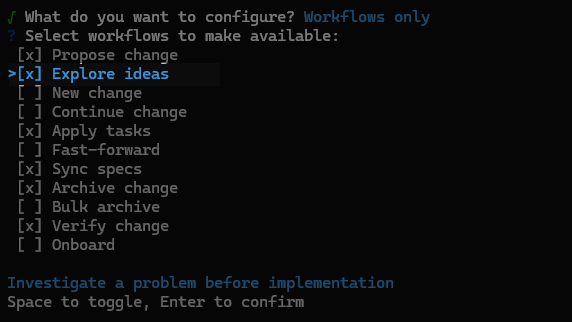
opsx-explorer is not included in the default workflow, so you need to configure OpenSpec to add it. After installing OpenSpec, run openspec config profile in the command line, then select Workflows only in the configuration screen, as shown below:
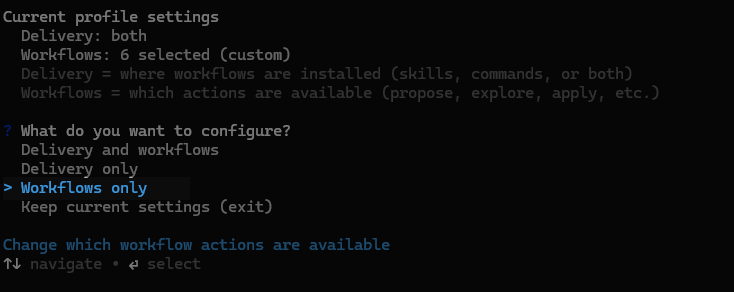
Use the spacebar to select Explorer ideas and Verify change. These correspond to opsx-explorer and opsx-verify. Then press Enter to confirm.
After configuration, go to your project root directory and run openspec init to set up a new OpenSpec environment, or run openspec update to update an existing OpenSpec configuration.
I will walk through the full OpenSpec development workflow in the next section.
Configuring multi-language support
If you try creating rule files with OpenSpec, you will notice they are written in English by default. That is inconvenient for non-English users. So we need to configure OpenSpec to write files in a specific language.
A simple approach is to add a language instruction directly in AGENTS.md, but that causes a problem. spec.md files use a lot of English keywords. If you tell OpenSpec to use another language, those keywords get translated too, and the LLM can no longer follow the spec constraints correctly.
The right approach is to configure the language in the config.yaml file inside the OpenSpec directory:
schema: spec-driven
context: |
  Language: Chinese
  Write in Chinese, but:
  - Keep technical terms like "API", "REST", "GraphQL" in English
  - Code examples and file paths remain in English

  Tech stack: Python 3.13

  Rules:
    proposal:
       - Keep proposals under 1500 words
       - Always include a "Non-goals" section

    tasks:
       - Break tasks into chunks of max 2 hours
Besides language, you can also configure other settings here, such as your tech stack and specific requirements for proposal.md and tasks.md files.
Choosing the right agent
Since OpenSpec needs to write spec-related files, the agent must have file editing permissions. If you use the original OpenCode tools, you should go with the Build agent, since the Plan agent has no editing capability.
In this tutorial, though, we have integrated the multi-agent orchestration from Oh-My-OpenCode-Slim. So you should use the Orchestrator agent. Beyond basic editing, the Orchestrator can call Explorer and Librarian agents during the planning phase to analyze project structure and search API documentation. During execution, Orchestrator can also call multiple Fixer agents to work in parallel, which speeds up development significantly.
From now on, just default to the Orchestrator agent. It will call other agents when it needs to.
Daily OpenCode Development Workflow
Now that we have covered installation and configuration, let me walk you through my daily OpenCode workflow using OpenCode, Oh-My-OpenCode-Slim, and OpenSpec together.
Project Initialization
Unlike traditional coding workflows, the development process in the AI era should center on building for AI. All configuration and documentation should be written in a way that AI can understand and follow. The AI then translates human ideas into code. Let me walk you through this from project initialization.
After creating the project, first run git init in the project root directory. If the project has a remote repository, remember to link it with git remote add. At that point, you can start using OpenCode's code review and workspace (worktree) features.
Next, if your project is a Python project, use uv init to initialize dependencies and project structure. If needed, also add lint and code review tools with uv add --dev ruff and uv add --dev mypy.
This gives the LLM a clear anchor for understanding the project. pyproject.toml is the standardized build protocol introduced by PEP 518, and most build tools use this file. Without running uv init upfront to establish a basic project structure, the LLM will randomly pick pip, poetry, or something else. Fixing that later is a pain.
Next, initialize the OpenSpec plugin. Still in the project root, run openspec init. In the command-line interface that appears, select the OpenCode agent and press Enter.
Finally, go into the openspec directory and edit config.yaml to add your rules, as described earlier.
Once everything is configured, run the /init command and ask OpenCode to generate the AGENTS.md file to lock in all these configuration choices.
The Development Workflow
With the project initialized, you can now move into the actual development flow.
As I described earlier, you should have already configured the OpenSpec workflow using openspec config profile and selected opsx-explorer and opsx-verify.
So the best way to start is to open a new session and begin with /opsx-explorer. No matter how clear your idea feels, use /opsx-explorer to flesh it out, fill in the details, and help the AI clear up any questions.
I know you want to just tell the AI to build a Facebook. But I recommend starting small, one small requirement at a time.
For example: "I want to build a budgeting app. For step one, let's start by setting up the project structure and adding dependencies." This keeps things focused. The AI completes a small amount of work at a time, which avoids context limitations, causing the AI to go off track after a long run.
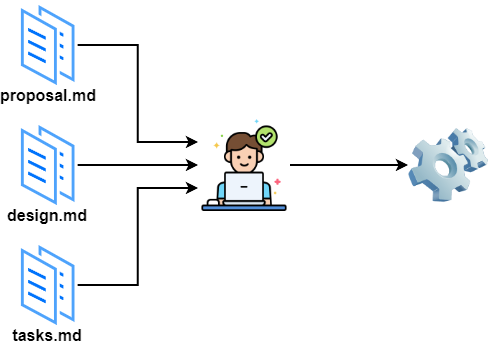
Once the requirement discussion is mostly done, run /opsx-propose to create a proposal. This locks down the discussion and development plan as spec documents. OpenSpec will break things down into one or more changes based on complexity, then generate proposal.md, design.md, and tasks.md.
Review these three files carefully. The LLM-generated tasks might have gaps or misunderstandings. If you find errors, you have two options:
- Talk to the LLM, add details, and ask
OpenSpecto regenerate the documents. - Or edit the rule files directly, then ask
OpenSpecto regenerate the documents.
Once the documents look good, I strongly recommend starting a new session with a fresh context. Then run /opsx-apply to enter the implementation phase.
The agent will load the spec documents from the previous session and start coding. With Oh-My-OpenCode-Slim's multi-agent system and various Skills helping out, this process mostly runs on autopilot. Go grab a coffee or read another one of my articles while you wait.
After coding is done, OpenSpec will prompt you to run /opsx-archive to archive the proposal. But before archiving, I recommend switching to a different model. For example, if you were using kimi k2.5, switch to GLM-5, then run /opsx-verify to verify that all tasks were completed. You can also run /review or /simplify to review and clean up the code and make sure the project quality is solid.
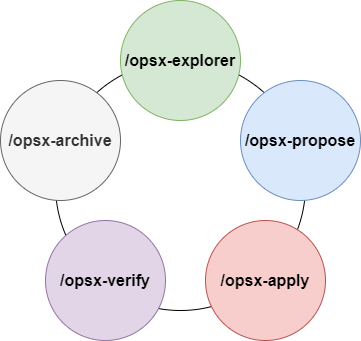
Finally, run /opsx-archive to archive the changes. One standard AI development cycle is now complete. When the next new requirement arrives, start fresh with a new session and /opsx-explorer.
Conclusion
In this tutorial, I covered how to use OpenCode, Oh-My-OpenCode-Slim, and OpenSpec to build your own AI coding workflow.
With this open-source combination, paired with the latest open-source models, you can get coding performance that rivals top-tier models, at a much better price.
This tutorial draws from my real-world experience. It focuses on the practical details of AI coding with OpenCode and walks through each step of the SDD-based development cycle. By the end of this tutorial, you should have a solid edge in the AI coding space.
Due to space and my own limitations, I could not cover every detail. I am still working on improving this article. If anything is unclear as you read through it, leave me a comment, and I will get back to you as soon as I can.
Thanks for subscribing. Feel free to share this article with your friends. You never know who it might help.
Mr. Qian's Recommendation:
Knowing a few AI coding tricks won't really set you apart at work. What you actually need is the ability to integrate AI-generated code into real enterprise codebases.
I highly recommend the Generative AI Software Engineering Specialization by Vanderbilt University. It'll take you from being a casual user to becoming a truly AI-driven software engineer.
If you choose to enroll, I may earn a small commission at zero extra cost to you. I only recommend high-quality resources that genuinely align with the engineering standards of Data Leads Future.
Further reading
By adding a reflective agent to the OpenSpec workflow, I managed to get DeepSeek-V4-Pro to perform at the level of Opus:

Can't your DeepSeek-V4 and GLM-5.2 agents read images yet? Give my method a try:

The concept of Loop Engineering has been getting a lot of buzz lately, so I decided to give it a shot in OpenCode. The results were surprisingly good: