I Used Autogen GraphFlow and Qwen3 Coder to Solve Math Problems — And It Worked
More reliable than your math professor


Disclaimer: This post contains affiliate links. If you click and enroll, I may earn a small commission at no extra cost to you. Thank you for your support!
Updated July 28, 2026:
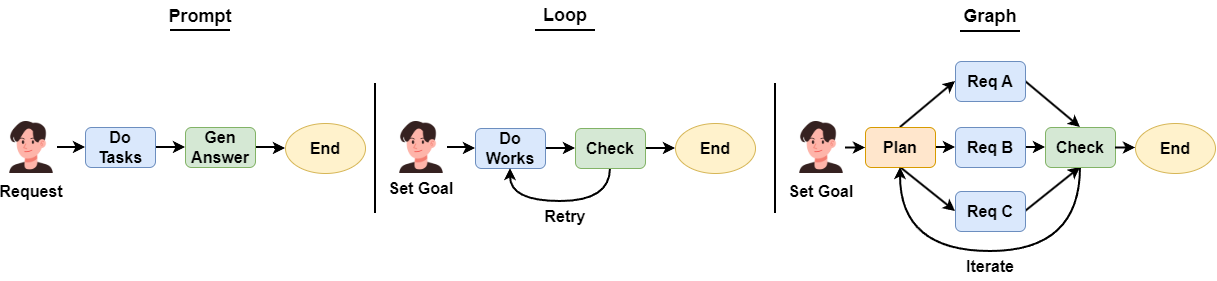
There's a concept that's been making waves again lately called Graph Engineering. It's built around three core ideas:
- Breaking down a complete task into smaller units of work that become nodes in the graph. These nodes can be an agent, a direct LLM call, a function call, or even a human feedback step.
- The edges between nodes determine the order in which they run. They can be sequential, looping, or parallel (Fan out and Fan in).
- The edges between nodes determine the order in which they run. They can be sequential, looping, or parallel (fan-out and fan-in).
Here's the thing though: Graph Engineering isn't actually a new concept. Way back in 2024, people already figured out that using DAGs to define workflows could handle complex tasks really well. That's exactly what gave birth to two frameworks: LangGraph and Autogen's GraphFlow.
In this tutorial today, I will show you how I used Autogen’s latest GraphFlow with the Qwen3 Coder model to accurately solve all kinds of math problems — from elementary school level to advanced college math.
As always, I put the source code for this tutorial at the end of the article. You can read it anytime.
Course Introduction
You must have secretly thought about using an LLM to do your homework. I had that idea from the very first day LLMs appeared, let them solve math problems for me.
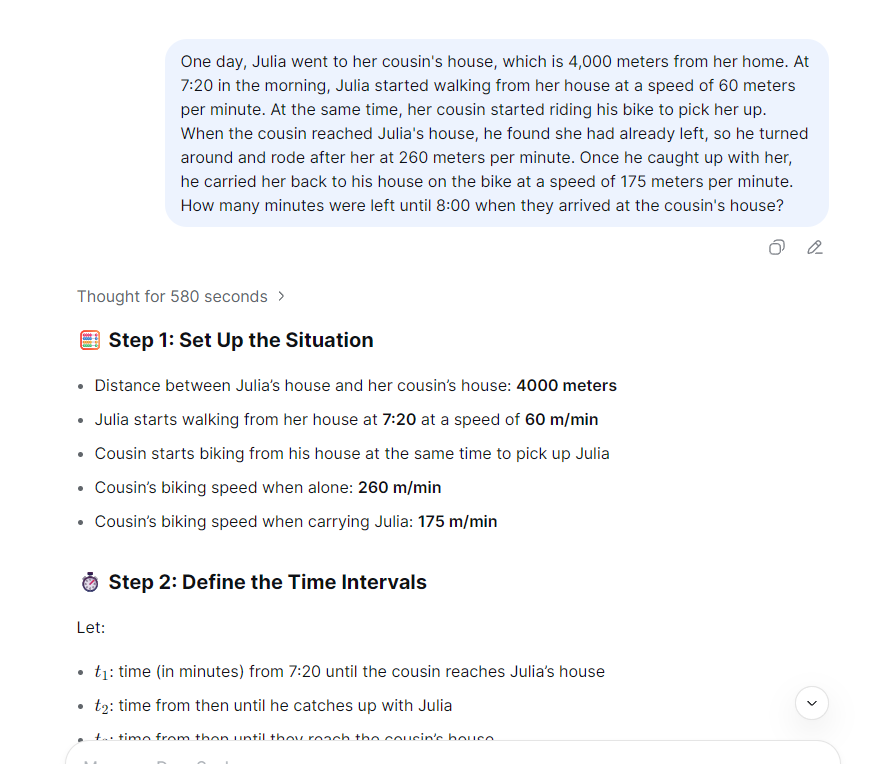
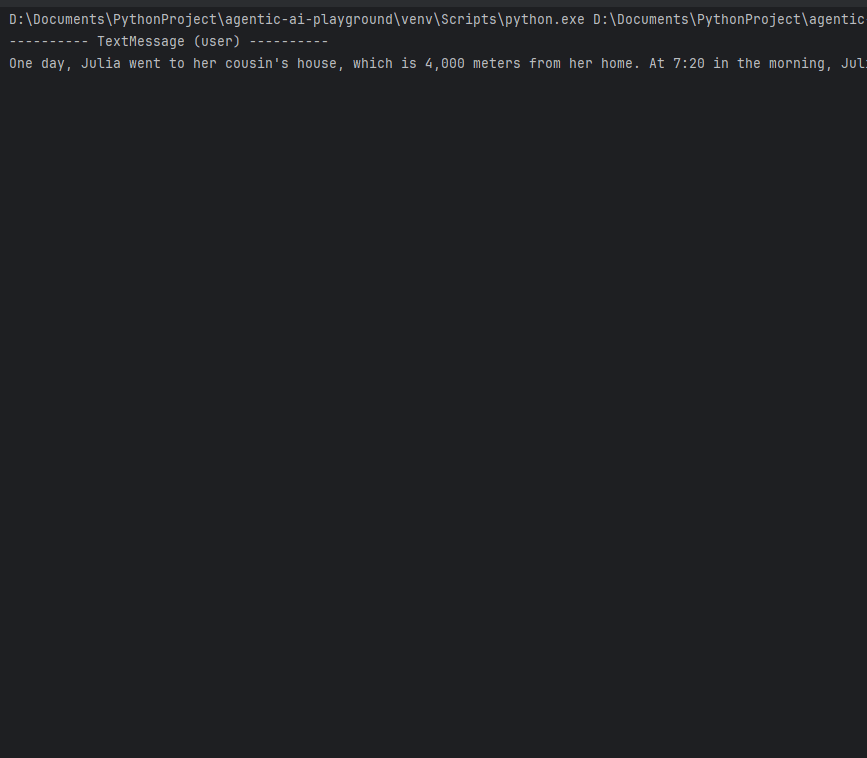
But dreams are sweet, reality is tough. If I throw a math problem at an LLM, it either gets the answer wrong or fails to reason at all. Here is what happened when I gave a math problem to the latest DeepSeek V3.1:
Not really the LLM’s fault. By design, LLMs are token generation models. Even if they can solve math problems, it is based on patterns learned during training, not actual numerical computation.
No worries. Even if we cannot ask LLMs to solve math problems directly, we can ask them to generate code that solves the problem. That is something LLMs do very well.
For example, I built a multi-agent app using Autogen GraphFlow and Qwen3 Coder that can accurately solve math problems from elementary school to university level:

The trick is simple: Qwen3 Coder writes Python code to solve the problem. A Docker Executor runs the code and gets the result. Then the app writes the final answer.
Fun right? Want to learn how? Don’t rush. In this lesson, I will walk you through building this multi-agent app step by step.
What Will I Learn?
In this lesson, you will learn:
- How to set up a Docker Executor agent that can run Python code.
- How to build an Autogen GraphFlow workflow using multiple atomic agent nodes to work together on complex tasks.
- Using a reasoning agent to help the workflow plan how to solve hard problems.
- How to use a reflection agent to let the workflow review and improve its own code and results.
The best part is I used small models like qwen3-30b and qwen3-coder-plus. And The final result beats large language models like DeepSeek v3.1 in numerical problem solving.
Atomic Capability Agents
In enterprise applications, the latest trend is using multiple atomic agents, each does one simple task. When you arrange them cleverly, they can handle complex jobs. This gives you two big wins:
- Each agent has one clear job. That means fewer mistakes and less hallucination.
- You don’t need to write long, confusing prompts. Just tell the agent what to do in simple words.
In this tutorial, I will show you how this approach gives your enterprise AI applications a real edge.
Ready? Buckle up. Let’s go.
Pre-Class Prep
Before we start, we need to get the environment ready.
Yes, the Python code generated by Qwen can run in your local virtual environment. But to keep your system safe from bad code, I recommend using Docker to create a dedicated runtime.
There are many guides on installing Docker, so I will skip that part. Today, I will just show you how to prepare the Docker image.
Here is the Dockerfile, used for the container in this tutorial:
FROM python:3.13-slim-bookworm

WORKDIR /app

ENV PYTHONDONTWRITEBYTECODE=1 \
    PYTHONUNBUFFERED=1 \
    PIP_NO_CACHE_DIR=1

COPY requirements_docker.txt requirements.txt

RUN pip install --no-cache-dir --upgrade pip && \
    pip install --no-cache-dir -r requirements.txt --upgrade
One special thing: we need to install some math packages in this Python runtime. That helps the agent solve all kinds of math problems better. I put all dependencies into requirements.txt:
numpy==2.3.0
pandas==2.3.2
sympy==1.12
scipy==1.16.1
You probably already thought of this: if I can install math packages, I can also install packages for other subjects. Just say the word.
You need to build the Python runtime container into an image ahead of time:
docker build -t python-docker-env .Also, to make the Docker Executor work, you need to install Autogen’s Docker extension into your project’s virtual environment.
pip install -U autogen-ext[docker]Unlike other workflow frameworks, Autogen GraphFlow can filter messages. It lets you choose which messages go to the next node. That saves tokens and reduces hallucination.
If you want to trace message inputs and outputs at each node, you can use MLFlow. I wrote a whole article about that. We will use it soon.

Now let’s start the lesson.
Ding Ding — Class Begins
Set Up the LLM Clients
In today’s multi-agent application, we will use two Qwen3 models.
The main one is qwen3-coder-plus. I will use this model to generate Python code that solves problems.
The other model is qwen3-30b-a3b-instruct-2507, It is a MoE model — small but smart. I use it in the workflow for thinking and code review.
This model cannot do deep reasoning, but it saves us lots of tokens and time. I can also build a separate reasoning agent to handle problem-solving logic. This setup is flexible and works well. I will prove that to you soon.
To make Autogen work with Qwen3 models, I prepared an OpenAILike client for you. You can click here to learn more.

I want the qwen3-30b model to think through solutions more carefully, so I lowered the temperature to 0.1:
slm_client = OpenAILikeChatCompletionClient(
    model="qwen3-30b-a3b-instruct-2507",
    temperature=0.1
)
I want the qwen3-coder model to be precise and consistent. So I set its temperature to 0.01:
coder_client = OpenAILikeChatCompletionClient(
    model="qwen3-coder-plus",
    temperature=0.01
)
Prepare the Docker Executor
Autogen’s Code Executor comes in two types. CommandLineCodeExecutor, runs Python code once then exits. JupyterExecutor keeps state between multiple code runs.
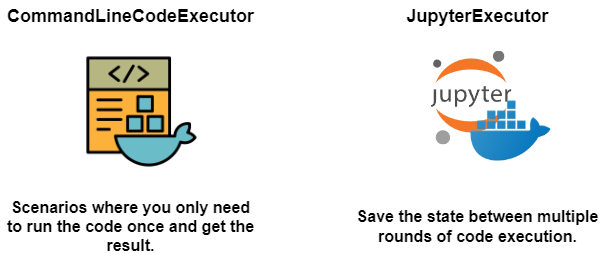
For today’s task, DockerCommandLineCodeExecutor is enough.
But after many real project tests, a stateful Python runtime based on Jupyter is much better for agents to solve complex tasks by exploring on their own:

We will build it using the image we prepared earlier. Since some data science code takes time to run, I suggest you set a longer timeout:
docker_executor = DockerCommandLineCodeExecutor(
    image="python-docker-env",
    timeout=300,
)
The Docker Executor container removes itself after the agent finishes. If you want to keep it for debugging, set auto_remove to False.
I am not sure if Autogen’s Docker Executor has a bug. If you want to mount your host file system into the container, use the extra_volumes parameter. Avoid the workspace folder inside the container.
docker_executor = DockerCommandLineCodeExecutor(
    image="python-docker-env",
    timeout=3000,
    extra_volumes={str(Path("./data").resolve()): {"bind": "/data", "mode": "rw"}},
)
Write Your Agents
To keep things clean, I put agents and their prompts in separate files: agents.py and prompts.py.
This project has three core agents: coder agent to generate code exe_agent to run the code and reviewer agent to check code and results.

The coder agent uses Autogen’s AssistantAgent. Its job is to understand the user’s question, plan a solution, and write executable Python code. It uses the qwen3-coder-plus model:
coder = AssistantAgent(
    "coder",
    model_client=coder_client,
    system_message=PROMPT_CODER
)
Here is its prompt:
PROMPT_CODER = dedent("""
## Role
You are a developer engineer responsible for writing Python code.
## Task
For the user's question, you will generate a piece of **Python** code that runs correctly and gives the right result.
### Requirements
- **Write the code logic strictly following thinker's problem-solving approach.**
- Use the print function to show the result.
- Short code comments.
- Only output the code block, no extra words or explanations.
- When showing results, if it's a float, keep two decimal places.
### Available libraries
- numpy, pandas, sympy, numexpr, scipy
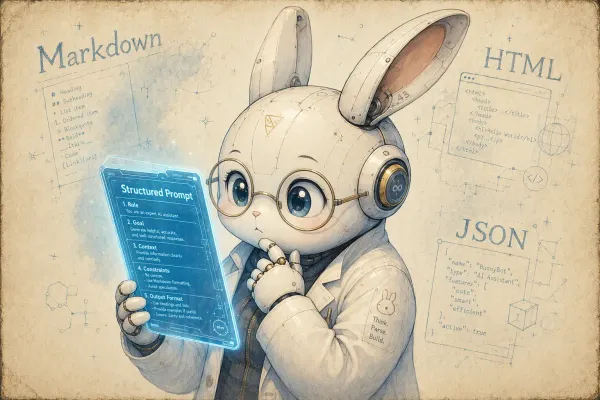
""")I used a popular structured prompt method. Markdown syntax and simple language make the prompt clean and easy — almost like a programming language.
I also told the agent which third-party packages it can use. This is important. Knowing what tools are available helps the agent do better work and avoid mistakes.
The exe_agent is an instance of CodeExecutorAgent. It is just a wrapper around the Docker Executor. Simple:
exe_agent = CodeExecutorAgent(
    "exe_agent",
    code_executor=docker_executor,
)
The reviewer agent is also an AssistantAgent but uses the qwen3-30b model. Its job is to check the code and results from the coder. If it passes, the reviewer writes the answer. If it fails, the reviewer gives feedback:
reviewer = AssistantAgent(
    "reviewer",
    model_client=slm_client,
    system_message=PROMPT_REVIEWER,
)
Here is the reviewer’s prompt:
PROMPT_REVIEWER = dedent("""
## Role
You are a test engineer.

## Task
- Check if the Python code follows the problem-solving approach proposed by thinker.
- Verify if the code runs correctly and produces results.
- Provide the review results.

### Review Passed
"COOL"

### Review Failed
- "REJECT"
- Output the exact error message from exe_agent.
- Give brief suggestions for improving the code.
- Don't include any introductions or explanations.
- Do not provide the revised code.
""")
Again, I used simple structured text. I asked the agent to output different keywords for pass or fail.
There is a problem here: Earlier, I said we want atomic agents that each do one job. But coder and reviewer are clearly doing multiple things. That is because I wanted to test if using LLMs to generate code for math problems even works. Once that is proven, I will refactor each agent’s prompt to make their jobs more focused.
Build a Quick Prototype to Test the Idea
Time to build a quick prototype to show the boss that this idea works.
In the prototype stage, I don’t want to work late building a complex Autogen GraphFlow. I want to solve it in one line of code. In Autogen, the simplest way to run agents in a loop is RoundRobinGroupChat.
RoundRobinGroupChat is an infinite loop of agents. It only stops when it hits a termination condition.
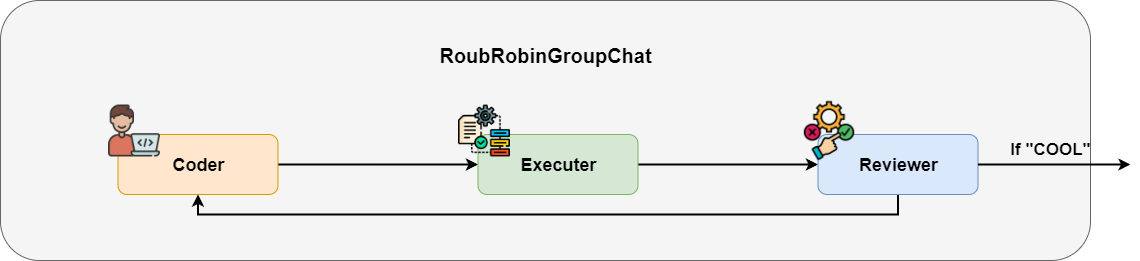
I set a condition to stop when the message contains “COOL”. Then I put all agents into the RoundRobinGroupChat in order.
text_termination = TextMentionTermination("COOL")
team = RoundRobinGroupChat([coder, exe_agent, reviewer],
                           termination_condition=text_termination)
Let’s test it with a math problem:
    async def main():
        task = "The bag has 4 black balls and 1 white ball. Every time, you pick one ball at random and swap it for a black ball. Keep going, and figure out the chance of pulling a black ball on the third try."

        async with docker_executor:
            await Console(team.run_stream(task=task))

    asyncio.run(main())
One thing to remember: when you run agents with Docker Executor, you need to manage the container’s start and stop. The best way is to use async with.
Looks good. The agent understood the question, wrote Python code, and got the result. The reviewer checked it and wrote the answer.
Spot Problems in the Prototype and Plan Improvements
As a quick prototype, RoundRobinGroupChat is enough to prove the idea works. But if you put this code into production, you will find it unstable and inaccurate.
Before turning this into production code, we need to identify what is wrong and how to fix it.
Try the prototype a few times. For simple problems it works. For more challenging math problems, the coder writes incorrect code.
Why? Because the coder has to both plan the solution and write the code. For hard problems, it cannot think of a good plan, so the code logic fails.
The reviewer has the same issue. It checks the code, writes the answer if it passes, or gives feedback if it fails.
It is too busy. It mixes all jobs. The answer often includes code comments. That is hard for students who just want to learn how to solve the problem, not read Python code.
Remember our agent design rule? In a multi-agent system, each agent should do one atomic job. That makes the whole system perform better.
So our next step is clear. We need to split the jobs of coder and reviewer. Let coder only write code. Let reviewer only check if the code passes or fails.
We also need two new agents:
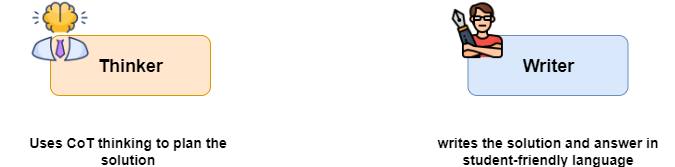
The thinker agent acts as the brain of the system. It uses CoT thinking to plan the solution. The coder follows the thinker’s plan exactly — no more thinking.
The writer agent writes the solution and answer in student-friendly language based on the correct code and result. The reviewer no longer writes answers, it only checks code.
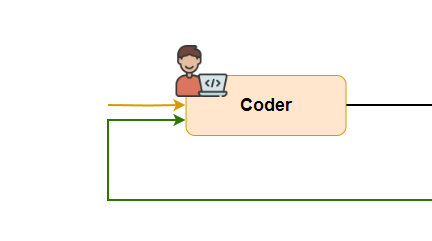
Here is the new workflow:

As you can see, thinker and writer are outside the loop. RoundRobinGroupChat won’t work anymore. We need a more complex workflow. Ladies and gentlemen, please welcome Autogen GraphFlow.
Prepare the New Agents
Before coding the GraphFlow, we need to add two new agents as planned.
First, the thinker agent. Even though it is the brain, it still uses the qwen3-30b, model. We only need it to plan the solution:
thinker = AssistantAgent(
    "thinker",
    model_client=slm_client,
    system_message=PROMPT_THINKER,
)
Its prompt is simple and structured:
PROMPT_THINKER = dedent("""
## Role
You are a college professor who is good at breaking down complex problems into clear steps for solving them.

## Task
For the user's question, break it down into a problem-solving approach that can be calculated step by step using code.

## Response
Use an ordered list to show the steps.

### Requirements
- Do not include actual code.
- Do not solve the problem.
- Do not do any numerical calculations.
""")
Second, the writer agent. It also uses the qwen3-30b. It writes the answer based on correct code and results. I will show you later how to pick the correct code:
writer = AssistantAgent(
    "writer",
    model_client=slm_client,
    system_message=PROMPT_WRITER,
    model_client_stream=True
)
Here is the writer’s prompt:
PROMPT_WRITER=dedent("""
## Role
You're a college professor who's really good at explaining problem-solving ideas and answers in a way students can easily understand.

## Task
Based on the user's question, use the logic of the Python code and the result of code execution to write the answer.

## Answer Content
The answer should include the problem-solving idea and the final answer.

### Style
- Use natural language that humans can understand.
- **Don't include any code**.

### Note
- **Use the execution result from exe_agent as the answer**.
- The problem-solving idea must match the logic in the coder's code.
- You can't come up with your own problem-solving idea.
""")
With both agents ready, we can now build the final agent workflow using Autogen GraphFlow.
What Is Autogen GraphFlow
When people talk about Autogen, they say its biggest difference from LangGraph or CrewAI is that Autogen lets LLMs choose which agent to use to plan and complete tasks. So Autogen feels more suited for research.
But for enterprise applications, we often want consistent and robust code execution. So we prefer to pre-arrange how tasks flow between agents using workflows.
Autogen’s team saw this too. In a recent version, they released GraphFlow— their workflow coding framework.
Compared to other workflow frameworks, GraphFlow has two special features:
It can filter messages going into a node. Only the messages the LLM needs to know are kept. That reduces hallucination.

It can group edges going into a node. You can set the node to run after all edges finish or just after some edges finish. That lets you build complex branches or loops.
In today’s application, we need both features. When code fails, the reviewer sends feedback to the coder. When code passes, the writer only reads the correct code, no noise from wrong code.
In the end, we'll have a multi-agent app with a chat interface, and it can perfectly answer your math questions:
Let’s begin.
Message Filtering and Edge Grouping
All agents are ready. Now we just need to focus on building the GraphFlow.
Here is a diagram of what the final workflow should look like:

You can see a loop from coder to reviewer. The reviewer keeps checking the code and uses two keywords to decide the next step.
The loop may run many rounds and create many messages. But the reviewer only needs the latest Python code and the result. So we need a MessageFilterAgent to filter messages:
filtered_reviewer = MessageFilterAgent(
    "reviewer",
    wrapped_agent=reviewer,
    filter=MessageFilterConfig(
        per_source=[
            PerSourceFilter(source="user", position="first", count=1),
            PerSourceFilter(source="thinker", position="first", count=1),
            PerSourceFilter(source="coder", position="last", count=1),
            PerSourceFilter(source="exe_agent", position="last", count=1),
        ]
    )
)
This agent wraps the reviewer and filters messages going into it.
Messages from user and thinker take the first one — they are not in the loop so the earliest message is fine.
Messages from coder and exe_agent take the latest one — as the loop runs they create many messages but only the last one matters.
The writer agent also needs a MessageFilterAgent. It needs the final correct code and result to write the answer:
filtered_writer = MessageFilterAgent(
    "writer",
    wrapped_agent=writer,
    filter=MessageFilterConfig(
        per_source=[
            PerSourceFilter(source="user", position="first", count=1),
            PerSourceFilter(source="coder", position="last", count=1),
            PerSourceFilter(source="exe_agent", position="last", count=1),
        ]
    )
)
After creating both MessageFilterAgents let’s look at another issue:
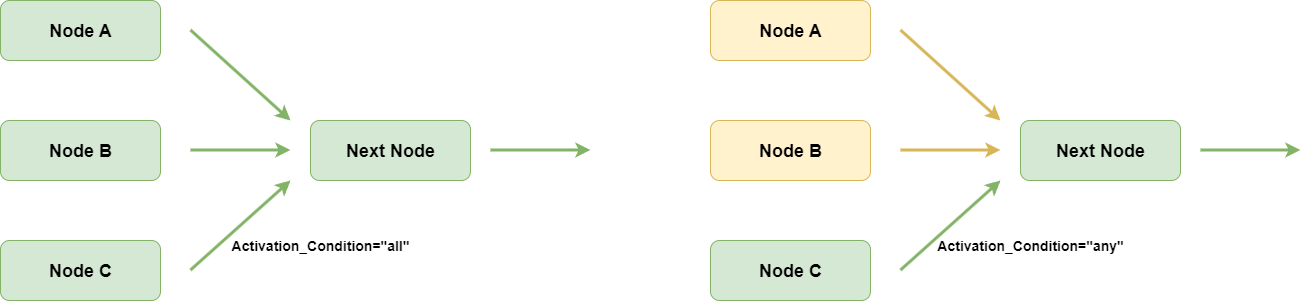
The diagram shows two edges going into the coder node. Should the coder wait for both edges to finish or just one?
You might say of course just one. We know that but the code does not.
Also different graph-based Workflow frameworks handle multi-edge nodes differently. For example, LlamaIndex Workflow runs when any edge arrives. But Autogen Graphflow by default waits for all edges to finish.
So in the latest Autogen version, GraphFlow added a new feature called activation_group. This groups edges going into a node. With activation_condition, you can set if all edges must finish or just one.
In today’s project, we put both edges into the same group and set activation_condition to any — meaning run when any edge arrives.
Start Coding the Workflow
We know all agents. We know how to build the GraphFlow. Now coding the workflow is easy.
Since the workflow has a loop, we need a guardrail to stop it from running forever. I use MaxMessageTermination to stop when the message count hits a limit.
terminator = MaxMessageTermination(20)Next create a DiGraphBuilder and add nodes. For reviewer and writer, use the filtered versions — filtered_reviewer and filtered_writer.
builder = DiGraphBuilder()
builder.add_node(thinker)
builder.add_node(coder).add_node(exe_agent)
builder.add_node(filtered_reviewer).add_node(filtered_writer)

builder.set_entry_point(thinker)
If your first node is inside a loop, set it as the entry. Here thinker, is not in the loop but I still set it as an entry.
Then add edges between nodes. As we said, set activation_group for the two edges going into coder as gen_code and activation_condition as any.
builder.add_edge(thinker, coder,
                 activation_group="gen_code", activation_condition="any")
builder.add_edge(coder, exe_agent)
builder.add_edge(exe_agent, filtered_reviewer)
builder.add_edge(filtered_reviewer, filtered_writer,
                 condition="COOL")
builder.add_edge(filtered_reviewer, coder,
                 condition="REJECT",
                 activation_group="gen_code", activation_condition="any")
Set different keywords as conditions for edges from filtered_reviewer, to different nodes based on code review results.
Finally, put all parameters together and initialize the GraphFlow instance:
graph = builder.build()
self._flow = GraphFlow(builder.get_participants(), graph=graph,
                       termination_condition=terminator)
To hide details and make it easy for users to call this workflow, we can wrap the code in a SuperTeacherFlow Class. To work with Autogen Console, we also add run and run_stream methods:
class SuperTeacherFlow:
    def __init__(self):
        self._build_workflow()

    async def run(
        self,
        *,
        task: str | BaseChatMessage | Sequence[BaseChatMessage] | None = None,
        cancellation_token: CancellationToken | None = None,
        output_task_messages: bool = True,
    ) -> TaskResult:
        result: TaskResult | None = None
        async for message in self.run_stream(
            task=task,
            cancellation_token=cancellation_token,
            output_task_messages=output_task_messages,
        ):
            if isinstance(message, TaskResult):
                result = message
        if result is not None:
            return result
        raise AssertionError("The stream should have returned the final result.")

    async def run_stream(
        self,
            *,
            task: str | BaseChatMessage | Sequence[BaseChatMessage] | None = None,
            cancellation_token: CancellationToken | None = None,
            output_task_messages: bool = True,
    ) -> AsyncGenerator[BaseAgentEvent | BaseChatMessage | TaskResult, None]:
        async for event in self._flow.run_stream(
                task=task,
                cancellation_token=cancellation_token,
                output_task_messages=output_task_messages
        ):
            yield event

    def _build_workflow(self):
        ...
Test the GraphFlow Execution
Before moving on, let’s test the workflow. While testing we can add MLFlow to trace LLM calls:
import mlflow

mlflow.set_experiment("Super Teacher Workflow")
mlflow.autogen.autolog()
From the animation, you can see that the workflow follows the preset nodes. Thinker plans the solution. Coder writes code based on the plan. Reviewer checks the code. Writer outputs the report.
With MLFlow, we can also check if the message filters work:
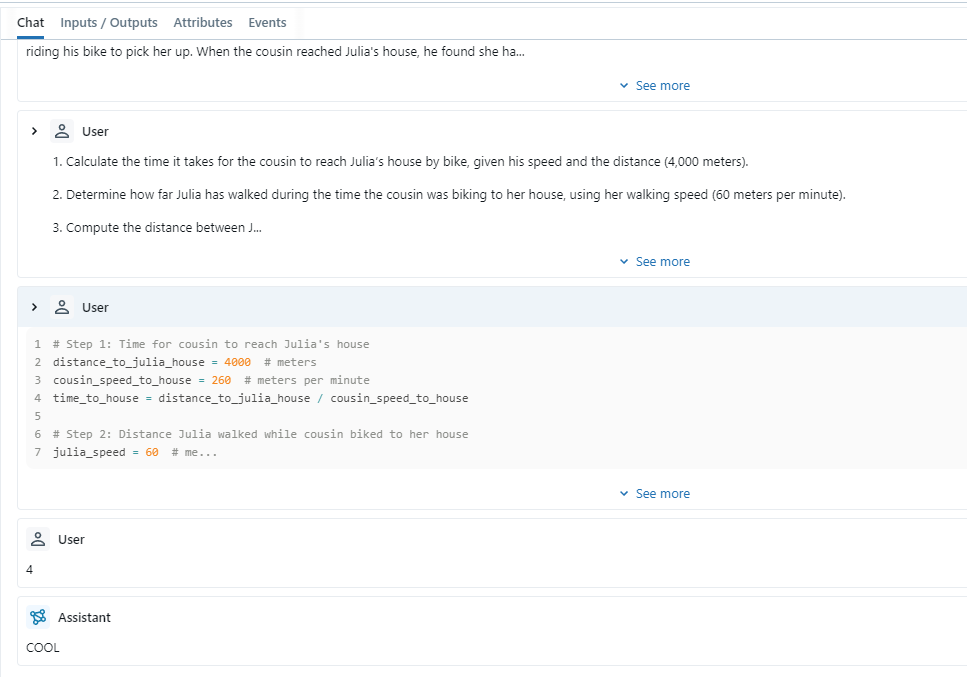
You can see that although coder generated code many times, only the last code and result went to the writer to write the report. Our GraphFlow is built right.
Build a User Interface with Chainlit
Maybe your end user is just a student who needs help with homework and knows no Python. Then you need a GUI.
I chose chainlit to build a simple chat interface.
Before coding, we need to adjust SuperTeacherFlow:
In the earlier code, we had to use async with to manage the docker_executor container start and stop every time.
I could put the context manager inside SuperTeacherFlow’s run_stream method — start container when solving starts, stop when done. But that makes the container start and stop too often, it's a waste of resources.
So I put the container start and stop in two separate methods. Start when the user opens the chat page. Stop when the user closes it:
class SuperTeacherFlow:
    def __init__(self):
        self._build_workflow()

    ...

    @staticmethod
    async def start():
        await docker_executor.start()

    @staticmethod
    async def stop():
        await docker_executor.stop()

    ...
These match Chainlit’s lifecycle events on_chat_start and on_chat_end:
@cl.on_chat_start
async def on_chat_start():
    flow = SuperTeacherFlow()
    await flow.start()
    cl.user_session.set("workflow", flow)

@cl.on_chat_end
async def on_chat_end():
    flow = cl.user_session.get("workflow")
    await flow.stop()
Since users do not need to see internal steps, I hide outputs from internal nodes. I just show mask text to show progress:
@cl.on_message
async def main(message: cl.Message):
    workflow = cl.user_session.get("workflow")
    show_text = "Thinking..."
    msg = cl.Message(content=show_text)
    await msg.send()
    streaming = False

    async for event in workflow.run_stream(task=message.content):
        if isinstance(event, TaskResult):
            continue

        if event.source and event.source in MASK_MAPPING.keys():
            show_text = MASK_MAPPING[event.source]
            msg.content = show_text
            await msg.update()
        if isinstance(event, ModelClientStreamingChunkEvent):
            if not streaming:
                show_text = ""
                msg.content = show_text
                await msg.update()
                streaming = True
            await msg.stream_token(event.content)
    await msg.update()
Now let’s see the final result:

See? Ask any math question. The agent runs code, then answers in natural language with solution steps. Our project is a full success!
Homework
Here are ways to improve our project. I will not implement them here due to space. Your turn to practice.
Exercise One: Add Few Shot Examples to Thinker Node
Even with atomic agents, sometimes hard problems still get wrong answers.
Mistakes happen in two places: wrong Python code — fix by making coder follow thinker’s plan exactly. Or a wrong solution plan from thinker, which needs human fix.
Here is a way to fix thinker’s wrong plan and save the knowledge:
Earlier, the solution plan relied only on the LLM’s own ability. But we use a small model — thinking power is limited. When we find thinker’s plan is wrong, we can write a correct plan and store it with the question in a vector database.
Next time for similar questions, thinker (or a new node) can use Agentic RAG to find the correct plan. Thinker will follow that plan. Accuracy will go up. Here is the process:

Exercise Two: Add OCR and Drawing Ability
Now we type questions by hand. But if your users are students, you need OCR to read questions from textbooks — especially ones with lots of formulas.
In Autogen, you can use MultiModalMessage to send images. But the current version seems to have a bug, it cannot send image URLs or base64 data correctly. So you either fix MultiModalMessage or use OpenAIClient directly.
On the output side, since we help students from elementary to high school, diagrams are more fun than plain text.
Good news — many new drawing models handle text well. I think rendering the solution as a diagram is worth a try.
Lesson Wrap-Up
When LLMs first came out, everyone threw math problems at them and said LLMs are bad at math. Even though new models got better at numbers, they still struggle with hard math.
Then came the agent era. We let LLMs write code, then run the code to solve problems. Now we can solve all kinds of math problems well. If we let LLMs use third-party packages in code, we can solve way more than just numbers.
In this tutorial, I combined Autogen GraphFlow and Qwen3-coder to show you how I built a multi-agent application that uses LLMs to write code for math problems.
This application proves that multiple atomic agents — each focused on one job — can work together to match or beat big LLMs. Less hallucination, better instruction following.
By adding reasoning and reflection agents, we boost the whole app’s performance. Message filters and guardrails keep the workflow running as planned.
This tutorial covered the general process and core ideas of enterprise agent development. I could not cover everything. If you have questions, leave a comment.
I am collecting ideas for agent apps. If you want to build something with LLMs, leave me a note.
Recommended Enterprise AI Courses
Getting the hang of some AI coding tricks is just the beginning. To learn the AI development tech stack more systematically and grow from an "AI enthusiast" to an "AI-driven software engineer," here are some courses I'd recommend to you:
- Dive deeper into AI coding and agent building. Check out Vanderbilt University's Generative AI Software Engineering Specialization on Coursera.
- To build real, production-ready enterprise AI agent apps to kickstart your AI career. The IBM RAG and Agentic AI Certificate is a great fit here.
Both courses are included in Coursera Plus. If you're planning to level up in both AI engineering and architecture this year, the annual subscription is definitely the better deal.
Source Code
Get the source code for this article. Start using it right away and save yourself a ton of trial and error time.