
How I Crushed Advent of Code And Solved Hard Problems Using Autogen Jupyter Executor and Qwen3
A detailed guide on using AI to generate code and solve puzzles automatically and quickly


In today’s tutorial, I will use Autogen’s docker-jupyter-executor runtime with Qwen3’s newest max model to try finishing the Advent of Code challenge quickly. I aim to demonstrate that combining LLM code generation with a stateful Python runtime can effectively solve extremely complex algorithmic problems.
As usual, I will share the full project source code for you to check. You can find it in the reference section.
Course Background
You have probably heard of Advent of Code (AOC). It is a fun programming challenge that claims to help beginners practice a programming language. The puzzles are really hard. Every year, I struggle and only finish the first few days.
I was not happy about that.
This year, there is still one month before the Advent of Code starts, but I have done all the prep work. New monitor, new IDE, new keyboard, and a new agent tool.
Yes, I do not plan to use my brain to solve the problems this year. Like AlphaGo, I want to build an agent. I will let AI read the puzzle, write the code, and get the result all by itself. My job will be making coffee and sitting at my desk waiting.
It worked. I tested with past challenges and started getting stars faster than I had time to read the problems. My cost was only some tokens.
I even allow users to enter Part Two of an AoC problem through multi-turn conversation, so the agent can keep solving.

And it is not just for Advent of Code. This agent can also run data analysis or other tasks you can imagine.
How did this all happen
In today’s tutorial, you will see:
- I will follow the ReAct pattern to build a single-agent app that solves complex challenges by planning sub-steps one at a time.
- Each sub-step depends on the main task and previous results, so the LLM can adjust mistakes anytime.
- Each sub-step uses Python code to solve the puzzle and uses Jupyter as the runtime to get intermediate results.
- The agent relies on the stateful Jupyter kernel, so it can reflect on previous results and adjust the next steps until it finds the final answer. The effect is amazing.
Why this works well
In my last post, we tried building a multi-agent system for math problems. You can read it here:

That system worked well, but not perfectly. It worked by letting a reasoning agent plan all steps at once and then sending them to a coding agent to write Python code.
This caused problems.
For exploratory tasks like reading a file and then deciding what to do based on its content, the system could not handle it.
If the code failed during execution, the whole Python file had to be regenerated to find the error and adjust it. This was not flexible.
Think about how humans handle challenging tasks like data analysis or ML modeling. We write some code, run it, see if the result matches expectations, then decide what to write next. That is why Jupyter is so popular in data science.
So why not use Jupyter as the Python runtime? Of course, we can. That is what we will do today. We will generate a small bit of code each time we run it, then move forward until we reach the goal.
Preparation
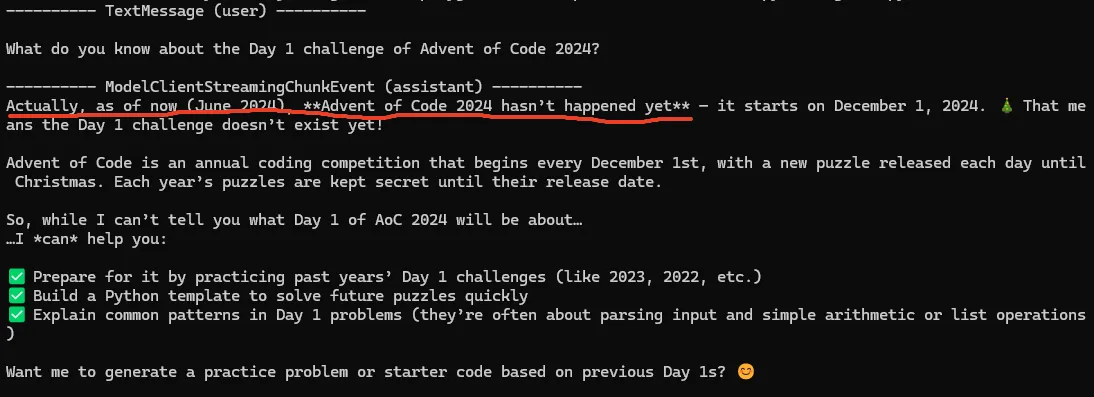
Make sure the LLM doesn't include AOC 2024 data
First, we need to ensure that the LLM we use hasn't been trained on Advent of Code 2024 data. This is the foundation of this project.
Also, I don't plan to give the agent any way to get information from the internet.
Build a Jupyter container
Since we will use Jupyter as the runtime, we need to set it up before the course starts.
I will use a Docker container to isolate Jupyter so that bad LLM code will not break the system.
Dockerfile looks like this:
FROM python:3.13-slim-bookworm

WORKDIR /app

COPY requirements.txt /app/requirements.txt

RUN pip config set global.index-url https://mirrors.aliyun.com/pypi/simple/ && \
    pip install --no-cache-dir jupyter_kernel_gateway ipykernel numpy pandas sympy scipy --upgrade

RUN pip install --no-cache-dir -r requirements.txt --upgrade

EXPOSE 8888

ENV TOKEN="UNSET"
CMD python -m jupyter kernelgateway \
    --KernelGatewayApp.ip=0.0.0.0 \
    --KernelGatewayApp.port=8888 \
    --KernelGatewayApp.auth_token="${TOKEN}" \
    --JupyterApp.answer_yes=true
requirements.txt looks like this:
matplotlib
xlrd
openpyxl
pdfplumber
reportlab
I install rarely changed dependencies and often changed dependencies separately to use Docker layer cache for faster builds.
Autogen uses Docker SDK to control the start and stop of the container, so I did not set up Jupyter auth. This makes the runtime call easier, but it is not safe for production.
Then we build the image and name it jupyter-server for later.
docker build -t jupyter-server .Test connectivity with Autogen
After building the image, we need to test with Autogen to see if running code in Jupyter works. We must install autogen-ext[docker-jupyter-executor] and nbclient.
Do not worry. I already added these to pyproject.toml So you just run pip install --upgrade -e ..
Before starting, we need to initialize a DockerJupyterServer module. This uses Docker SDK to start a container from the Jupyter image. We will use this today.
jupyter_server = DockerJupyterServer(
    custom_image_name="jupyter-server:latest",
    expose_port=8888
)
This way of using the Docker SDK to manage Jupyter images is called the Docker out-of-Docker method. But this method has some problems when used in production or when connecting to a separately deployed Jupyter service. Don’t worry—my latest tutorial has already solved these issues for you:

There are three ways to use Jupyter runtime.
First, extract the Python code generated by the LLM, run it manually through the Jupyter executor, and get the result.
async def main_1() -> None:
    async with jupyter_server:
        async with DockerJupyterCodeExecutor(jupyter_server) as executor:
            code_blocks = [CodeBlock(code="print('hello world!')", language="python")]
            code_result = await executor.execute_code_blocks(code_blocks, cancellation_token=CancellationToken())
            print(code_result)
Note that DockerJupyterCodeExecutor is stateful, so in an async with scope repeated calls reuse previous variables without regenerating them.
Second use PythonCodeExecutionTool to execute code and return results.
async def main_2() -> None:
    async with jupyter_server:
        async with DockerJupyterCodeExecutor(jupyter_server) as executor:
            tool = PythonCodeExecutionTool(executor)
            agent = AssistantAgent("assistant", model_client=model_client, tools=[tool])
            result = await agent.run(task="What is the 10th Fibonacci number? Use Python to calculate it.")
            print(result.messages[-1].content)
This uses the agent’s function call ability. If your agent needs to do many jobs and code execution is just one part, use this.
Third use CodeExecutorAgent to execute code.
async def main_3() -> None:
    async with jupyter_server:
        async with DockerJupyterCodeExecutor(jupyter_server) as executor:
            code_executor_agent = CodeExecutorAgent("code_executor", code_executor=executor)
            task = TextMessage(
                content="""
                ```python
                a = 3
                ```
                """,
                source="user"
            )
            response = await code_executor_agent.on_messages([task], CancellationToken())
            print(response.chat_message)

            task_2 = TextMessage(
                content="""
                ```python
                print(a)
                ```
                """,
                source="user"
            )
            response_2 = await code_executor_agent.on_messages([task_2], CancellationToken())
            print(response_2.chat_message)
In a multi-agent system, if you want a dedicated agent for code execution and reflection, this is good.
For example, in my last tutorial I used CodeExecutorAgent in an Autogen GraphFlow to handle code execution.

Let’s Start
With the Jupyter runtime ready, we can look at today’s project.
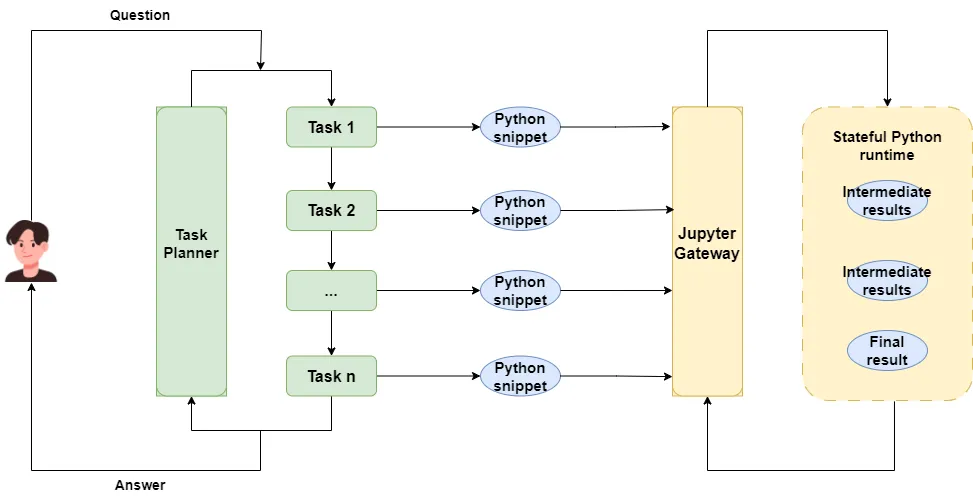
Architecture design
Advent of Code is hard. No LLM can plan the whole logic up front. So we will plan one step, run the code, see the result, then plan the next.
So the loop becomes think, act, observe, think again.
Sounds familiar. Yes, this is the famous ReAct agent design.
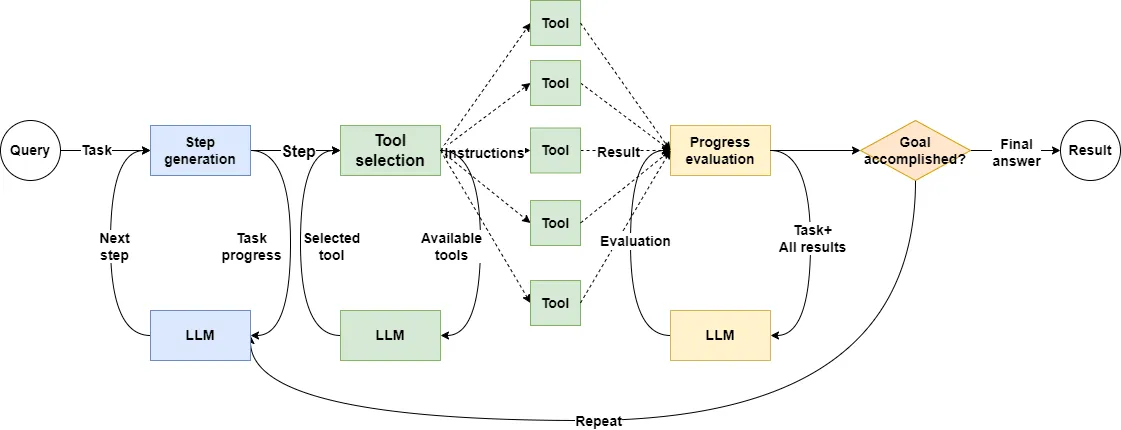
Since ReAct only needs one agent, we will build a single-agent app. The agent will use the user request and the previous result to plan the current step, then write a Python snippet to get the intermediate result.
With a single agent app, it fits to use PythonCodeExecutorTool for running code.
Unlike traditional generate and run code, here we plan one step and get only an intermediate result.
In this case direct Python runtime does not work well. The best way is to send code to a Jupyter kernel, which saves variables and results.
Our single-agent app architecture looks like this:
Write agent code
With goals and design set, it is coding time.
Using Docker means we need to manage context and container lifecycle. I do not want the caller to start or stop Docker each time. Code execution is the agent’s duty, not the caller’s.
I also want to keep the Autogen AssistantAgent API so the agent stays general. So I will wrap its init and call it as a new Agent.
The agent and Jupyter runtime must allow generated code to read files. So I will mount a folder in the Docker container and put user-uploaded files in it.
class AOCAssistant:
    ...

    @staticmethod
    def _copy_file(
        file_name: str | None = None,
        file_path: Path | str | None = None,
    ) -> Path | str | None:
        if file_path is None:
            return None

        if file_name is None:
            file_name = Path(file_path).name
        dst_path = BINDING_DIR / file_name
        shutil.copy2(file_path, dst_path)
        return file_name
The Agent will manage DockerJupyterServer and DockerJupyterCodeExecutor lifecycle.
class AOCAssistant:
    ...
    async def start(self):
        await self._executor.start()

    async def stop(self):
        await self._model_client.close()
        await self._executor.stop()
        await self._jupyter_server.stop()

    async def __aenter__(self) -> "AOCAssistant":
        await self.start()
        return self

    async def __aexit__(self, exc_type, exc_val, exc_tb):
        await self.stop()

    def _init_jupyter_docker(self) -> None:
        self._jupyter_server = DockerJupyterServer(
            custom_image_name="jupyter-server:latest",
            expose_port=8888,
            bind_dir=BINDING_DIR,
        )
        self._executor = DockerJupyterCodeExecutor(
            jupyter_server=self._jupyter_server,
            timeout=600)
I implemented __aenter__ and __aexit__ , so you can manage resources with async with.
Next, init LLM client and AssistantAgent , bind the CodeExecutor as a tool to the Agent.
class AOCAssistant:
    ...
    def _init_assistant(self) -> None:
        self._model_client = OpenAILikeChatCompletionClient(
            model=self._model_name,
            temperature=0.5,
            top_p=0.85,
        )

        tool = PythonCodeExecutionTool(self._executor)

        self._agent = AssistantAgent(
            'assistant',
            model_client=self._model_client,
            tools=[tool],
            model_client_stream=True,
            system_message=SYS_PROMPT,
            max_tool_iterations=30,
        )
I used the newest Qwen3-max model. Open source qwen3-next-80b-a3b-instruct is also good. I set temperature to 0.5 for some creativity in final results and top_p to 0.85 for serious planning and coding.
I need ReAct style iteration, so I set max_tool_iterations in AssistantAgent. In Autogen, this lets the agent iterate based on tool_calls. It stops when it hits the max.
Finally, to keep our custom Agent API the same as Autogen AssistantAgent I implemented run and run_stream.
class AOCAssistant:
    ...
    async def run(
            self,
            *,
            task: str | BaseChatMessage | Sequence[BaseChatMessage] | None = None,
            cancellation_token: CancellationToken | None = None,
            file_name: str | None = None,
            file_path: Path | str | None = None,
    ) -> TaskResult:
        async for message in self.run_stream(
            task=task,
            cancellation_token=cancellation_token,
            file_name=file_name,
            file_path=file_path,
        ):
            if isinstance(message, TaskResult):
                return message
        raise ValueError("No task result output.")

    async def run_stream(
            self,
            *,
            task: str | BaseChatMessage | Sequence[BaseChatMessage] | None = None,
            cancellation_token: CancellationToken | None = None,
            file_name: str | None = None,
            file_path: Path | str | None = None,
    ) -> AsyncGenerator[BaseAgentEvent | BaseChatMessage | TaskResult, None]:
        file_name = self._copy_file(file_name, file_path)

        input_messages = []
        if isinstance(task, str):
            input_messages.append(TextMessage(
                source="user",
                content=task
            ))
        elif isinstance(task, BaseChatMessage):
            input_messages.append(task)

        if file_name is not None:
            input_messages.append(TextMessage(
                source="user",
                content=f"The input file is `{file_name}`"
            ))

        async for message in self._agent.run_stream(
                task=input_messages,
                cancellation_token=cancellation_token):
            yield message
run just calls run_stream and returns TaskResult.
run_stream copies user files to the mounted directory, rebuilds input_messages adds file info, then calls AssistantAgent.run_stream to get LLM streaming output.
Write the prompt
This project needs the agent to plan sub-tasks step by step, write correct Python code, iterate based on results, and give a good final output. So the prompt will be detailed.
I will give you the whole prompt and explain why it is written that way.
I will also show you a trick to debug prompts better.
Here is the prompt first:
💡 Unlock Full Access for Free!
Subscribe now to read this article and get instant access to all exclusive member content + join our data science community discussions.