Using LLamaIndex Workflow to Implement an Agent Handoff Feature Like OpenAI Swarm
Example: a customer service chatbot project


Happy Lunar New Year, my friends!
In the last article, I introduced the Workflow framework of LlamaIndex.

Today, I will show you how to use LlamaIndex Workflow to implement a multi-agent orchestration feature similar to OpenAI Swarm, using a customer service chatbot project as an example.
Introduction
Remember the Swarm framework released by OpenAI not long ago? Its biggest feature is agents and handoffs.
The agents are straightforward: they use a set of specific commands and tools to get tasks done. It's like putting a LLM function call into a neat package.
And handoffs are different. They allow an agent to pass the work to another agent seamlessly based on the context of the current conversation, making agents work together without any hiccups.
Why this is important
Let's look at a diagram explaining the whole process of a ReactAgent.
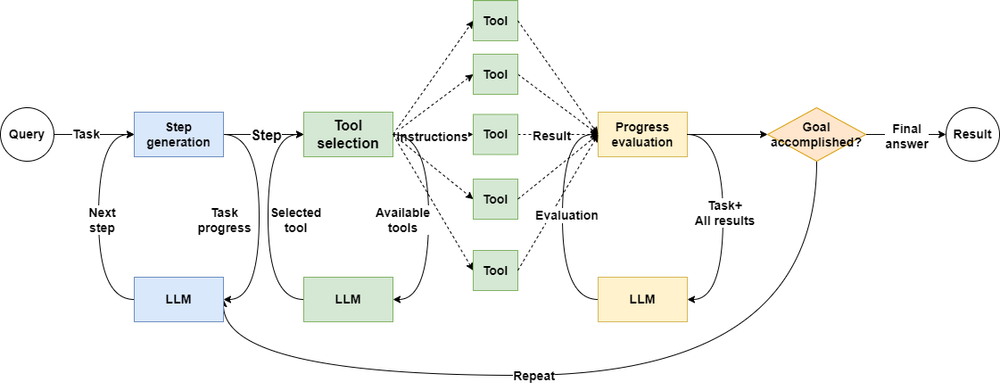
Just a simple agent call, like one, two, three, needs at least three accesses to LLM to complete.
Traditional agent applications are like this, keeping conversation context and user state, and the agent call chain is usually fixed. For each user request, agents have to call LLM multiple times to check the state, and honestly, some calls are unnecessary.
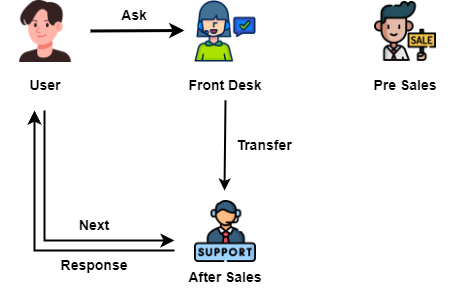
Here's an example: imagine we have an e-commerce website, and we need a customer service team to answer users' questions.

In a chain agent application, every question from a user goes to the front desk, and then the front desk asks for the pre-sales service. If they can't answer, the front desk asks for after-sales service, and then the front desk reorganizes the answers from the backend and replies to the customer.
Isn't that silly? Look at all the unnecessary delays and call costs it causes!
How Swarm does it
Swarm uses a handoff approach that fits the real world better. Let me use that customer service example again:
Imagine a store called Swarm. When a customer asks the front desk a question, the front desk figures out what kind of question it is (pre-sale or after-sale) and passes the customer to the corresponding service. Then, the customer talks to that service directly.
Sounds reasonable, right? So why don't we just use Swarm?
Why not just use Swarm
Because Swarm is still just an experimental framework. According to the official statement:
Swarm is currently an experimental sample framework intended to explore ergonomic interfaces for multi-agent systems. It is not intended to be used in production and therefore has no official support. (This also means we will not be reviewing PRs or issues!)
So, we can't use Swarm directly in production systems.
But what we need is the agent handoff capability, right? Since that's the case, why not build a similar framework yourself?
Today's article is written for this purpose. We will develop a project using a customer service system as an example, which will use Workflow to implement agent orchestration and handoff capabilities. Let's get started.
Project in Practice: A Customer Service Chatbot with Agent Handoff Capability
This project is quite complex. To help you understand my implementation, I have put the entire project code at the end of the article. You can freely read and modify it without my permission.
Step one, set up an interactive interface
Whether you use an agent or not, you always need to adjust your prompts and code logic. At this point, a what-you-see-is-what-you-get chat UI becomes very important.
In this section, I'll use chainlit to quickly implement a super cool web-based chat window.
Chainlit is a Python library built on Streamlit. This means you don't need any frontend skills to quickly build a Chatbot prototype. (Hooray)
Let's get moving.
First, we create a .env file in the project's root directory, which stores important environmental variables like OPENAI_API_KEY and OPENAI_BASE_URL. Later, I will use dotenv to read it.
This is important because by using the .env file, you can strip the API_KEY from your code, then you can freely publish your code.
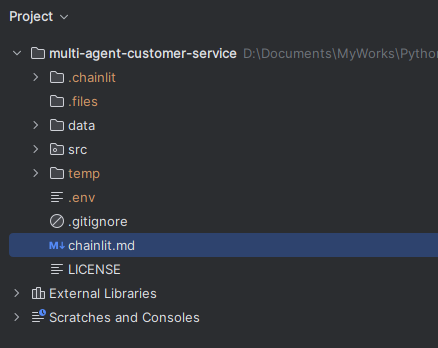
Next, we need to set up a simple project scaffold. Our project will contain two folders: src and data. Our Python source code files will be placed in the src folder, while text source files for RAG use will be placed in the data folder.
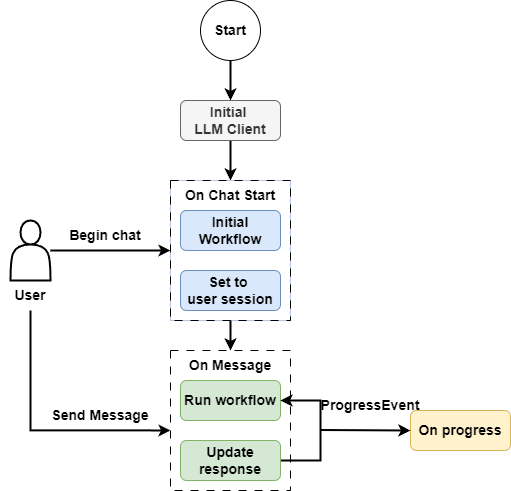
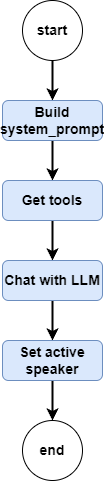
In the src directory, first create an app.py file, which will act as the view to launch the chainlit interface. This file consists of three parts:
- Code to prepare the Workflow program.
- Code to respond to the user lifecycle, outputting intermediate processes.
- Actual code to call the Workflow agent and conduct the conversation.
The code flowchart is shown below:
As a production-ready system, we often need to connect to the enterprise-private deployment of large model ports. How to connect to a private large model can be referred to in this article.
To make our customer service less rigid, we can set the temperature a bit higher. Here is the code for initializing the system environment, I will talk about the implementation of CustomerService later:
llm = OpenAILike(
    model="qwen-max-latest",
    is_chat_model=True,
    is_function_calling_model=True,
    temperature=0.35
)
Settings.llm = llm
Imagine, when the next customer service takes over to answer your question, what will she do first? Right, she needs to check the conversation history first.
So we need to create a unique, conversation-context and user-state-preserving workflow for each distinguished user in the user session:
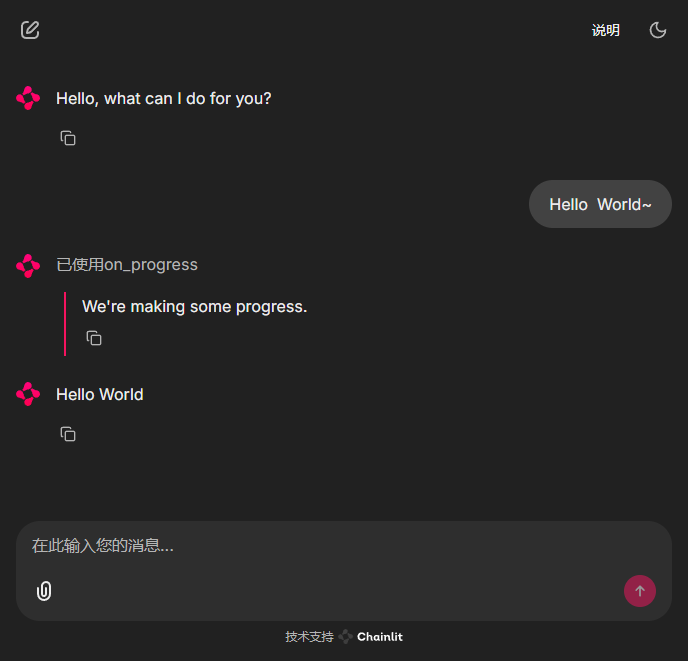
GREETINGS = "Hello, what can I do for you?"


def ready_my_workflow() -> CustomerService:
    memory = ChatMemoryBuffer(
        llm=llm,
        token_limit=5000
    )

    agent = CustomerService(
        memory=memory,
        timeout=None,
        user_state=initialize_user_state()
    )
    return agent


def initialize_user_state() -> dict[str, str | None]:
    return {
        "name": None
    }


@cl.on_chat_start
async def start():
    workflow = ready_my_workflow()
    cl.user_session.set("workflow", workflow)

    await cl.Message(
        author="assistant", content=GREETINGS
    ).send()
At the same time, I will also use chainlit's cl.step decorator to implement a simple logging method, which can help us output some process logs on the page, letting users know where we are now:
@cl.step(type="run", show_input=False)
async def on_progress(message: str):
    return message
Then there is the main method, which is called every round of conversation.
@cl.on_message
async def main(message: cl.Message):
    workflow: CustomerService = cl.user_session.get("workflow")
    context = cl.user_session.get("context")
    msg = cl.Message(content="", author="assistant")
    user_msg = message.content
    handler = workflow.run(
        msg=user_msg,
        ctx=context
    )
    async for event in handler.stream_events():
        if isinstance(event, ProgressEvent):
            await on_progress(event.msg)

    await msg.send()
    result = await handler
    msg.content = result
    await msg.update()
    cl.user_session.set("context", handler.ctx)
In this method, we first get the user-inputted dialogue, then call the workflow's run method to start the agent routing, while iterating through the events in the workflow pipeline and calling on_progress to output to the page. Finally, we output the result of the dialogue on the page and update the Context.
To match the construction of the chainlit interface, we can first write a simple workflow:
class CustomerService(Workflow):
    def __init__(
            self,
            llm: OpenAILike | None = None,
            memory: ChatMemoryBuffer = None,
            user_state: dict[str, str | None] = None,
            *args,
            **kwargs
    ):
        self.llm = llm or Settings.llm
        self.memory = memory or ChatMemoryBuffer()
        self.user_state = user_state
        super().__init__(*args, **kwargs)

    @step
    async def start(self, ctx: Context, ev: StartEvent) -> StopEvent:
        ctx.write_event_to_stream(ProgressEvent(msg="We're making some progress."))
        return StopEvent(result="Hello World")
Tada, our interactive interface is out:
Next, we can start preparing the ingredients for today, and text source files for RAG use.
Step two, generate text files
Since this project is about simulating a customer support team for an online drone e-commerce website, I plan to set the background to an online unmanned aerial vehicle e-commerce site.
I need two files: one file to introduce the drones being sold in the store and their details. Another file contains common FAQs about drone use and after-sales terms.
To avoid business and data licensing issues, I plan to use LLM to generate the text I want. I specifically instructed LLM not to include any brands or real product information.
Here is a screenshot of my file generation:
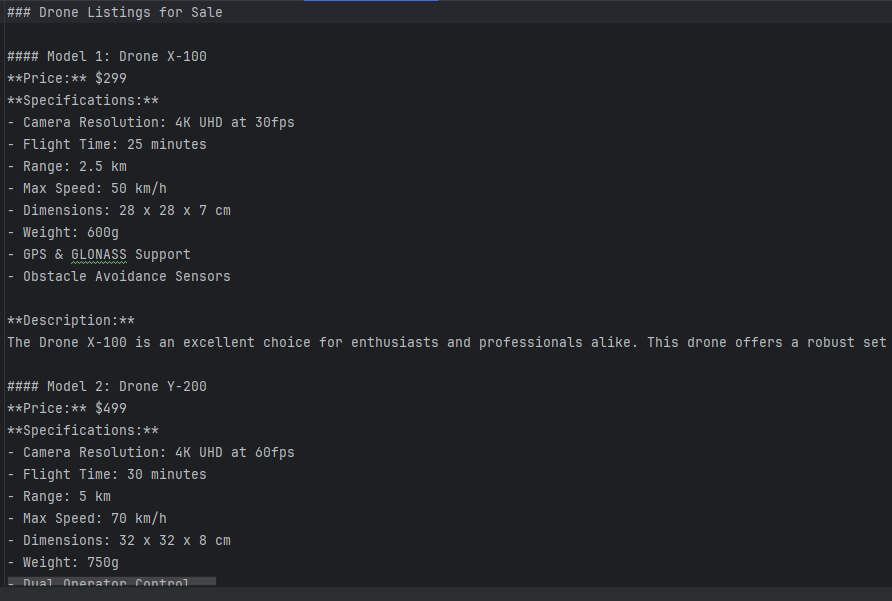
You can take my prompt as a reference:
SKUS_TEMPLATE_EN = """
    You are the owner of an online drone store, please generate a description in English of all the drones for sale.
    Include the drone model number, selling price, detailed specifications, and a detailed description in more than 400 words.
    Do not include brand names.
    No less than 20 types of drones, ranging from consumer to industrial use.
"""
TERMS_TEMPLATE_EN = """
You are the head of a brand's back office department, and you are asked to generate a standardized response to after-sales FAQs in English that is greater than 25,000 words.
The text should include common usage questions, as well as questions related to returns and repairs after the sale.
This text will be used as a reference for the customer service team when answering customer questions about after-sales issues.
Only the body text is generated, no preamble or explanation is added.
"""Step three, handle indexing and retrieve privatized data
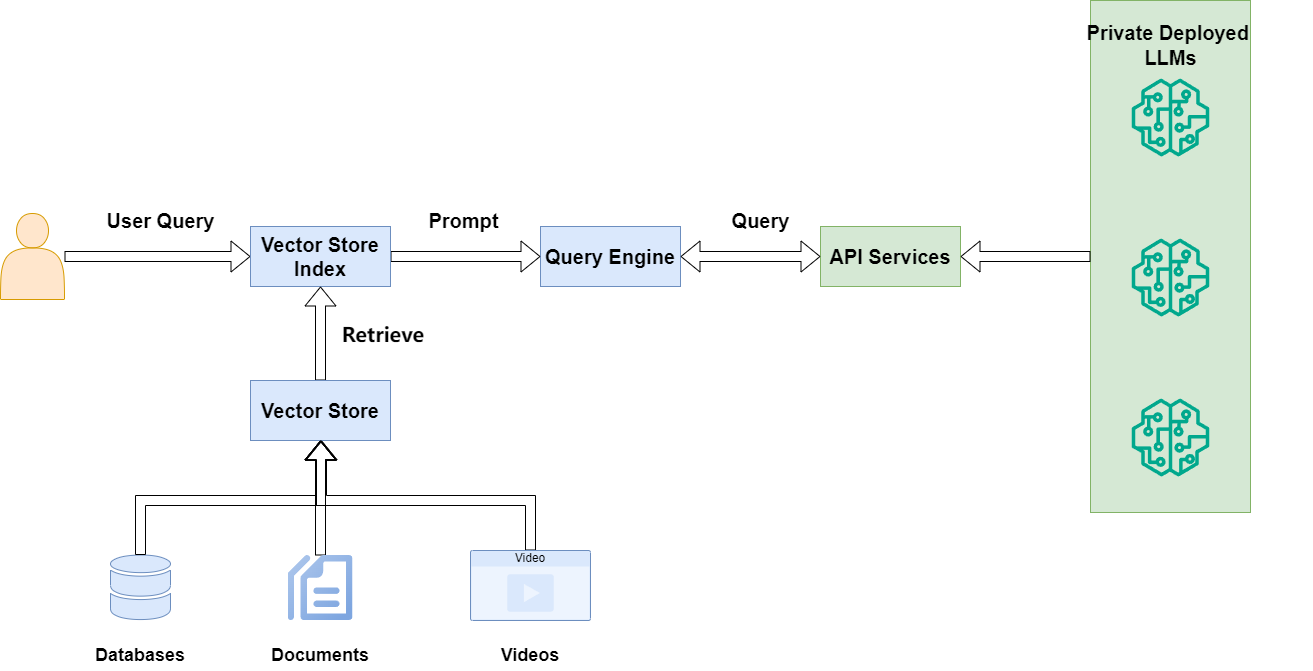
The foundation LLM does not contain corporate internal data. For enterprise applications, it is inevitable to use RAG to allow the LLM to access corporate privatized data.
Our drone store is no exception. Before letting the agent staff start work, we need to provide them with some tools to access the product catalog and after-sales policy.
LlamaIndex provides many indexes suitable for different occasions. If used in a real system, I would prefer to use KnowledgeGraphIndex for product information text.
However, to make the sample project easy to understand, I still choose to use chromadb and VectorStoreIndex:
def get_index(collection_name: str,
              files: list[str]) -> VectorStoreIndex:
    chroma_client = chromadb.PersistentClient(path="temp/.chroma")

    collection = chroma_client.get_or_create_collection(collection_name)
    vector_store = ChromaVectorStore(chroma_collection=collection)
    storage_context = StorageContext.from_defaults(vector_store=vector_store)

    ready = collection.count()
    if ready > 0:
        print("File already loaded")
        index = VectorStoreIndex.from_vector_store(vector_store=vector_store)
    else:
        print("File not loaded.")
        docs = SimpleDirectoryReader(input_files=files).load_data()
        index = VectorStoreIndex.from_documents(
            docs, storage_context=storage_context, embed_model=embed_model,
            transformer=[SentenceSplitter(chunk_size=512, chunk_overlap=20)]
        )

    return index


INDEXES = {
    "SKUS": get_index("skus_docs", ["data/skus_en.txt"]),
    "TERMS": get_index("terms_docs", ["data/terms_en.txt"])
}
The running flowchart of this code is as follows:
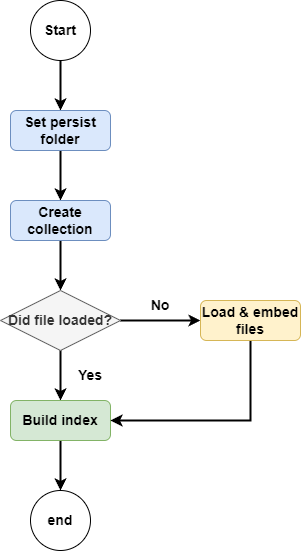
If vector data already exists, return the index directly. If the data has not been loaded yet, first load the data into the vector store, then return the index.
Then we add a tool method to help the agent get the corresponding retriever:
async def query_docs(
        index: VectorStoreIndex, query: str,
        similarity_top_k: int = 1
) -> str:
    retriever = index.as_retriever(similarity_top_k=similarity_top_k)
    nodes = await retriever.aretrieve(query)
    result = ""
    for node in nodes:
        result += node.get_content() + "\n\n"
    return result
Step four, hire a few agents
Since we are building a smart customer service project, it is necessary to hire a few customer service agents.
We also need to set up a data class for agents, which needs to include instructions and a set of tools, just like Swarm agents. Here we use AgentConfig to constrain, which is inherited from Pydantic's BaseModel.
class AgentConfig(BaseModel):
    """
    Detailed configuration for an agent
    """
    model_config = ConfigDict(arbitrary_types_allowed=True)
    name: str = Field(description="agent name")
    description: str = Field(
        description="agent description, which describes what the agent does"
    )
    system_prompt: str | None = None
    tools: list[BaseTool] | None = Field(
        description="function tools available for this agent"
    )
We need to hire a lobby manager agent, this agent needs to mark which agent the user will be handed over to.
class TransferToAgent(BaseModel):
    """Used to explain which agent to transfer to next."""
    agent_name: str = Field(description="The name of the agent to transfer to.")
We also need to design a request transfer agent, which uses this agent to notify the workflow when a certain customer service cannot answer the user's question.
class RequestTransfer(BaseModel):
    """
    Used to indicate that you don't have the necessary permission to complete the user's request,
    or that you've already completed the user's request and want to transfer to another agent.
    """
    pass
Then we need to prepare a few tools for the agents to use:
First is a login tool, this tool is only used to register the user's name. If you need to handle the user's login action, you can implement the details in this method. I use a closure to return a tool list.
def get_authentication_tools() -> list[BaseTool]:
    async def login(ctx: Context, username: str) -> bool:
        """When the user provides their name, you can use this method to update their status.。
        :param username The user's title or name.
        """
        if not username:
            return False

        user_state = await ctx.get("user_state", None)
        user_state["name"] = username.strip()
        await ctx.set("user_state", user_state)
        return True

    return [FunctionToolWithContext.from_defaults(async_fn=login)]
Here is a detail, since the tool needs to handle the user state saved in the workflow Context, we need to access the ctx object. But when the tool is called by the agent, the agent cannot sense the ctx object, so we need to let the agent ignore it.
Here I modified the behavior of the FunctionTool module of LlamaIndex and rewrote the FunctionToolWithContext module. To save time, I referred to an example on the official website, you can find it here. Of course, you can also find the source code at the end of the project code in the article.
We also need tools to get the product catalog and after-sales terms, these two tools are direct calls to the retriever, quite simple.
def get_pre_sales_tools() -> list[BaseTool]:
    async def skus_info_retrieve(ctx: Context, query: str) -> str:
        """
        When the user asks about a product, you can use this tool to look it up.
        :param query: The user's request.
        :return: The information found.
        """
        sku_info = await query_docs(INDEXES["SKUS"], query)
        return sku_info

    return [FunctionToolWithContext.from_defaults(async_fn=skus_info_retrieve)]


def get_after_sales_tools() -> list[BaseTool]:
    async def terms_info_retrieve(ctx: Context, query: str) -> str:
        """
        When the user asks about how to use a product, or about after-sales and repair options, you can use this tool to look it up.
        :param query: The user's request.
        :return: The information found.
        """
        terms_info = await query_docs(INDEXES["TERMS"], query)
        return terms_info
    return [FunctionToolWithContext.from_defaults(async_fn=terms_info_retrieve)]
To sum up, we need three professional customer service agents:
- The first one is the front desk, used to register the user's visit.
- The second one is the pre-sales service, used to recommend various products to users.
- The third one is the after-sales service, used to answer various usage questions and after-sales terms.
def _get_agent_configs() -> list[AgentConfig]:
    return [
        AgentConfig(
            name="Authentication Agent",
            description="Record the user's name. If there's no name, you need to ask this from the customer.",
            system_prompt="""
            You are a front desk customer service agent for registration.
            If the user hasn't provided their name, you need to ask them.
            When the user has other requests, transfer the user's request.
            """,
            tools=get_authentication_tools()
        ),
        AgentConfig(
            name="Pre Sales Agent",
            description="When the user asks about product information, you need to consult this customer service agent.",
            system_prompt="""
            You are a customer service agent answering pre-sales questions for customers.
            You will respond to users' inquiries based on the context of the conversation.

            When the context is not enough, you will use tools to supplement the information.
            You can only handle user inquiries related to product pre-sales.
            Please use the RequestTransfer tool to transfer other user requests.
            """,
            tools=get_pre_sales_tools()
        ),
        AgentConfig(
            name="After Sales Agent",
            description="When the user asks about after-sales information, you need to consult this customer service agent.",
            system_prompt="""
            You are a customer service agent answering after-sales questions for customers, including how to use the product, return and exchange policies, and repair solutions.
            You respond to users' inquiries based on the context of the conversation.
            When the context is not enough, you will use tools to supplement the information.
            You can only handle user inquiries related to product after-sales.
            Please use the RequestTransfer tool to transfer other user requests.
            """,
            tools=get_after_sales_tools()
        )
    ]
According to the needs of the workflow, we also need to write two methods to register agents to the workflow.
def get_agent_config_pair() -> dict[str, AgentConfig]:
    agent_configs = _get_agent_configs()
    return {agent.name: agent for agent in agent_configs}


def get_agent_configs_str() -> str:
    agent_configs = _get_agent_configs()
    pair_list = [f"{agent.name}: {agent.description}" for agent in agent_configs]
    return "\n".join(pair_list)
Finally, we also need a workflow system_prompt for orchestration, which will contain all agent information and user status, and hand over the user to the correct customer service agent when needed.
This prompt will be used directly by the workflow, no separate agent is needed, so just put the prompt here:
ORCHESTRATION_PROMPT = """
    You are a customer service manager for a drone store.
    Based on the user's current status, latest request, and the available customer service agents, you help the user decide which agent to consult next.

    You don't focus on the dependencies between agents; the agents will handle those themselves.
    If the user asks about something unrelated to drones, you should politely and briefly decline to answer.

    Here is the list of available customer service agents:
    {agent_configs_str}

    Here is the user's current status:
    {user_state_str}
"""
Step five, build the core workflow
After so much preparation, we can finally get to the main course, and I'm sure everyone is eager to get started haha.
Since the workflow is an event-driven framework, we need to define several events like before:
class OrchestrationEvent(Event):
    query: str


class ActiveSpeakerEvent(Event):
    query: str


class ToolCallEvent(Event):
    tool_call: ToolSelection
    tools: list[BaseTool]


class ToolCallResultEvent(Event):
    chat_message: ChatMessage


class ProgressEvent(Event):
msg: strOrchestrationEventto indicate that the workflow needs to transfer agents.- After the agent transfer is completed,
ActiveSpeakerEventwill tell the workflow to use the new agent to answer the user. - If the agent needs to make a Function call,
ToolCallEventwill be thrown to execute concurrently. - The results of concurrent execution will be thrown out with
ToolCallResultEvent, and summarized into the final result. - Finally, we also need a
ProgressEventto stream the intermediate steps, making it easy for users to know where we are now. To avoid too much information interference, we only output the information of agent transfer here.
After defining various events, we need to start writing the workflow. The workflow this time is a bit complex, so to make it easier for everyone to understand, I still drew a flowchart:
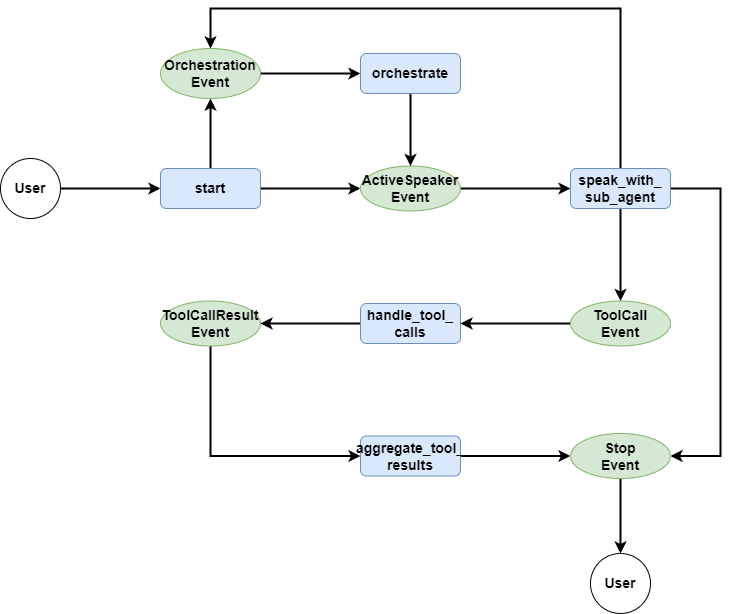
First, let's look at the start method. The start method is relatively simple, as the entry method for user dialogue, it is responsible for storing the user's message in ChatMemory, and then judging whether there is an available agent currently, if there is, it throws an ActiveSpeakerEvent, entering the next step, if not, it throws an OrchestrationEvent, entering the agent orchestration.
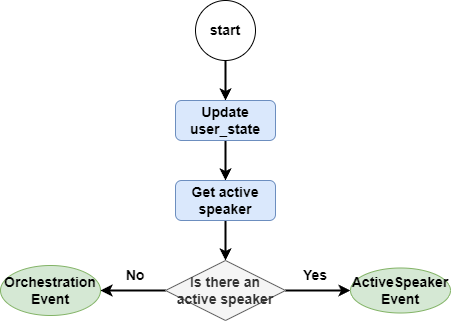
class CustomerService(Workflow):
    ...

    @step
    async def start(
            self, ctx: Context, ev: StartEvent
    ) -> ActiveSpeakerEvent | OrchestrationEvent:
        self.memory.put(ChatMessage(
            role="user",
            content=ev.msg
        ))
        user_state = await ctx.get("user_state", None)
        if not user_state:
            await ctx.set("user_state", self.user_state)

        user_msg = ev.msg
        active_speaker = await ctx.get("active_speaker", default=None)

        if active_speaker:
            return ActiveSpeakerEvent(query=user_msg)
        else:
            return OrchestrationEvent(query=user_msg)
From shallow to deep, let's look at how the agent orchestration orchestrate method works:
This method first takes the currently available agent and user state, and updates our ORCHESTRATION_PROMPT written in agents.py, thus getting the complete system_prompt.
Then we use TransferToAgent, system_prompt, and chat_history all to LLM, letting LLM judge which agent to hand over to next.
class CustomerService(Workflow):
    ...

    @step
    async def orchestrate(
            self, ctx: Context, ev: OrchestrationEvent
    ) -> ActiveSpeakerEvent | StopEvent:
        chat_history = self.memory.get()
        user_state_str = await self._get_user_state_str(ctx)
        system_prompt = ORCHESTRATION_PROMPT.format(
            agent_configs_str=get_agent_configs_str(),
            user_state_str=user_state_str
        )
        messages = [ChatMessage(role="system", content=system_prompt)] + chat_history
        tools = [get_function_tool(TransferToAgent)]
        event, tool_calls, _ = await self.achat_to_tool_calls(ctx, tools, messages)
        if event is not None:
            return event
        tool_call = tool_calls[0]
        selected_agent = tool_call.tool_kwargs["agent_name"]
        await ctx.set("active_speaker", selected_agent)
        ctx.write_event_to_stream(
            ProgressEvent(msg=f"In step orchestrate:\nTransfer to agent: {selected_agent}")
        )
        return ActiveSpeakerEvent(query=ev.query)
After getting the latest agent, we update the context and throw an ActiveSpeakerEvent.
We also need to define achat_to_tool_calls and _get_user_state_str as these two tool methods. achat_to_tool_calls method is responsible for getting the currently needed tools from LLM. _get_user_state_str is used to convert the user state into a string.
class CustomerService(Workflow):
    ...

    async def achat_to_tool_calls(self,
                              ctx: Context,
                              tools: list[FunctionTool],
                              chat_history: list[ChatMessage]
    ) -> tuple[StopEvent | None, list[ToolSelection], ChatResponse]:
    response = await self.llm.achat_with_tools(tools, chat_history=chat_history)
    tool_calls: list[ToolSelection] = self.llm.get_tool_calls_from_response(
        response=response, error_on_no_tool_call=False
    )
    stop_event = None
    if len(tool_calls) == 0:
        await self.memory.aput(response.message)
        stop_event = StopEvent(
            result=response.message.content
        )
    return stop_event, tool_calls, response

    @staticmethod
    async def _get_user_state_str(ctx: Context) -> str:
        user_state = await ctx.get("user_state", None)
        user_state_list = [f"{k}: {v}" for k, v in user_state.items()]
        return "\n".join(user_state_list)
After studying the Orchestrate branch, let's see how the ActiveSpeaker branch works, which is the speak_with_sub_agent method:
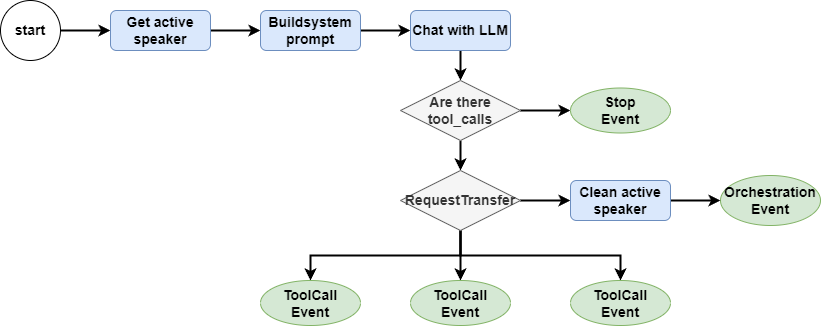
This method first gets the current service-providing agent, as well as chat_history and user_state.
Then use the current agent's sys_prompt and tools, as well as chat_history, to let LLM judge which tools to call next.
class CustomerService(Workflow):
    ...

    @step
    async def speak_with_sub_agent(
            self, ctx: Context, ev: ActiveSpeakerEvent
    ) -> OrchestrationEvent | ToolCallEvent | StopEvent:
        active_speaker = await ctx.get("active_speaker", default="")
        agent_config: AgentConfig = get_agent_config_pair()[active_speaker]
        chat_history = self.memory.get()
        user_state_str = await self._get_user_state_str(ctx)

        system_prompt = (
                agent_config.system_prompt.strip()
                + f"\n\n<user state>:\n{user_state_str}"
        )
        llm_input = [ChatMessage(role="system", content=system_prompt)] + chat_history
        tools = [get_function_tool(RequestTransfer)] + agent_config.tools
        event, tool_calls, response = await self.achat_to_tool_calls(ctx, tools, llm_input)

        if event is not None:
            return event
        await ctx.set("num_tool_calls", len(tool_calls))
        for tool_call in tool_calls:
            if tool_call.tool_name == "RequestTransfer":
                await ctx.set("active_speaker", None)
                ctx.write_event_to_stream(
                    ProgressEvent(msg="The agent is requesting a transfer, please hold on...")
                )
                return OrchestrationEvent(query=ev.query)
            else:
                ctx.send_event(
                    ToolCallEvent(tool_call=tool_call, tools=agent_config.tools)
                )
        await self.memory.aput(response.message)
It is important to note that although the sample project is relatively simple, each agent's tools only have one, but in actual projects, there are often multiple tools to be called concurrently. So we need to iterate through tool_calls, throwing ToolCallEvent separately.
At the same time, we also need to consider the situation where the current agent may not be able to handle the user's request, thus calling RequestTransfer, then we need to go back to the orchestrate step and re-select the agent.
Let's look at the handle_tool_calls section, the code in this section looks a lot, but the actual thing to do is very simple, just get the tool to be executed and execute it, so simple that I don't even want to draw a flowchart.
class CustomerService(Workflow):
    ...

    @step(num_workers=4)
    async def handle_tool_calls(
            self, ctx: Context, ev: ToolCallEvent
    ) -> ToolCallResultEvent:
        tool_call = ev.tool_call
        tools_by_name = {tool.metadata.get_name(): tool for tool in ev.tools}
        tool_msg = None
        tool = tools_by_name[tool_call.tool_name]
        additional_kwargs = {
            "tool_call_id": tool_call.tool_id,
            "name": tool.metadata.get_name()
        }
        if not tool:
            tool_msg = ChatMessage(
                role="tool",
                content=f"Tool {tool_call.tool_name} does not exists.",
                additional_kwargs=additional_kwargs
            )
            return ToolCallResultEvent(chat_message=tool_msg)

        try:
            if isinstance(tool, FunctionToolWithContext):
                tool_output = await tool.acall(ctx, **tool_call.tool_kwargs)
            else:
                tool_output = await tool.acall(**tool_call.tool_kwargs)

            tool_msg = ChatMessage(
                role="tool",
                content=tool_output.content,
                additional_kwargs=additional_kwargs
            )
        except Exception as e:
            tool_msg = ChatMessage(
                role="tool",
                content=f"Encountered error in tool call: {e}",
                additional_kwargs=additional_kwargs
            )
        return ToolCallResultEvent(chat_message=tool_msg)
There is a small detail here, I set a parameter num_workers=4 for the step decorator. This is to tell the workflow that the concurrency is only up to 4, to avoid too high concurrency causing downstream system blockage.
Then we come to the last method aggregate_too_results.
class CustomerService(Workflow):
    ...

    @step
    async def aggregate_tool_results(
            self, ctx: Context, ev: ToolCallResultEvent
    ) -> ActiveSpeakerEvent | None:
        num_tool_calls = await ctx.get("num_tool_calls")
        results = ctx.collect_events(ev, [ToolCallResultEvent] * num_tool_calls)
        if not results:
            return None

        for result in results:
            await self.memory.aput(result.chat_message)
        return ActiveSpeakerEvent(query="")
This method is relatively simple, just get all the execution results of tool_calls, then write them into ChatMemory, and finally hand them back to the agent to evaluate the results and answer the user.
Step six, check our hard work
At this point in the plot, our customer service team has been built, let's check if these agents are working hard. Start!
chainlit run src/app.pyNot bad, the front desk agent first asks for my name, simulating the login process, then based on my needs, hands it over to the pre-sales agent:
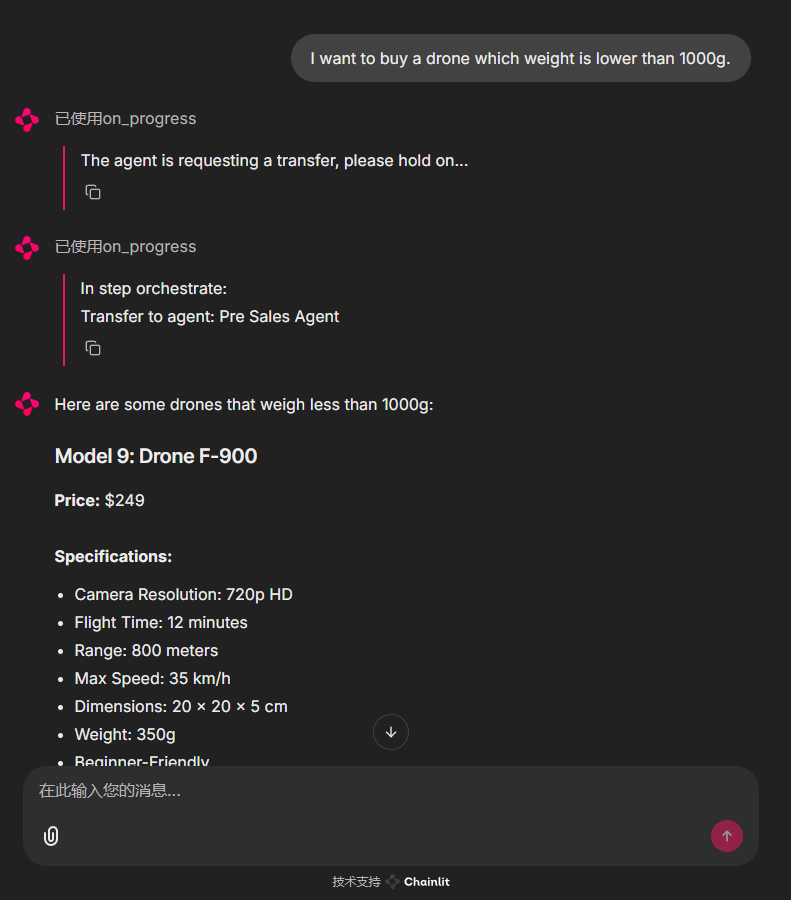
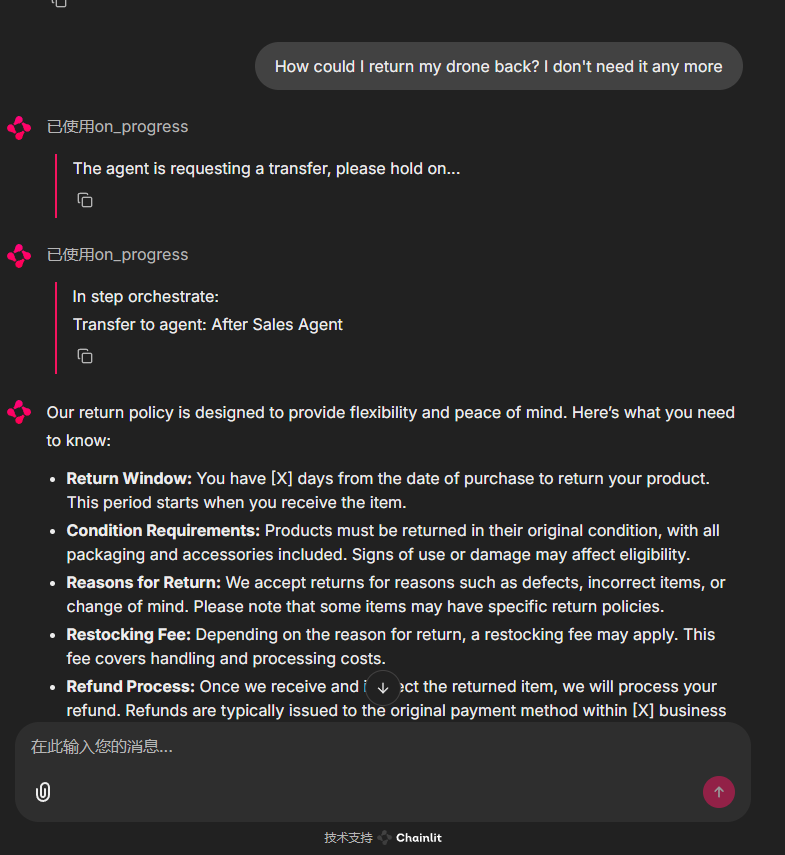
It can also be transferred to the after-sales agent based on my request:
I can even play with them all day!
What's next? The multi-agent orchestration of LlamaIndex AgentWorkflow will bring a more perfect solution:

Conclusion
To summarize today's lesson, in this customer service chatbot project, we successfully simulated the agent handoff capability of OpenAI Swarm using LlamaIndex Workflow, achieving seamless collaboration among multiple agents.
We can see that the agents handoff brings obvious advantages to the project:
- The workflow autonomously decides which agent to use based on the dialogue context, there is no fixed code process, and it is completely decided by LLM.
- Once the workflow decides which agent will serve the user, the user interacts directly with the corresponding agent, without any intermediate steps.
However, there are still some shortcomings in the project:
- The call to the agent is too low-level, causing us to handle the function calling process in the code.
- The modularity of the workflow is not well done, I have also mentioned this in previous articles, which brings some obstacles to team collaboration.
I look forward to gradually solving these problems in the upcoming articles. I welcome your comments and discussions and will reply to everyone as soon as possible.
Mr. Qian's Recommendation:
Designing an event-driven LlamaIndex Workflow is one of the biggest steps you can take. From here, you should think about how to use LlamaIndex to build a production-ready, high-accuracy RAG system.
We recommend checking out the RAG for Generative AI Applications specialization course brought to you by industry experts at IBM.
You'll get hands-on experience with all the key tools and skills you need to build a RAG Workflow, so you can hit the ground running from day one.
If you choose to enroll, I may earn a small commission at zero extra cost to you. I only recommend high-quality resources that genuinely align with the engineering standards of Data Leads Future.