
Keras 3.0 Tutorial: End-to-End Deep Learning Project Guide
Implement an encoder-decoder recurrent network from scratch


Introduction
Even though I started using Pytorch a while ago, I still miss the concise code style of Keras and the good old days when you could implement a neural network model in just a few lines of code.
So, I was thrilled when Keras announced last November that in addition to TensorFlow, it now also supports Pytorch and Jax as backends!
However, things weren't perfect: since Keras 3.0 was released not long ago, the related tutorials and documentation hadn't caught up, and I encountered some troubles during the code migration.
Luckily, after some effort, I can now smoothly use version 3.0 for various end-to-end model developments.
In this article, I'll share some practical experiences with Keras 3.0 to help you avoid some detours. I'll use a typical encoder-decoder recurrent neural network as an example to explain how to complete an end-to-end project from scratch using the subclassing API of Keras 3.0, and discuss details to consider when using Pytorch as the backend.
Let's get started.
Framework Installation and Environment Setup
Framework installation
Installing Keras 3.0 (or the latest version) is simple, just follow the Getting Started documentation on the official website.
Before installing Keras, it's recommended to install Pytorch with the corresponding CUDA version first. Either CUDA 11.8 or CUDA 12.1 works, depending on your graphics card driver support.
Although Pytorch can be used as a backend, Tensorflow version 2.16.1 is still installed by default during the Keras installation process.
This version of Tensorflow is compiled based on CUDA 12.3, so after installing Keras, you might encounter a warning about missing CUDA (see this issue).
Could not find cuda drivers on your machine, GPU will not be used.Since we are using Pytorch as the backend, my advice is to ignore this warning.
Alternatively, you can set a system variable to permanently turn off Tensorflow's logs.
import os

os.environ['TF_CPP_MIN_LOG_LEVEL'] = '2'
Environment configuration
After installing both Pytorch and Keras, you need to set the environment variable to configure Keras's backend to Pytorch. There are two ways to do this:
- Modify the configuration file.
- Set an environment variable.
First, let's discuss using the configuration file method.
Keras's configuration file is located in ~/.keras/keras.json. If you are using Windows, this file is located in your <user directory>/.keras/keras.json.
Of course, you can also change the location of the .keras directory by setting the KERAS_HOME environment variable.
Note, you might not find the .keras directory immediately after installing Keras for the first time. At that point, you can execute import keras in IPython or Jupyter Notebook to locate the directory.
Then, just change the value of the "backend" key in the keras.json file to "torch".
{
    "floatx": "float32",
    "epsilon": 1e-07,
    "backend": "torch",
    "image_data_format": "channels_last"
}
If you are in a production system or using cloud environments like Colab, you might not be able to modify the configuration file. In such cases, you can resolve this by setting an environment variable:
os.environ["KERAS_BACKEND"] = "torch"Once the Keras backend is configured, you can confirm it with the following code:
In:  import keras
     keras.config.backend()

Out: 'torch'
After the preparations are done, we'll officially start our project practice for today.
Project in Action: An End-to-End Example
The fastest way to learn a framework is through real project practice. So now it's time to fulfill my promise.
I will guide you through using the subclassing API step by step to implement a neural machine translation (NMT) model and explain some details of using Keras 3.0.
Theory introduction
If you're not familiar with the NMT model, here's a brief introduction:
NMT is a type of recurrent neural network model based on an encoder-decoder architecture.
In this architecture, there is an embedding layer and an RNN (we use LSTM in this article) layer forming an encoder, and another embedding layer and RNN layer forming a decoder.
The original text, after being vectorized, is input into the encoder module. After a series of steps, the final state is input into the decoder module.
Additionally, the target text is also input into the decoder module, but before entering the decoder, it is offset by one step forward. Thus, the beginning part of the target text starts with a start-of-sequence (SOS) placeholder.
The encoder's input state and the target text's input are processed in the decoder through a series of recurrent calculations, and finally output to a Dense layer, where they are activated to calculate the probabilities of each text vector, compared with the target text's word vectors, and calculate the loss.
Therefore, we also add an end-of-sequence (EOS) placeholder at the end of the target text to mark the text's end.
The entire architecture is shown in the following diagram:
Of course, due to the popularity of the Transformer architecture, Keras' KerasNLP package also offers various pre-trained models like Bert and GPT for completing NLP tasks.
However, this article focuses on understanding how to use Keras 3.0, so using a basic RNN network will be enough.
Modules and flowchart
Since this is a production-ready project, we build modules based on Keras 3.0's subclassing API.
For a clear understanding of each module and their interactions, I've created the flowchart below:
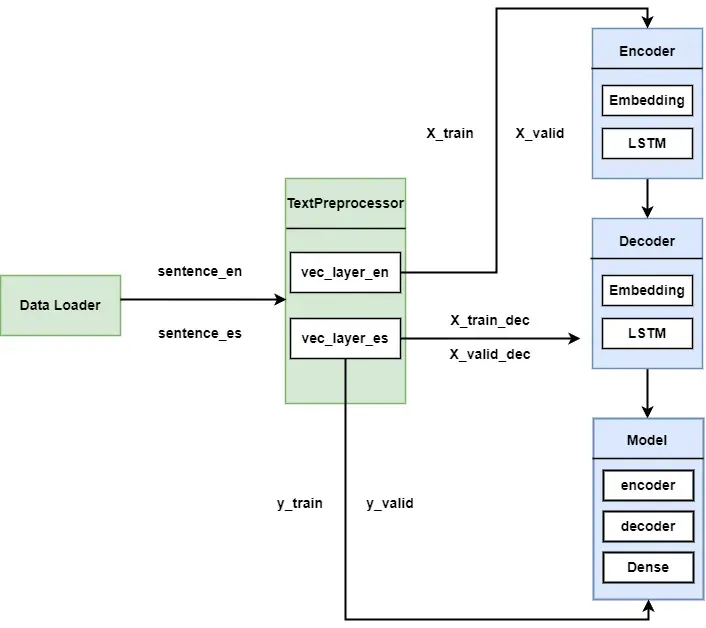
We'll write our code according to the design on the flowchart.
Importing packages
In a Jupyter Notebook environment, I like to import all related packages at the start of the project.
This way, if I find something missing in the middle, I just need to add it in one place, instead of searching for the import cell:
from pathlib import Path
import pickle

import keras
from keras import layers, utils
import numpy as np

utils.set_random_seed(42)
Here's a little tip: the utils.set_random_seed method can set the random seeds for Python, Numpy, and Pytorch all in one line of code, which is super convenient.
Data preparation
Before we start, we need to choose suitable data. Like past encoder-decoder models, we also chose the spa-eng text dataset.
This dataset is provided by contributors to the Tatoeba project and contains 120,000 sentence pairs. It is released under the Creative Commons Attribution 2.0 France license, and you can download the dataset from here.
After downloading, let's first check the contents of the spa.txt file:
The rain lasted three days.	La lluvia duró tres días.	CC-BY 2.0 (France) Attribution: tatoeba.org #27004 (CK) & #431740 (Leono)
The refrigerator is closed.	El frigorífico está cerrado.	CC-BY 2.0 (France) Attribution: tatoeba.org #5152850 (CarpeLanam) & #10211587 (manufrutos)
The reports were confusing.	Los informes eran confusos.	CC-BY 2.0 (France) Attribution: tatoeba.org #2268485 (_undertoad) & #2268486 (cueyayotl)
The resemblance is uncanny.	La similitud es extraña.	CC-BY 2.0 (France) Attribution: tatoeba.org #2691302 (CM) & #5941808 (albrusgher)
The resemblance is uncanny.	El parecido es asombroso.	CC-BY 2.0 (France) Attribution: tatoeba.org #2691302 (CM) & #6026125 (albrusgher)
The results seem promising.	Los resultados se antojan prometedores.	CC-BY 2.0 (France) Attribution: tatoeba.org #8480484 (shekitten) & #8464272 (arh)
The rich have many friends.	Los ricos tienen muchos amigos.	CC-BY 2.0 (France) Attribution: tatoeba.org #1579047 (sam_m) & #1457378 (marcelostockle)
As you can see, the content includes at least three columns, with the first column being the original text and the second column being the target text, separated by tabs.
Since the file isn't large, we can directly use numpy's genfromtxt method to read this dataset.
text_file = Path("./temp/eng-spanish/spa-eng/spa.txt")

pairs = np.genfromtxt(text_file, delimiter="\t", dtype=str,
                     usecols=(0, 1), encoding="utf-8",
                     autostrip=True,
                     converters={1: lambda x: x.replace("¡", "").replace("¿", "")})
np.random.shuffle(pairs)
sentence_en, sentence_es = pairs[:, 0], pairs[:, 1]
Next, let's check the processing results:
In:   print(f"{sentence_en[0]} => {sentence_es[0]}")

Out:  I'm really sorry. => Realmente lo siento.
OK, no problems.
Data preprocessing
Next, we need to preprocess the text content to convert it into word vector data.
First, we define some constants:
class Configure:
    VOCAB_SIZE: int = 1000
    MAX_LENGTH: int = 50
    SOS: str = 'startofseq'
    EOS: str = 'endofseq'
Then, we start our data processing pipeline.
Note that in Keras 3.0, although you have chosen Pytorch as the backend, the TextVectorization Layer is still implemented based on TensorFlow.
Therefore, you cannot use TextVectorization as a layer in the Keras Model but must use it separately in the preprocessing pipeline.
This leads to a problem: when we migrate the trained model to the production system for inference tasks, without the TextVectorization vocabulary, we cannot perform vectorization.
So, we need to persist the vocabulary and reuse it, but there are some issues with the persistence of Keras 3.0's TextVectorization, which I will discuss later.
I will use a TextPreprocessor module to perform the vectorization. Here is the specific code:
class TextPreprocessor:
    def __init__(self,
                 en_config = None, es_config = None):
        if en_config is None:
            self.text_vec_layer_en = layers.TextVectorization(
                Configure.VOCAB_SIZE, output_sequence_length=Configure.MAX_LENGTH
            )
        else:
            self.text_vec_layer_en = layers.TextVectorization.from_config(en_config)

        if es_config is None:
            self.text_vec_layer_es = layers.TextVectorization(
                Configure.VOCAB_SIZE, output_sequence_length=Configure.MAX_LENGTH
            )
        else:
            self.text_vec_layer_es= layers.TextVectorization.from_config(es_config)

        self.adapted = False
        self.sos = Configure.SOS
        self.eos = Configure.EOS

    def adapt(self, en_sentences: list[str], es_sentences: list[str]) -> None:
        self.text_vec_layer_en.adapt(en_sentences)
        self.text_vec_layer_es.adapt([f"{self.sos} {s} {self.eos}" for s in es_sentences])
        self.adapted = True

    def en_vocabulary(self):
        return self.text_vec_layer_en.get_vocabulary()

    def es_vocabulary(self):
        return self.text_vec_layer_es.get_vocabulary()

    def vectorize_en(self, en_sentences: list[str]):
        return self.text_vec_layer_en(en_sentences)

    def vectorize_es(self, es_sentences: list[str]):
        return self.text_vec_layer_es(es_sentences)

    @classmethod
    def from_config(cls, config):
        return cls(**config)

    def get_config(self):
        en_config = self.text_vec_layer_en.get_config()
        en_config['vocabulary'] = self.en_vocabulary()
        es_config = self.text_vec_layer_es.get_config()
        es_config['vocabulary'] = self.es_vocabulary()
        return {'en_config': en_config,
                'es_config': es_config}

    def save(self, filepath: str):
        if not self.adapted:
            raise RuntimeError("Layer hasn't been adapted yet.")
        if filepath is None:
            raise ValueError("A file path needs to be defined.")
        if not filepath.endswith('.pkl'):
            raise ValueError("The file path needs to end in .pkl.")
        pickle.dump({
            'config': self.get_config()
        }, open(filepath, 'wb'))

    @classmethod
    def load(cls, filepath: str):
        conf = pickle.load(open(filepath, 'rb'))
        instance = cls(**conf['config'])
        return instance
Let me explain what this module does:
- Since we need to vectorize both the original text and the target text, this module includes two
TextVectorizationLayers. - After adapting, this module will hold the vocabularies for both the original and target texts. This way, when deploying to the production system, the
TextVectorizationwon't need to adapt again. - The module uses the pickle module to enable persistence. You can use the
get_configmethod to get the configuration of the twoTextVectorizationLayers and save it. You can also usefrom_configto initialize the module's instance from the saved configuration directly. - However, when I used the
get_configmethod, the vocabulary wasn't retrieved (currently, I'm using Keras version 3.3, and I'm not sure if this is a bug), so I had to use theget_vocabularymethod to get the vocabulary separately.
Let's adapt the text and save the vocabulary:
text_preprocessor = TextPreprocessor()
text_preprocessor.adapt(sentence_en, sentence_es)
text_preprocessor.save('./data/text_preprocessor.pkl')
Check the vocabularies for both languages:
In:   text_preprocessor.en_vocabulary()[:10]
Out:  ['', '[UNK]', 'i', 'the', 'to', 'you', 'tom', 'a', 'is', 'he']

In:   text_preprocessor.es_vocabulary()[:10]
Out:  ['', '[UNK]', 'startofseq', 'endofseq', 'de', 'que', 'no', 'tom', 'a', 'la']
No problem at all.
Once the TextPreprocessor module is ready, we can start splitting the training and validation sets and begin the vectorization work. Since the target text also serves as input for the decoder module, we have two additional feature sets: X_train_dec and X_valid_dec:
X_train = text_preprocessor.vectorize_en(sentence_en[:100_000])
X_valid = text_preprocessor.vectorize_en(sentence_en[100_000:])

X_train_dec = text_preprocessor.vectorize_es([f"{Configure.SOS} {s}" for s in sentence_es[:100_000]])
X_valid_dec = text_preprocessor.vectorize_es([f"{Configure.SOS} {s}" for s in sentence_es[100_000:]])

y_train = text_preprocessor.vectorize_es([f"{s} {Configure.EOS}" for s in sentence_es[:100_000]])
y_valid = text_preprocessor.vectorize_es([f"{s} {Configure.EOS}" for s in sentence_es[100_000:]])
Implementing the encoder-decoder model
As depicted in the architecture diagram earlier, the entire model is divided into encoder and decoder parts. So, we implement two custom subclasses based on keras.layers.Layer for each part.
It's important to implement the __init__, call, and get_config methods for each custom Layer.
- The
__init__method initializes the Layer's member variables, weights, and sub-layers. - The
callmethod works similarly to Keras's Functional API, accepting inputs as parameters and returning the Layer's output after processing. - The
get_configmethod is used to retrieve the configuration of the Layer when saving the model.
Encoder Layer:
@keras.saving.register_keras_serializable()
class Encoder(keras.layers.Layer):
    def __init__(self, embed_size: int = 128, **kwargs):
        super().__init__(**kwargs)
        self.embed_size = embed_size

        self.encoder_embedding_layer = layers.Embedding(input_dim=Configure.VOCAB_SIZE,
                                                        output_dim=self.embed_size,
                                                        mask_zero=True)
        self.encoder = layers.LSTM(512, return_state=True)

    def call(self, inputs):
        encoder_embeddings = self.encoder_embedding_layer(inputs)
        encoder_outputs, *encoder_state = self.encoder(encoder_embeddings)
        return encoder_outputs, encoder_state

    def get_config(self):
        config = {"embed_size": self.embed_size}
        base_config = super().get_config()
        return config | base_config
In the Encoder, we set the return_state parameter of LSTM to True. This allows the final state of the LSTM to be returned as output for the Decoder Layer to use.
Decoder Layer:
@keras.saving.register_keras_serializable()
class Decoder(keras.layers.Layer):
    def __init__(self, embed_size: int = 128, **kwargs):
        super().__init__(**kwargs)
        self.embed_size = embed_size

        self.decoder_embedding_layer = layers.Embedding(input_dim=Configure.VOCAB_SIZE,
                                                        output_dim=self.embed_size,
                                                        mask_zero=True)
        self.decoder = layers.LSTM(512, return_sequences=True)

    def call(self, inputs, initial_state=None):
        decoder_embeddings = self.decoder_embedding_layer(inputs)
        decoder_outputs = self.decoder(decoder_embeddings,
                                       initial_state=initial_state)
        return decoder_outputs

    def get_config(self):
        config = {"embed_size": self.embed_size}
        base_config = super().get_config()
        return config | base_config
In the Decoder, besides receiving data input, the call method also accepts the Encoder's input through the initial_state function and returns the module's output.
We also implement a custom Model, which needs to implement the __init__, call, and get_config methods, similar to keras.layers.Layer.
@keras.saving.register_keras_serializable()
class NMTModel(keras.models.Model):
    embed_size: int = 128

    def __init__(self, **kwargs):
        super().__init__(**kwargs)

        self.encoder = Encoder(self.embed_size)
        self.decoder = Decoder(self.embed_size)

        self.out = layers.Dense(Configure.VOCAB_SIZE, activation='softmax')

    def call(self, inputs):
        encoder_inputs, decoder_inputs = inputs

        encoder_outputs, encoder_state = self.encoder(encoder_inputs)
        decoder_outputs = self.decoder(decoder_inputs, initial_state=encoder_state)
        out_proba = self.out(decoder_outputs)
        return out_proba

    def get_config(self):
        base_config = super().get_config()
return base_config- In the Model, we initialize a
Denselayer to convert the Decoder's output into results for the word vectors. - The
callmethod takes two inputs, which can be easily distinguished through unpacking. - Both Layer and Model need to have the
@keras.saving.register_keras_serializable()decorator to ensure correct serialization when saving the model.
Model training
After defining the model, we proceed to the training phase:
nmt_model = NMTModel()
nmt_model.compile(loss='sparse_categorical_crossentropy',
                  optimizer='nadam',
                  metrics=['accuracy'])
checkpoint = keras.callbacks.ModelCheckpoint(
    './data/nmt_model.keras',
    monitor='val_accuracy',
    save_best_only=True
)
nmt_model.fit((X_train, X_train_dec), y_train, epochs=1,
              validation_data=((X_valid, X_valid_dec), y_valid),
              batch_size=128,
              callbacks=[checkpoint])
In this part of the code:
- We first call the compile method to compile the model instance, defining components such as
loss,optimizer, andmetrics. - We set up a
ModelCheckpointcallback to save the model with the bestval_accuracyafter training. - We use the
fitmethod, passingX_trainandX_train_decas a tuple to thexparameter, and handlevalidation_datasimilarly. - This is just a demo, so I set
epochsto 1. You can adjust the values ofepochsandbatch_sizeas needed. - Keras 3.0 also supports Pytorch's
DataLoader, or you can implement a backend-agnostic preprocessing pipeline based onkeras.utils.PyDataset. I can explain how to use these in my next article.
After training is complete, the model should be saved.
Inference task
After training, you can deploy the corresponding code modules, along with the saved vocabulary and model, to the production system for inference tasks.
Since the model's Dense layer outputs the probability of each word vector in the vocabulary, you need to merge each inferred word with the previous results and re-input them with the original text to predict the next word:
preprocessor = TextPreprocessor.load('./data/text_preprocessor.pkl')
nmt_model = keras.saving.load_model('./data/nmt_model.keras')

def translate(sentence_en):
    translation = ""
    for word_index in range(50):
        X = preprocessor.vectorize_en([sentence_en])
        X_dec = preprocessor.vectorize_es([Configure.SOS + " " + translation])
        y_proba = nmt_model.predict((X, X_dec), verbose=0)[0, word_index]
        predicted_word_id = np.argmax(y_proba)
        predicted_word = preprocessor.es_vocabulary()[predicted_word_id]
        if predicted_word == Configure.EOS:
            break
        translation = translation + " " + predicted_word
    return translation.strip()
Let's write a simple method to test the results:
In:   translate("It was pretty cool.")
Out:  'era bastante [UNK]'
Although it's not very accurate, the goal of this article is to learn how to use the Keras 3.0 subclassing API, so you still have plenty of room to optimize this model, right?
Conclusion
The release of Keras 3.0 allows us to implement models efficiently using Keras's concise API while using Pytorch or Jax as backends.
However, since the version was released recently, the accompanying documentation is not yet complete, so you might encounter some difficulties in trying new versions.
This article through an end-to-end practical example, explains the environment setup and basic development process of Keras 3.0, helping you get started quickly.
Unfortunately, the Keras 3.0 project is still in its early stages and cannot completely break away from the dependence on TensorFlow, as well as some of TensorFlow's inexplicable issues.
But I am still optimistic about this version. I believe that as time goes on and support for multiple backends improves, Keras will be revitalized, helping to make deep learning technology more accessible and reducing the learning curve for deep learning.
What else would you like to know about Keras 3.0? Feel free to leave a comment and discuss.