Exclusive Reveal: Code Sandbox Tech Behind Manus and Claude Agent Skills
Use Jupyter code executor to help your agent finish tasks in a smarter way


This tutorial will use a more general approach to fully recreate the core tech behind code interpreter sandboxes in commercial products like Manus and Claude agent skills.
As always, the source code is at the end of this post. Feel free to grab it.
Introduction
Recently, an incident with Gemini 3.0 generated code wiped out 800GB of customer data. This again reminds us of the importance of building code sandboxes for agents.
In earlier articles, we’ve already seen many times that letting agents generate code and run it in a sandbox environment can boost their math problem-solving ability and help them tackle complex challenges.

But right now, many commercial products that offer code sandboxes charge fees and limit resources. So in today’s tutorial, I’ll show you how to hook your agent up to a self-hosted Jupyter Server. You’ll get a powerful sandbox runtime with reusable context and solid computing power.
This is a special, exclusive tutorial with full details—enough for you to master this core tech. So what are you waiting for? Let’s jump in.
Don’t forget to follow my blog to stay updated on my latest progress in AI application practices.
Environment Setup
Build a Jupyter Kernel container
The “code sandbox” your agent connects to relies on containerization for safety and environment isolation. So first, prepare a Docker image that runs Jupyter Server.
The heart of any Docker container is the Dockerfile. To save you time, here’s the full content:
# Dockerfile.jupyter
FROM python:3.13-slim-bookworm

WORKDIR /app

COPY requirements.txt /app/requirements.txt

RUN pip install --no-cache-dir jupyter_kernel_gateway ipykernel numpy pandas sympy scipy --upgrade

RUN pip install --no-cache-dir -r requirements.txt --upgrade

EXPOSE 8888

ENV TOKEN="UNSET"
CMD python -m jupyter kernelgateway \
    --KernelGatewayApp.ip=0.0.0.0 \
    --KernelGatewayApp.port=8888 \
    --KernelGatewayApp.auth_token="${TOKEN}" \
    --JupyterApp.answer_yes=true \
    --JupyterWebsocketPersonality.list_kernels=true
This file uses python:3.13-slim-bookworm as the base image—not a pre-built Jupyter image—because we’ll customize the Jupyter environment later.
I pulled essential dependencies out of requirements.txt and installed them separately. This maximizes Docker layer caching.
Here’s the requirements.txt content:
matplotlib
xlrd
openpyxl
I included some basic Jupyter launch parameters. As we go, we’ll add more to build the complete Jupyter code sandbox.
Once your Dockerfile is ready, run this command to build the image:
docker build -t jupyter-server .Don’t start the Jupyter container yet—we’ll explain why later.
If your company can't use Docker Desktop due to licensing issues, don't worry—I've got an alternative solution for you. You can click here to read more:

Install the Autogen agent framework
Most agent frameworks have moved Jupyter runtime support into paid offerings. Right now, Autogen is the only solid open option that supports Jupyter runtimes.
To build agents, first install the autogen-agentchat package:
pip install -U "autogen-agentchat"To use containerized code executors, also install Autogen’s Docker client library:
pip install "autogen-ext[docker-jupyter-executor]"With the image built and Autogen installed, you’re ready to code.
Using the Jupyter Code Sandbox
Start with the recommended Docker API approach
Let’s begin with the official API example to see how Autogen’s code executor works.
Autogen has three key modules for Jupyter + Docker: DockerJupyterCodeExecutor, DockerJupyterServer, and CodeExecutorAgent.
DockerJupyterServer uses the Docker API to start a container from a given image, mount directories, and store Jupyter connection info.
DockerJupyterCodeExecutor handles all operations with the Jupyter Kernel API. Once it gets connection info from the server, you can submit and run code.
CodeExecutorAgent is a special Autogen agent that pulls Python code from context and executes it. If you give it a model_client, it can even write its own code and reflect on results.

Now let’s build a code executor agent to test if this stateful Jupyter sandbox works.
Remember the jupyter-server Docker image we built? Use it to initialize DockerJupyterServer.
server = DockerJupyterServer(
    custom_image_name="jupyter-server",
    expose_port=8888,
    token="UNSET",
    bind_dir="temp",
)
Then use that server to create a DockerJupyterCodeExecutor instance:
executor = DockerJupyterCodeExecutor(
    jupyter_server=server,
    timeout=600,
    output_dir=Path("temp")
)
Note: both server and executor mount your local temp folder into the container. Code can read/write files there, but inside the Jupyter kernel, the working directory is /app, not temp.
Next, create the CodeExecutorAgent. Just pass the executor instance to the code_executor parameter.
code_executor = CodeExecutorAgent(
    "code_executor",
    code_executor=executor,
)
Now write a main method to test coder_executor.
async def main():
    async with executor:
        code1 = TextMessage(
            content=dedent("""
            ```python
            x = 1+2
            print("Round one: The calculation for the value of x is done.")
            ```
            """),
            source="user"
        )
        response1 = await code_executor.on_messages(messages=[code1], cancellation_token=CancellationToken())
        print(response1.chat_message.content)

        code2 = TextMessage(
            content=dedent("""
            ```python
            print("Round two: Get the value of variable x again: x=", x)
            ```
            """),
            source="user",
        )
        response2 = await code_executor.on_messages(messages=[code2], cancellation_token=CancellationToken())
        print(response2.chat_message.content)

asyncio.run(main())
To check stateful execution, call code_executor twice:
First, define a variable x and compute something.
Second, print x.
In a command-line sandbox, this fails—the second run doesn’t know about x. But with Jupyter’s stateful kernel, the variable stays alive between calls (as long as you use the same executor):

I’ve already shown how this stateful sandbox helps agents solve hard problems. Read more here:

This method—starting a Jupyter container from an image via code—is called “Docker out of Docker.”
Problems with Docker out of Docker
If you’re just testing Jupyter’s superpowers on your local machine, DockerJupyterServer works fine.
But the big issue? The Jupyter Server actually starts on the same machine running your agent code.
This breaks down if you need serious compute power, or plan to deploy to production:
For data security or performance, companies often use powerful internal Jupyter Servers. If your data is gigabytes big, you need a server with tens of GBs of RAM—not your laptop.
Things get worse if you containerize your agent app. Due to network isolation, your agent container might start a Jupyter container but fail to reach it.
You wouldn’t run both agent and Jupyter on the same web server. Instead, deploy Jupyter on a dedicated compute server and let multiple agents share it—maximizing hardware use.
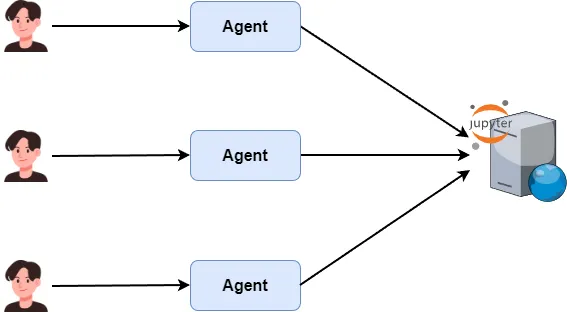
For example, I rented a GPU server on vast.ai, set up JupyterLab, and want my agent to connect directly for data analysis.
Let agents connect to the Jupyter Server directly
By now it’s clear: to use external compute power, your agent must connect to a pre-deployed Jupyter Server—not spin up its own.
You won’t find this solution anywhere online.
So here’s today’s key reveal: how to connect your multi-agent app to a self-hosted Jupyter Kernel server—for low cost (vs. Azure/Claude) and high compute power.
💡 Unlock Full Access for Free!
Subscribe now to read this article and get instant access to all exclusive member content + join our data science community discussions.