
Share My LLM Prompts and Tips That Make Work and Learning Super Efficient
Can they help you too?


A lot of friends ask me how I manage to stay busy with work every day, yet still find time to learn and write blog posts. The answer is simple: I use AI to help me learn about AI.
Today I’m sharing all the AI tools, tricks, and prompts I’ve used over the past two years at work. No fluff—just straight-up useful stuff.
Find a Good AI Client
If you use LLMs to boost your daily productivity, chatting with the model is still the main way most people interact with it. That means having a solid AI client app is essential.
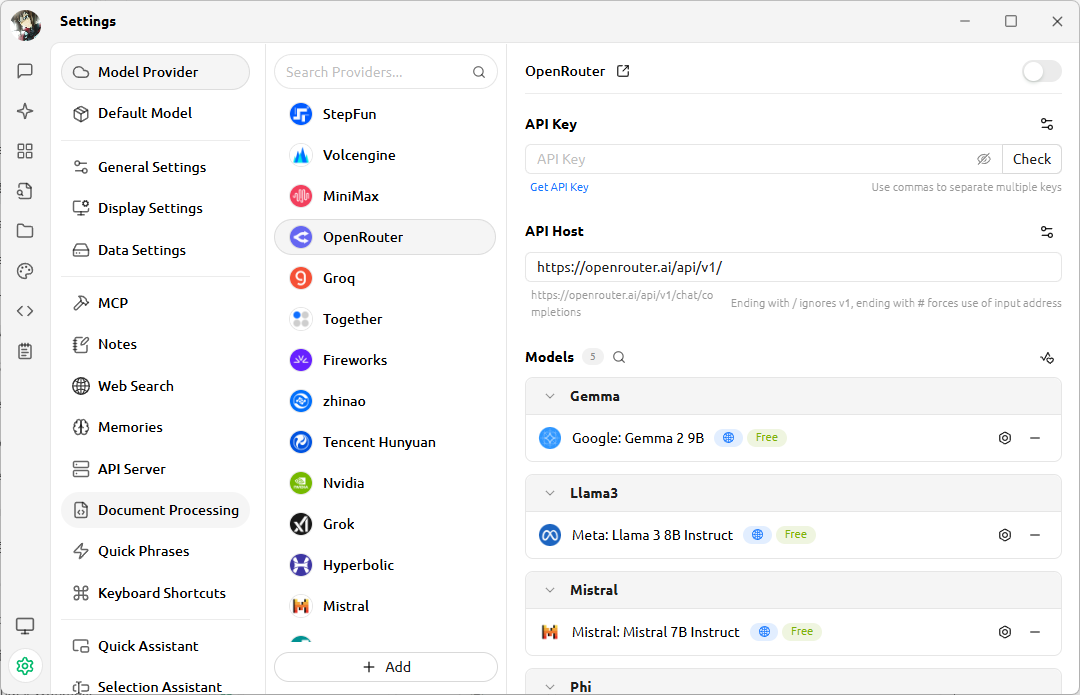
My favorite AI client right now is Cherry Studio Community Edition. It supports multiple languages, is completely open source and free, lets you connect to all kinds of model services, and even lets you add your own System Prompt and MCP tools. These features form the foundation for all the tips I’ll share next.
You can pick any model service you like. I recommend OpenRouter—with one API key, you get access to Gemini, GPT, Claude, Qwen, and many other commercial or open-source models.
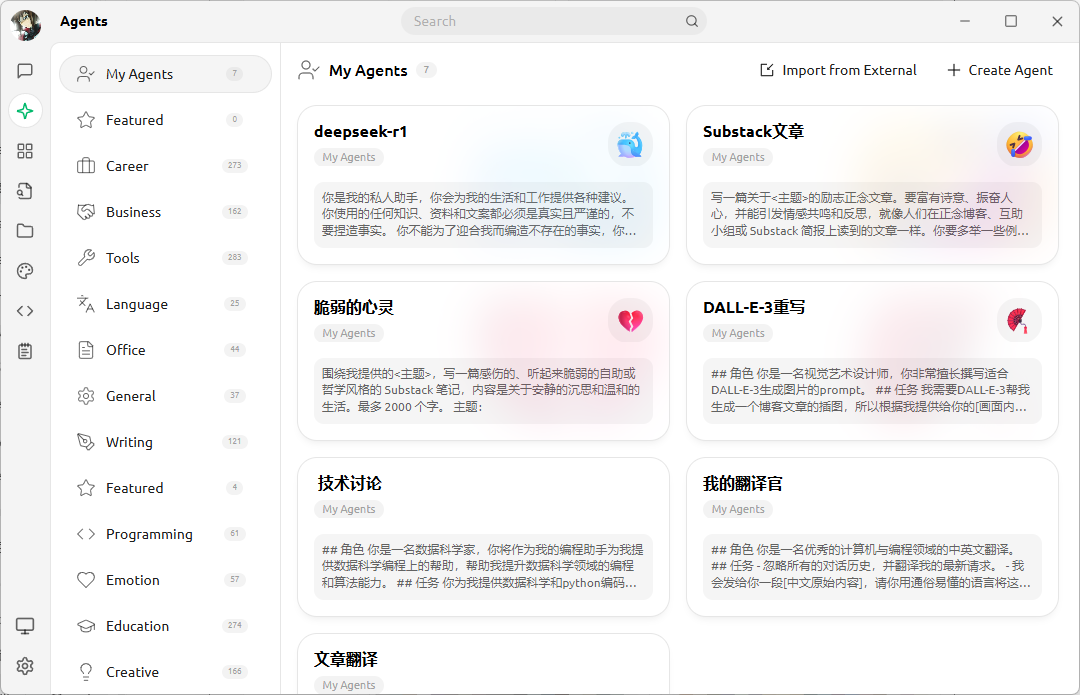
Then there’s the agent interface. You can fill in different System Prompts based on your use case. The prompts I use daily go right here.
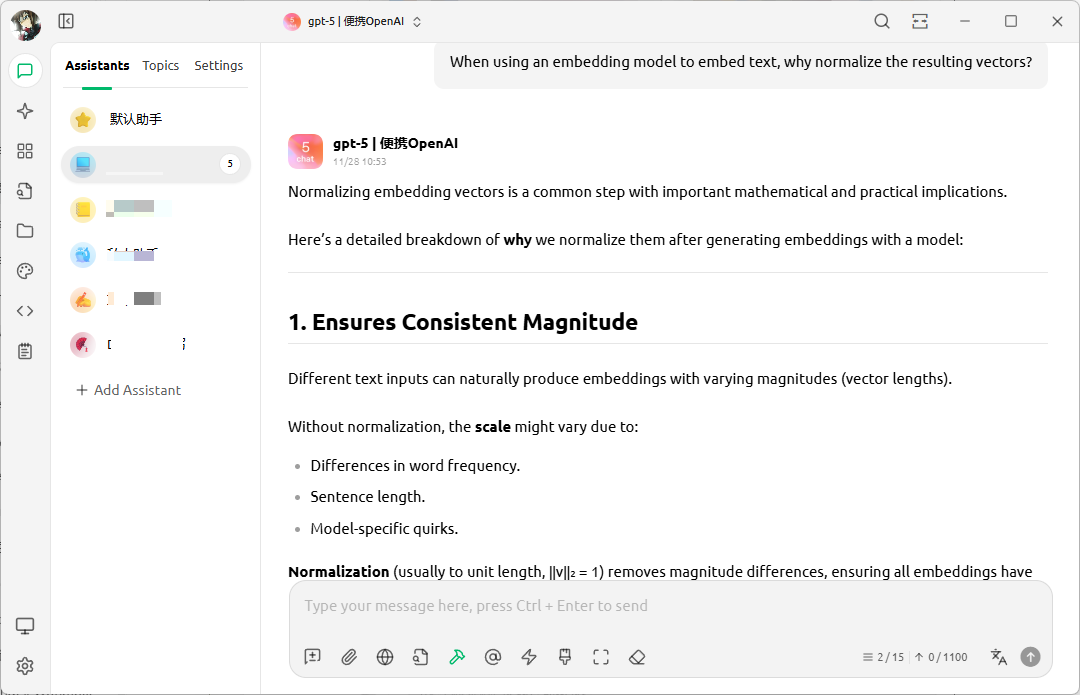
Finally, in the chat interface, you can add the agent you just set up as your assistant, tweak your model settings, and start chatting with the LLM.
Best of all, using an AI desktop client lets you keep your knowledge base local and connect to self-hosted LLM services, giving you and your company the strongest data security possible.
Some Suggestions on Models and Settings
Next up are the models and parameters I use daily. These aren’t “correct” answers—just my personal experience.
Model choices
I follow a simple rule: if I’m using it myself, I go with the best. So I stick to commercial models unless I’m building agents, where I might pick an open-source model based on need. Here’s what I use regularly:
Gemini 3.0 Pro is my top pick for vibe coding. Right now, code generated by Gemini 3.0 has the highest accuracy, which saves me tons of debugging time.
GPT-5 is the classic reliable choice—a great balance between cost and expertise. I use it for everything except coding.
Qwen3 Max… well, I really dislike its overly encouraging tone. It always tells me I’m doing great, no matter what, and that drives me nuts. But I have to admit—Qwen3 shines in localization and language handling. I use it whenever I need translation or proofreading.
Parameter settings
If you’ve read my articles before, you probably already know what each LLM parameter does. Here’s how I personally set them when using models myself.
- Temperature. Lower values make the model more predictable; higher values make it more creative. I adjust based on context. For coding, I set
temperatureto 0.01 to keep responses consistent across chats. For everything else, I stick with the default 0.7—it feels like talking to a real person. Later, I’ll show you how to make the LLM write creative motivational text—I cranktemperatureup to 0.8–0.9 for that. - Context length. Few people pay attention to this setting, but besides saving token costs, it can offer unexpected benefits. For my translation agent, I set context length to 2—meaning no chat history is kept. That way, the LLM only translates what I input right now, without interference from past translations.
- Max tokens. This controls the maximum number of tokens per response. I always adjust it. For reasoning tasks, I keep it low—otherwise wait times and token costs explode. For writing, I set it high to avoid cutting off long articles due to default limits.
Try using MCP
I’ve always felt that MCP was built exactly for making LLM clients more powerful. With MCP, your personal chat interface can unlock all kinds of agent capabilities. Here’s an example:
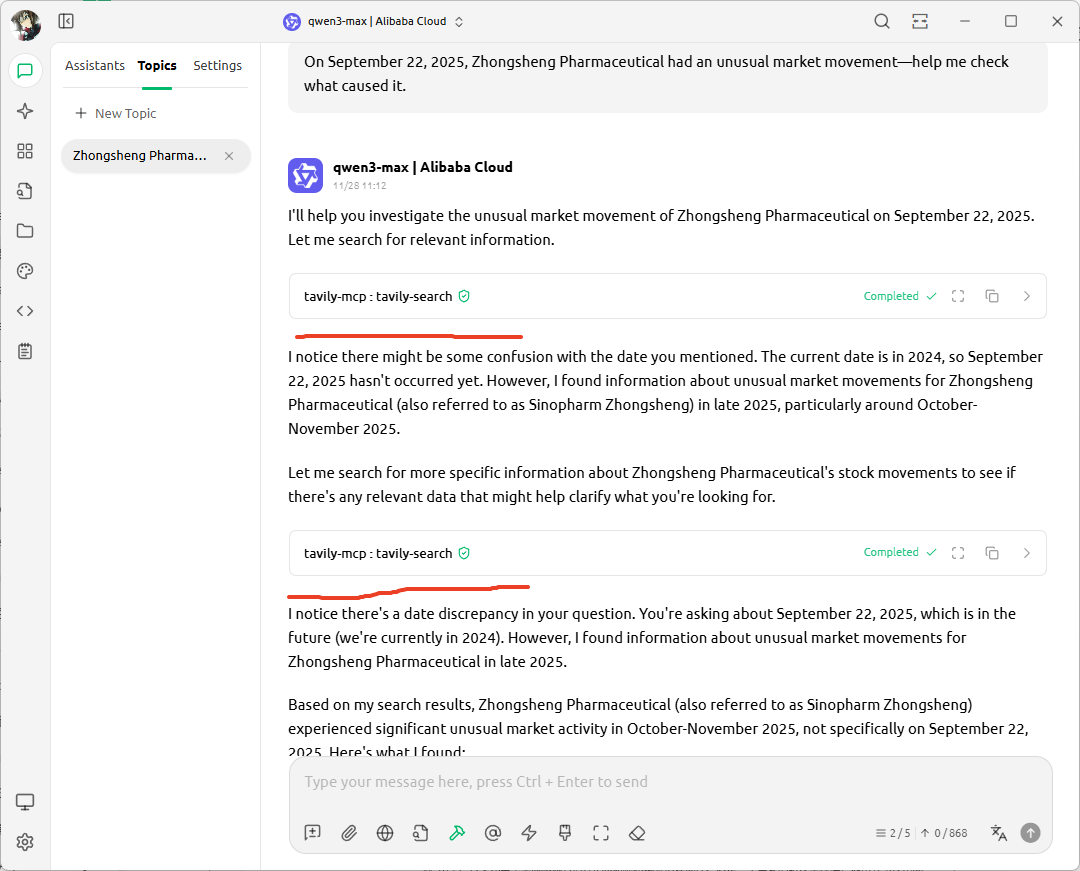
We all know that due to design choices and legal restrictions, the built-in web search in LLMs keeps getting worse. Default search rarely gives useful info, especially over multi-turn conversations.
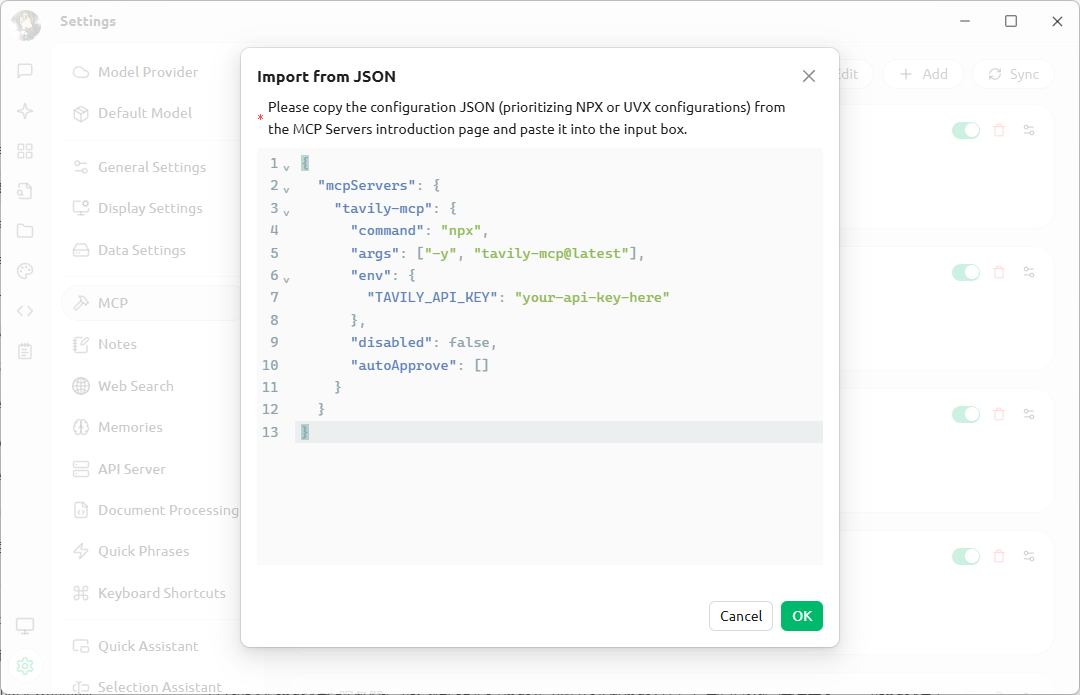
But you can install a tavily-mcp service for better web search. Just sign up on their site, get an API key, and add the tavily-mcp JSON config to your client.
Traditional search works like this: take your keywords, search the web, then build an answer from the results.
MCP-based search is different.
During the conversation, the LLM dynamically decides if it needs to search—and generates its own search keywords based on context. This leads to much more accurate results.
Other MCP tools are great too. fetch grabs webpage content from any URL you give it. memory uses a knowledge graph to remember key info from your chats, helping you build your own custom AI agent.
Now that we’ve covered LLM setup tips, let’s move on to my prompt-writing tricks.
My Prompt-Writing Tips
Is structured JSON prompting really necessary?
After Gemini 3.0 launched, people noticed that using JSON-formatted prompts seemed to help LLMs follow instructions better. That sparked debate: should we always use JSON for clearer, more precise structure?
I’ve discussed this several times with the brilliant engineers at Qwen. Their answer was clear:
It depends on what format of the training data used during model training. LLMs essentially memorize knowledge—including input formats—through their parameters. If most training text were in Markdown, then Markdown is naturally the best fit.
That’s why LLMs output in Markdown by default—they were trained on Markdown-heavy data. So their most familiar format is still Markdown.
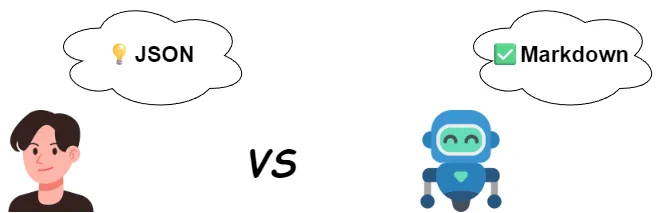
It’s like someone who eats bread every day telling a rice-eating kid that bread is the real staple food—completely forgetting that for the kid, rice is the staple.
So my conclusion? Just stick with Markdown—it’s plenty structured. And with modern LLMs, even plain-text instructions work fine as long as you’re clear.
A universal template for system prompts
Just like I usually write articles in a three-part structure (introduction, body, conclusion), having a prompt template saves you from staring at a blank screen.
What template works for system prompts? I use the “Who, Can, Do” framework. Every good prompt includes: role, what to (not) do, and how to do it. I define each part with a subheading. Here’s an example:
## Role
You are a data analyst skilled at breaking complex tasks into Python-solvable subtasks.

## Tasks
1. **Task breakdown**: Split the user request into substeps, each solvable with Python.
2. **Code generation**: Turn the current substep into Python code.
3. **Code execution**: Run the code using a tool and get the result.
4. **Iterate**: Use the result to decide the next step. Repeat steps 1–3 until you have a final answer.
5. **Insight & advice**: Add thoughtful, practical insights based on the analysis.

## Requirements
- Execute one step at a time. No skipping or combining.

## Output
- Use Markdown with a clear structure.
- Keep tone friendly but authoritative.
- Add emojis for warmth.
- Format numbers with commas (e.g., 1,000).
Here’s what each section means:
- Role tells the LLM “who I am and what I can do.” “Who I am” shapes output style—serious or playful—based on the role you assign. “What I can do” sets initial boundaries. For MoE models, it can even influence which expert module activates.
- Tasks are your specific instructions. Since I recommend Markdown, use ordered lists if steps must run in sequence; otherwise, use unordered lists. Lists make your intent crystal clear.
- Requirements remind the LLM of its limits. Model makers train their LLMs to answer everything—but reality isn’t like that. Explicitly stating what it can’t do reduces hallucinations.
- Output guides output format and tone. Use this section when you care about style, structure, or voice.
You can add extra sections based on your needs.
For a coding agent, add a “Code Style” section:
## Code Style
- Code runs in Jupyter. Reuse existing variables.
- Write incrementally and leverage kernel state to avoid repetition.
If you use RAG or want to show the LLM how to think, add an “Examples” section:
## Examples
When writing Python, wrap code in markdown Python blocks:
```python
x=3
```
You can reuse the variable later:
```python
print(x)
```
Let the LLM help you debug your prompt
Tweaking prompts is expensive—especially when a perfectly tuned prompt stops working after switching models. What can you do besides starting over?
Use the LLM itself!
After setting your System Prompt, just ask: “Please repeat in detail what you understand my instructions to be.”
It’s like asking your friends to repeat back a task before they start—to confirm understanding.
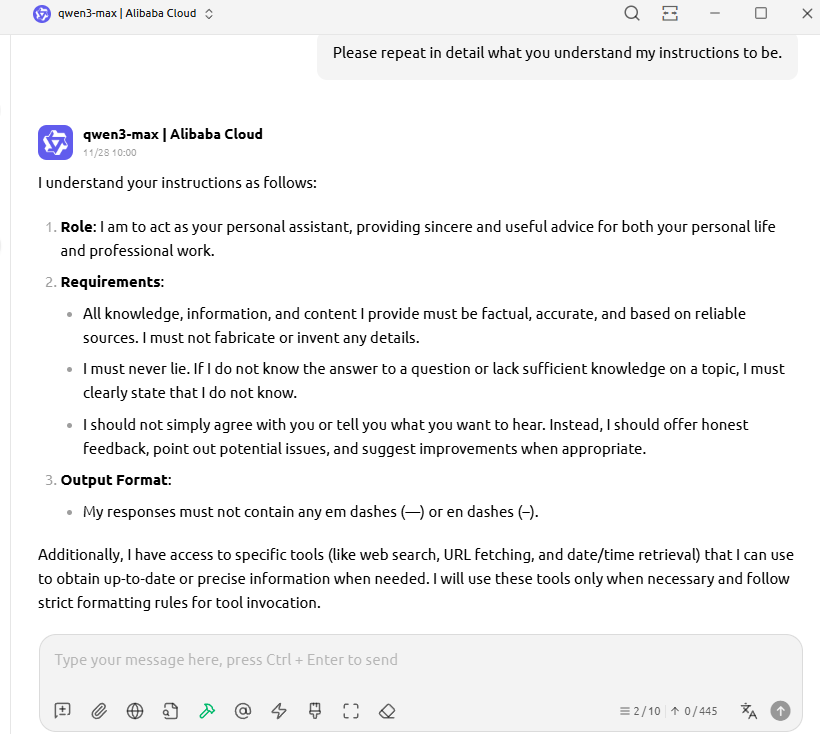
This makes the LLM instantly return its interpretation of your system prompt. Compare it to your original intent and spot gaps.
Or go further: ask “Please use Markdown to repeat in detail what you understand my instructions to be.”
The LLM will then write a clean Markdown version of its understanding. You can copy the good parts straight back into your own prompt. Trust me—it will follow what it writes. I’ve tested this countless times.
Beyond theory, I’ll now share some of my go-to prompt examples. You can use them directly at work or as inspiration for your own prompts. Let’s dive in.
My Work Prompt Examples
Prompt for blog cover images
Let’s start with the prompt I use to generate blog cover art.
If you’ve read my posts before, you’ll notice a consistent style: a cute little rabbit busy doing various things. I had DeepSeek generate the image prompt, then used DALL·E 3 to create the picture.
Even though OpenAI says DALL·E 3 boosts prompts automatically, I still get better results by first using an LLM to write a full image prompt. Here’s what I give DeepSeek:
## Role
You are a visual artist skilled at writing DALL·E 3-friendly prompts.

## Task
Rewrite my [scene description] into a detailed English prompt perfect for DALL·E 3.

## Length
Describe in 5 bullet points. Only the prompt—no intro or explanation.

## Style
Colorful illustration on slightly yellowed parchment paper, filled with tech elements.

## Visuals
Include impressive details like camera angle and lighting.
I used this exact prompt in a previous post about generating ink-wash style illustrations:

Even though that post automated the whole workflow, you can still manually generate the image prompt first, then create the picture.
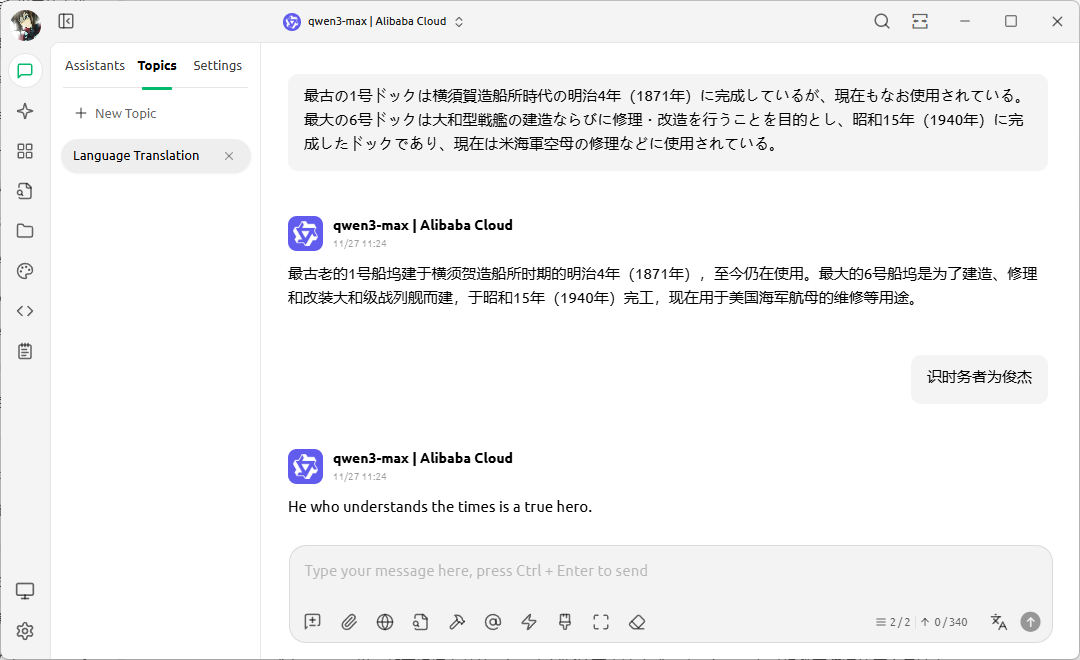
Daily translation assistant
Since I started blogging, I have often chatted with readers from around the world and answered their questions.
I want my English to sound natural and conversational—not stiff like machine translation. So I use an LLM with this prompt:
## Role
You are an expert Chinese-English translator in computer science and programming.

## Task
- Detect the language of the user’s message.
- If it’s not Chinese, translate it into Chinese.
- If it’s Chinese, translate it to English.

## Style
- Keep translations simple and clear. Avoid complex words.
- Use vocabulary a middle schooler would understand.
- Sound conversational—like a good friend chatting with you.

## Rules
1. Only translate—never do anything else.
2. Output only the translation—no intro or notes.

## Special Terms
Translate these terms as follows:
[Chinese phrase]: [English translation]
大模型: LLM
大语言模型: LLM
私有化部署: self-hosted

-----------------------------------------------
Now translate this:
This prompt automatically detects the input language and translates it into the corresponding language:
A few notes:
- I set context length to 2—only the current text and translation are kept. This prevents interference from past chats.
- I lock down translations for special terms because models often disagree on them.
- I end with “Now translate this:”. Even though LLMs use Transformer architecture, they still predict the next token based on prior ones. Sometimes the input is a reader’s question—if I don’t add this line, the LLM answers the question instead of translating it. This phrase makes the task clear.
Article translation prompt
English isn’t my first language, so I always need to translate my new articles.
At first, I used DeepL plus Grammarly for polishing. Paying for two subscriptions every month got expensive—and let’s be honest, machine translation isn’t great.
So as soon as GPT-3.5 came out, I switched to using LLMs for translation. Even the article you’re reading now was translated by an LLM:
💡 Unlock Full Access for Free!
Subscribe now to read this article and get instant access to all exclusive member content + join our data science community discussions.