
Microsoft Agent Framework (MAF) Middleware Basics: Add Compliance Fences to Your Agent
Principles, usage, and development standards


Introduction
The recent incident where Tencent’s Yuanbao AI insulted users once again shows that no matter how powerful an agent is, you must set up compliance guardrails and carefully review its inputs and outputs before going live.
When we build enterprise-grade agent applications, we often work on a large-scale system involving multiple teams. Beyond the parts handled by our own team, we also need to dynamically plug in features from other teams—such as permissions, logging, billing, and compliance review.
These features should not interfere with the agent system’s core capabilities, yet they must be easy to install and remove. In traditional web frameworks like FastAPI, middleware provides exactly this kind of dynamic code injection capability. So, does something similar exist in agent systems?
Actually, yes.
In today’s tutorial, I’ll show you how I used Microsoft Agent Framework’s middleware and AG-UI features to add compliance review for user inputs into my agent.
This will teach you how to use middleware in enterprise agent applications and give you a first look at using AG-UI for microservice distributed agent development. Let’s start.
You can get all the source code at the end. 👇
Don’t forget to follow my blog to stay updated on my latest progress in AI application practices.
System Setup
Install the latest Microsoft Agent Framework
MAF is still updating quickly. Since APIs change a lot, this guide uses the newest version. It’s better to install the prerelease version.
pip install agent-framework --preOr add the dependency in your pyproject.toml file:
"agent-framework-ag-ui>=1.0.0b260127"Install Microsoft Agent Framework AG-UI
MAF works with AG-UI to support distributed agent development. You’ll need this capability today, so install the latest version of ag-ui; otherwise, APIs won’t match up.
"agent-framework-ag-ui>=1.0.0b260127"After installing the needed Python packages, we can move on. First, let's get a quick background on what middleware is and what it can do.
Quick Intro to MAF Middleware
What is middleware
According to the MAF documentation:
Middleware in the Agent Framework intercepts, changes, and enhances agent behavior at different execution points. You can use it for logging, security checks, error handling, and result transformation without changing the agent’s or function’s core logic.
That’s what we’ll learn today.
How middleware works
As I said before, MAF middleware uses the chain-of-responsibility pattern. Each piece of logic lives in its own node. Every node knows the next one. When a node finishes running, it passes control to the next node.
Here’s a simple example:
async def logging_agent_middleware(
    context: AgentRunContext,
    next: Callable[[AgentRunContext], Awaitable[None]]
) -> None:
    print("[Agent] Starting execution")
    await next(context)
    print("[Agent] Execution completed")
The next parameter points to the next node. You can run code before or after calling it.
The actual agent logic acts as the last node. After all middleware nodes finish, the agent runs.
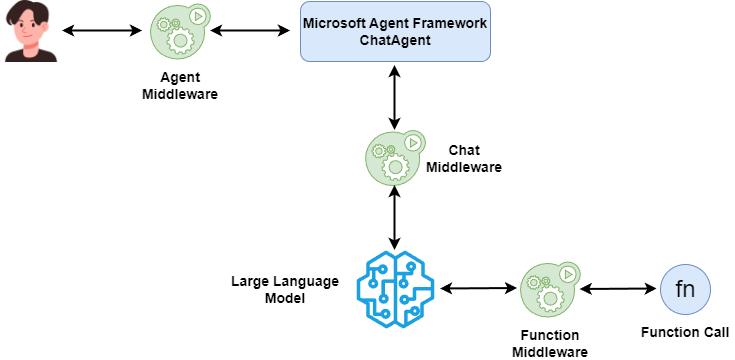
In MAF, middleware can run in three stages:
- Before or after
runorrun_stream. - Before or after a function call.
- Before or after calling the LLM.
Now let’s look at how different middleware types work.
Function-Based middleware
If your middleware is simple, like just logging agent runs, use a function-based middleware.
You only need a function with two parameters: context and next. The context keeps your runtime info, and next calls the next node.
MAF uses the type annotation of context to tell which stage this code belongs to. For example, if it runs at the agent stage, the type should be AgentRunContext:
async def logging_agent_middleware(
    context: AgentRunContext,
    next: Callable[[AgentRunContext], Awaitable[None]]
) -> None:
    print("[Agent] Starting execution")
    await next(context)
    print("[Agent] Execution completed")
For a function call stage, use FunctionInvocationContext:
async def logging_function_middleware(
    context: FunctionInvocationContext,
    next: Callable[[FunctionInvocationContext], Awaitable[None]],
) -> None:
    print(f"[Function] Calling {context.function.name}")
    await next(context)
    print(f"[Function] {context.function.name} completed")
And for the chat stage, use ChatContext:
async def logging_chat_middleware(
    context: ChatContext,
    next: Callable[[ChatContext], Awaitable[None]],
) -> None:
    print(f"[Chat] Sending {len(context.messages)} messages to AI.")
    await next(context)
    print(f"[Chat] AI response received.")
If you dislike type annotations, you can use decorators.
@agent_middleware runs at the agent stage:
@agent_middleware
async def logging_agent_middleware(context, next) -> None:
    print("[Agent] Starting execution")
    await next(context)
    print("[Agent] Execution completed")
Then you don’t need to add type annotations anymore.
There are also @function_middleware and @chat_middleware for function calls and chat calls.
If your middleware needs to save state or handle more complex logic, function-based won’t be enough. Use class-based middleware.
Class-Based middleware
Class-based middleware organizes code with object-oriented methods. That lets middleware remember state and handle tricky logic.
A class-based middleware must meet two rules:
- Inherit from the right base class:
AgentMiddleware,FunctionMiddleware, orChatMiddleware. - Have a
processmethod with the same parameters as the function-based ones. They use the same contexts.
Here’s an example for a middleware class that runs at the function call stage:
class LoggingFunctionMiddleware(FunctionMiddleware):
    async def process(
        self,
        context: FunctionInvocationContext,
        next: Callable[[FunctionInvocationContext], Awaitable[None]]
    ) -> None:
        print(f"[Function Class] Calling {context.function.name}")
        await next(context)
        print(f"[Function Class] {context.function.name} completed.")
Just make sure to pair the right base class with the right context type. The others follow the same rule.
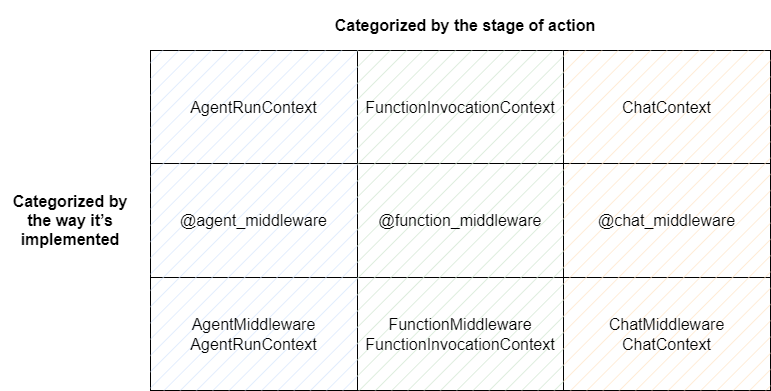
How to use middleware
There are three stages for middleware and three ways to build it. Let’s put that in one grid chart to see how they connect.
The framework now only supports passing middleware when creating the agent:
agent = chat_client.as_agent(
    name="assistant",
    instructions="You are a helpful assistant",
    tools=[get_weather],
    middleware=[
        logging_agent_middleware,
        LoggingFunctionMiddleware(),  logging_chat_middleware,
        blocking_middleware, logging_function_middleware,
    ]
)
You can mix all nine types freely.
But note that only the last function middleware you add actually works right now. I’m not sure if that’s a bug, but we’ll find out later.
Project Practice: Add Compliance Check to Your Agent
Now let’s get hands-on. I’ll show how to use MAF middleware to add compliance checking to an agent.
Why add compliance checks
Every LLM already has basic compliance setups built in based on local laws. When companies self-host LLMs, they also add custom checks in frameworks like vLLM. But those only watch the model’s input or output.
Now that agents are everywhere, we also need checks at the agent level: preventing prompt injection, checking MCP permissions, and so on. Middleware makes this possible.
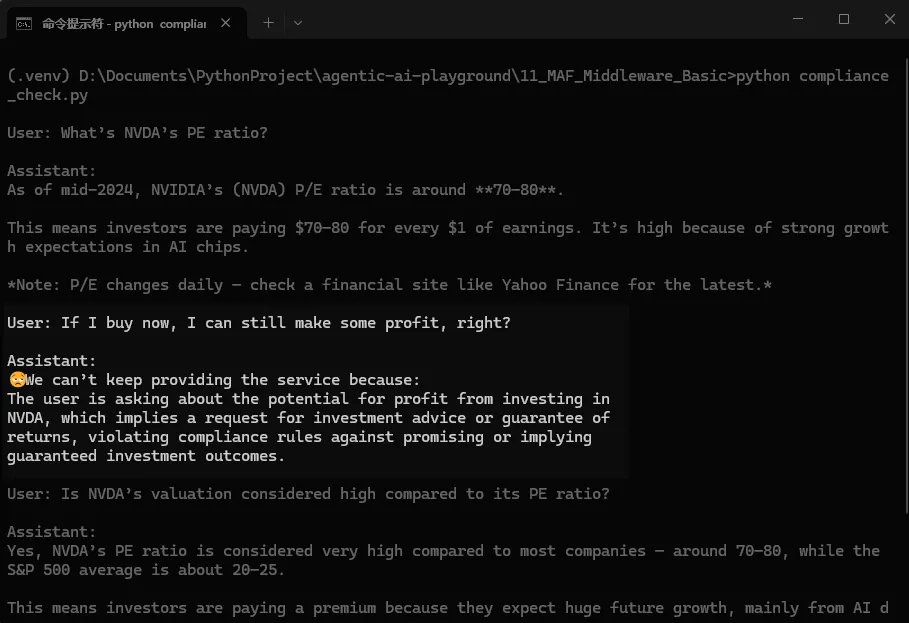
In today’s demo, we’ll review every user message to make sure no one tries to make our finance assistant promise investment returns.
In the end, the agent will refuse to answer questions like “Will I lose money?” or “Can you guarantee profit?”

How will you do it
Why use compliance checks as an example? Because in real web apps, product teams don’t manage compliance themselves. The compliance department creates the rules and sends them as microservices to each product.
That way, teams don’t touch those rules. They just plug them in using framework middleware. It’s common in normal web apps.
We’ll do the same with MAF agents, using middleware to insert compliance logic.
💡 Unlock Full Access for Free!
Subscribe now to read this article and get instant access to all exclusive member content + join our data science community discussions.